Pressure washing vinyl siding is safe when the operator uses moderate pressure, a wide spray pattern, a vinyl-compatible detergent, and a downward spray angle. The safest results come from detergent and water volume rather than maximum PSI, while loose panels, brittle siding, oxidation, openings, and landscaping require additional controls.
Key Facts
- A practical starting range is 1,200-1,800 PSI at the machine, adjusted downward for older, loose, or fragile siding.
- A 25-degree or 40-degree fan tip is safer than a 0-degree tip, but distance and technique matter more than color alone.
- Apply detergent to wet siding from the bottom upward, then rinse with clean water from the top downward.
- Never direct water upward beneath vinyl laps, around window trim, behind utility penetrations, or into vents.
- A typical 2,000-square-foot home takes 2-4 hours to wash, excluding difficult repairs and extensive plant protection.
- Sodium hypochlorite can remove organic growth, but it requires label compliance, protective equipment, plant protection, and controlled runoff.
Pressure Washer Vinyl Siding: What Is Safe?
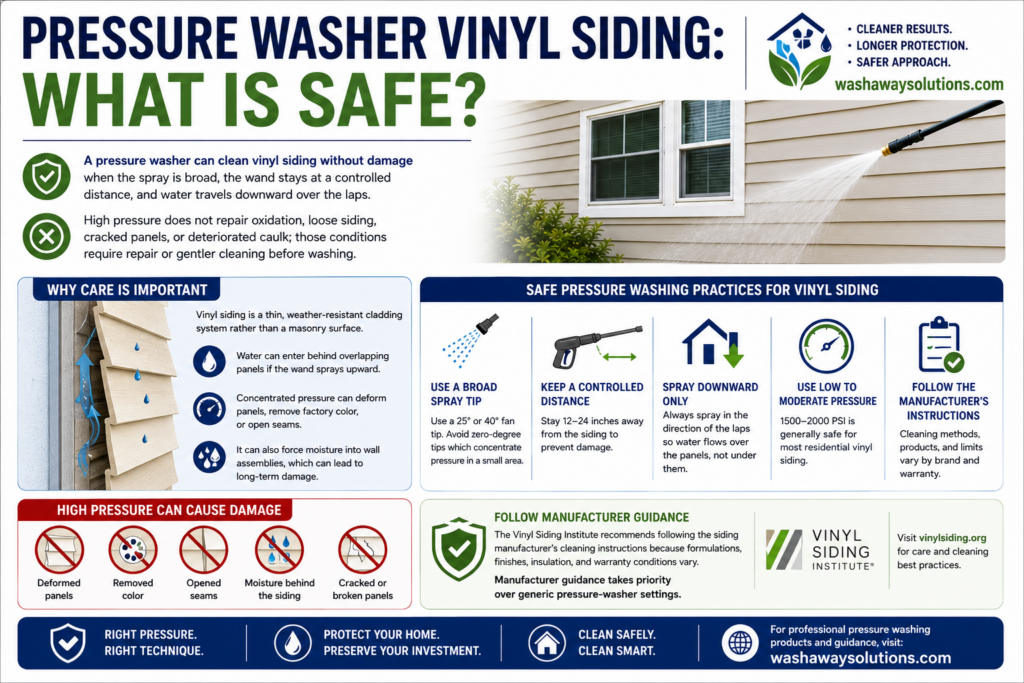
A pressure washer can clean vinyl siding without damage when the spray is broad, the wand stays at a controlled distance, and water travels downward over the laps. High pressure does not repair oxidation, loose siding, cracked panels, or deteriorated caulk; those conditions require repair or gentler cleaning before washing.
Vinyl siding is a thin, weather-resistant cladding system rather than a masonry surface. Water can enter behind overlapping panels if the wand sprays upward, and concentrated pressure can deform panels, remove factory color, open seams, or force moisture into wall assemblies.
The Vinyl Siding Institute recommends following the siding manufacturer’s cleaning instructions because formulations, finishes, insulation, and warranty conditions vary. Manufacturer guidance takes priority over generic pressure-washer settings.
How does pressure washing remove siding dirt?
Pressure washing combines mechanical impact, detergent chemistry, and rinsing volume. The detergent loosens oily soil and organic staining, while the fan-shaped water stream carries the suspended residue away from the panel.
Mold, mildew, and algae are not the same as ordinary dust. A strong stream may remove visible growth without fully treating the biological residue, so a compatible cleaner and sufficient dwell time usually produce a more durable result.
What pressure should you use?
Use the lowest pressure that cleans the test area, commonly 1,200-1,800 PSI for residential vinyl siding. A machine advertised at 2,000 PSI can still damage siding at close range because actual impact depends on nozzle angle, flow, distance, and whether the spray hits an edge.
The frequently repeated 1,500-2,500 PSI range is an upper operating reference, not a universal target. Older siding, dark heat-warped panels, insulated vinyl, and panels with loose edges often require less pressure, a wider tip, or a soft-wash method.
Which Equipment Works Best?
Electric pressure washers suit most one-story homes with routine dirt, while gas machines help with larger surfaces and faster rinsing. A dedicated soft-wash system is preferable when organic growth is extensive, the siding is fragile, or the operator must apply chemical at low pressure.
| Equipment option | Typical output | Best application | Typical cost |
|---|---|---|---|
| Compact electric washer | 1,300-1,800 PSI, 1.2-1.5 GPM | Small one-story home, light soil | $100-$250 purchase |
| Larger electric washer | 1,700-2,300 PSI, 1.3-1.8 GPM | Average one-story home, routine washing | $180-$350 purchase |
| Residential gas washer | 2,500-3,100 PSI, 2.3-2.8 GPM | Large home, heavier soil, faster rinsing | $300-$700 purchase |
| Contractor gas washer | 3,000-4,000 PSI, 3.5-4.0 GPM | Frequent use, large elevations, commercial work | $700-$1,500 purchase |
| Soft-wash pump system | 50-300 PSI, 4-10 GPM | Chemical-led cleaning and fragile surfaces | $1,500-$5,000-plus system |
Advertised maximum PSI should not drive the purchase. For siding, a reliable downstream injector, adjustable pressure, a long hose, a telescoping wand, and adequate GPM are usually more useful than a high-pressure specification.
Which nozzle should you use?
Start with a 40-degree white fan tip for a broad rinse and test a 25-degree green tip only when the wider pattern cannot remove loosened soil. Use a black low-pressure soap nozzle for downstream detergent application when the washer’s injector is designed for it.
| Nozzle type | Nominal angle | Siding use | Working guidance |
|---|---|---|---|
| Black soap tip | 65 degrees | Detergent application | Low pressure, 12-24 inches away |
| White fan tip | 40 degrees | Safest general rinse | Start 18-24 inches away |
| Green fan tip | 25 degrees | Stubborn loosened soil | Test at 24 inches first |
| Yellow tip | 15 degrees | Usually unsuitable for vinyl | Avoid unless manufacturer permits |
| Red tip | 0 degrees | Concentrated spot impact | Never use on vinyl panels |
Nozzle colors vary by manufacturer, so read the angle printed on the tip rather than relying on color. A 25-degree spray held six inches from the siding can be more destructive than a 15-degree spray held several feet away.
Before You Start
A typical homeowner needs 2-4 hours, $20-$90 in consumables or rental fees, and a helper for hose management and plant protection. The prerequisites are stable siding, a functioning outdoor water connection, safe electrical power if using an electric unit, and weather that permits the surface to dry.
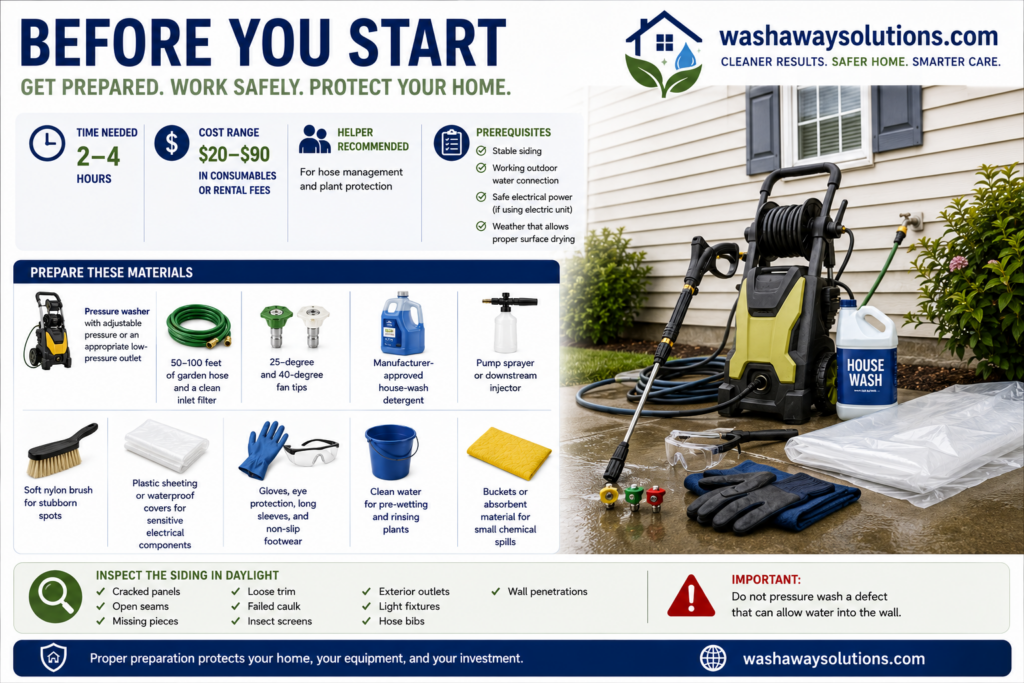
Inspect the siding in daylight. Look for cracked panels, open seams, missing pieces, loose trim, failed caulk, insect screens, exterior outlets, light fixtures, hose bibs, and wall penetrations. Do not pressure wash a defect that can allow water into the wall.
When should you postpone the job?
Postpone cleaning during freezing weather, strong wind, thunderstorms, or intense direct sun that dries detergent rapidly. A practical working range is about 50-85°F, although the detergent label and siding manufacturer’s instructions control.
Avoid washing hot panels in full sun. Divide the wall into sections small enough to wet, clean, and rinse before the cleaner dries.
How Do You Pressure Wash Vinyl Siding?
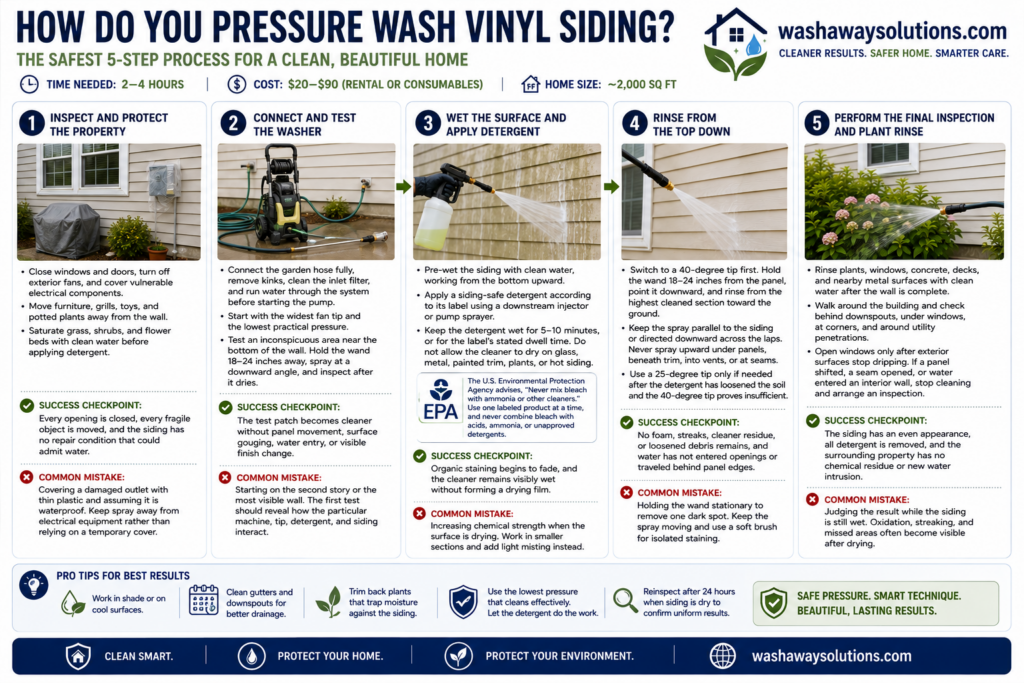
The safest process has five stages: inspect and protect the property, pre-wet the siding and plants, apply detergent from bottom to top, rinse from top to bottom, and inspect the result before removing protection. A 2,000-square-foot home commonly requires 2-4 hours.
Step 1: Inspect and Protect the Property
Close windows and doors, turn off exterior fans, and cover vulnerable electrical components without blocking ventilation or creating a trip hazard. Disconnect outdoor speakers, cameras, and decorative fixtures if their seals are questionable.
Move furniture, grills, toys, and potted plants away from the wall. Saturate grass, shrubs, and flower beds with clean water before applying detergent, because wet vegetation absorbs less chemical solution.
Success checkpoint: Every opening is closed, every fragile object is moved, and the siding has no repair condition that could admit water.
Common mistake: Covering a damaged outlet with thin plastic and assuming it is waterproof. Keep spray away from electrical equipment rather than relying on a temporary cover.
Step 2: Connect and Test the Washer
Connect the garden hose fully, remove kinks, clean the inlet filter, and run water through the system before starting the pump. Start with the widest fan tip and the lowest practical pressure.
Test an inconspicuous area near the bottom of the wall. Hold the wand 18-24 inches away, spray at a downward angle, and inspect the panel after it dries for distortion, color change, or loosened edges.
Success checkpoint: The test patch becomes cleaner without panel movement, surface gouging, water entry, or visible finish change.
Common mistake: Starting on the second story or the most visible wall. The first test should reveal how the particular machine, tip, detergent, and siding interact.
Step 3: Wet the Surface and Apply Detergent
Pre-wet the siding with clean water, working from the bottom upward so lower panels do not dry while upper sections are being prepared. Apply a siding-safe detergent according to its label, commonly through a downstream injector or pump sprayer.
Many house-wash products use diluted sodium hypochlorite for algae and mildew. Do not copy a generic bleach ratio into a different product, because household bleach strength, surfactant concentration, surface temperature, and runoff conditions change the final solution.
Keep the detergent wet for approximately 5-10 minutes, or for the label’s stated dwell time. Do not allow the cleaner to dry on glass, metal, painted trim, plants, or hot siding.
Success checkpoint: Organic staining begins to fade, and the cleaner remains visibly wet without forming a drying film.
Common mistake: Increasing chemical strength when the surface is drying. Work in smaller sections and add light misting instead.
The U.S. Environmental Protection Agency advises, “Never mix bleach with ammonia or other cleaners.” Use one labeled product at a time, and never combine bleach with acids, ammonia, or unapproved detergents.
Step 4: Rinse From the Top Down
Switch to a 40-degree tip first. Hold the wand approximately 18-24 inches from the panel, point it downward, and rinse from the highest cleaned section toward the ground.
Keep the spray parallel to the siding or directed downward across the laps. Never spray upward under the lower edge of a panel, beneath window trim, into soffit vents, or directly at J-channels and seams.
Use a 25-degree tip only after the detergent has loosened the soil and the 40-degree tip proves insufficient. Higher flow rates can rinse faster, but they do not make upward spraying safe.
Success checkpoint: No foam, streaks, cleaner residue, or loosened debris remains, and water has not entered openings or traveled behind panel edges.
Common mistake: Holding the wand stationary to remove one dark spot. Keep the spray moving and use a soft brush for isolated staining.
Step 5: Perform the Final Inspection and Plant Rinse
Rinse plants, windows, concrete, decks, and nearby metal surfaces with clean water after the wall is complete. Walk around the building and check behind downspouts, under windows, at corners, and around utility penetrations.
Open windows only after exterior surfaces stop dripping. If a panel shifted, a seam opened, or water entered an interior wall, stop cleaning and arrange an inspection before continuing.
Success checkpoint: The siding has an even appearance, all detergent is removed, and the surrounding property has no chemical residue or new water intrusion.
Common mistake: Judging the result while the siding is still wet. Oxidation, streaking, and missed areas often become visible after drying.
Pressure Washing Versus Soft Washing
Soft washing is generally safer for organic growth because it uses chemical dwell time and low pump pressure instead of concentrated impact. Pressure washing remains useful for rinsing loose soil and diluted cleaner, but neither method can make structurally damaged or heavily oxidized siding sound.
| Method | Typical pressure | Primary action | Main limitation |
|---|---|---|---|
| Manual cleaning | 0 PSI | Brush and detergent agitation | 4-8 hours for a large home |
| Consumer pressure washing | 1,200-2,300 PSI | Mechanical rinse and impact | Higher intrusion risk at close range |
| Low-pressure house washing | 300-1,000 PSI | Detergent plus moderate rinse | Requires careful chemical control |
| Professional soft washing | 50-300 PSI | Chemical treatment and high-volume rinse | Equipment and chemical training required |
The claim that soft washing has “zero risk” is inaccurate. Chemical overspray can damage plants, painted finishes, metals, sealants, and respiratory health, while improper runoff can affect waterways. Soft washing reduces impact damage; it does not remove the need for competent application.
Which method fits your siding condition?
Choose moderate pressure with detergent for sound, modern vinyl carrying ordinary dirt or light algae. Choose low-pressure chemical cleaning for extensive mildew, tall elevations, brittle panels, or siding that responds poorly to impact.
Manual cleaning is appropriate near delicate fixtures, freshly painted trim, failing seams, and small isolated areas. It is slower but gives the operator the most control around defects.
How Much Does Cleaning Vinyl Siding Cost?
DIY cleaning typically costs $40-$90 for a one-day rental, $15-$50 for detergent and protective supplies, and additional money for replacement nozzles or hoses. Professional house washing commonly costs $250-$600 for an average home, with height, access, condition, and regional labor rates driving the final price.
| Home situation | Typical labor time | DIY equipment cost | Professional price |
|---|---|---|---|
| Small one-story, light soil | 1-2 hours | $25-$60 | $150-$300 |
| 2,000-square-foot two-story home | 2-4 hours | $40-$120 | $250-$600 |
| Large two-story, moderate growth | 4-6 hours | $60-$150 | $500-$900 |
| Heavy growth or difficult access | 5-8 hours | $80-$200 | $700-$1,500-plus |
These are typical planning ranges, not fixed market rates. A quote should identify whether detergent, plant protection, window rinsing, high elevations, oxidation treatment, and minor repairs are included.
How often should vinyl siding be cleaned?
Most homes need cleaning every 1-3 years, depending on shade, humidity, tree cover, dust, and nearby roads. North-facing walls and surfaces beneath overhanging trees often develop algae sooner because they remain damp longer.
Annual inspection is more useful than an automatic annual wash. Clean when organic growth becomes established, but address drainage, leaking gutters, blocked airflow, and persistent shade if staining returns quickly.
What Problems Can Pressure Washing Cause?
Pressure washing can deform vinyl, force water behind laps, strip oxidized surfaces unevenly, damage caulk, and spread chemical residue. The greatest risk comes from a narrow spray held close to an edge or aimed upward, not from the machine’s maximum PSI alone.
How do you handle chalky white oxidation?
Chalky white residue indicates oxidation of the vinyl surface or a coating, not ordinary dirt. Pressure washing may create uneven bright and dull areas because it removes loose oxidation at different rates.
Use a manufacturer-approved oxidation cleaner and a soft brush on a small test patch. If the finish remains uneven, panel replacement or professional restoration may be more appropriate than stronger pressure.
What if water gets behind the siding?
Stop immediately if water enters an interior wall, appears around a window, or reaches an electrical component. Dry the area, document the location, and have the flashing, caulk, panel overlap, or sheathing inspected.
Vinyl siding is designed to manage incidental moisture, but it is not a waterproof wall barrier. The wall’s weather-resistive barrier, flashing, and drainage plane must remain intact.
What if panels are loose or brittle?
Do not pressure wash loose, cracked, warped, or brittle siding until it is repaired. Lowering PSI cannot compensate for a broken lock, failed fastener, or panel that has lost flexibility from age or heat.
A professional may clean around the defect manually, but cleaning should follow repair rather than conceal it. Siding installed before the mid-1990s deserves especially careful inspection because age and weathering vary widely by product.
Common Mistakes and How to Fix Them
| Failure mode | Likely cause | Corrective action |
|---|---|---|
| Dark streaks after washing | Detergent dried or was applied unevenly | Re-wet, clean smaller sections, rinse fully |
| White chalky patches | Oxidized finish disturbed by pressure | Stop pressure cleaning, test oxidation remover |
| Green or yellow plants | Chemical overspray or inadequate pre-wetting | Flood plants with clean water, follow product label |
| Water behind panels | Upward spray or close-range impact | Stop, dry, inspect laps and flashing |
| Washer will not draw soap | High-pressure tip or blocked injector | Use low-pressure soap tip, clean injector filter |
| Low cleaning performance | Insufficient flow or clogged inlet screen | Open faucet, remove hose kinks, clean filter |
A soap injector commonly fails because the operator leaves a high-pressure nozzle installed. Downstream injectors need reduced back pressure to draw detergent, so switching to the manufacturer’s low-pressure tip is often the first fix.
A pressure washer also cannot remove every stain. Rust, artillery-spore marks, tree tannins, artillery fungus, and oxidation need targeted products or replacement work, not a stronger nozzle.
Situational Guidance for Different Homes
What changes on a two-story house?
Use a telescoping wand, low-pressure chemical application, or professional soft-wash equipment rather than standing on a ladder while operating a pressure washer. A typical gas machine with 2.5-4.0 GPM can rinse large walls faster, but its additional flow does not justify higher impact at the siding.
Keep the spray downward from ground level. If the wand cannot reach the upper wall without aiming upward, change the equipment or hire a trained operator.
Can you clean insulated vinyl siding?
Insulated vinyl siding can be cleaned with the same general detergent principles, but seams, trim, and manufacturer-specific finish instructions still control. Avoid heat, aggressive impact, and close-range spraying because insulation does not make the panel surface stronger.
Can you pressure wash painted vinyl siding?
Painted vinyl siding requires the paint manufacturer’s cleaning guidance and a test patch. Pressure can remove weak paint or expose oxidation, while some detergents can soften or discolor an aged coating.
Should you clean before painting?
Clean and allow the siding to dry completely before painting. Sherwin-Williams and other coating manufacturers typically require a clean, sound surface, but pressure washing alone does not remove oxidation or correct loose panels.
When Should You Hire a Professional?
Hire a professional when the home exceeds two stories, siding is brittle or oxidized, chemical treatment is extensive, electrical components are difficult to protect, or runoff could affect a pond, storm drain, or sensitive landscaping. Professional equipment reduces labor time, but it does not eliminate technique-related risks.
Ask the contractor for the planned pressure range, detergent type, plant-protection procedure, runoff controls, insurance, and treatment for oxidation. A contractor who promises “maximum PSI” or claims “zero risk” is describing the wrong performance criteria.
A sound professional process should include a test patch, controlled chemical dwell time, downward spray geometry, protection of openings, and a final inspection. Those details matter more than whether the equipment is electric, gas-powered, or marketed as commercial.
FAQ
Can a garden hose clean vinyl siding without a pressure washer?
A garden hose can remove loose dust and rinse detergent, but it usually cannot remove established algae or embedded soil efficiently. Combine a siding-safe detergent with a soft nylon brush or low-pressure sprayer for delicate panels, loose seams, or areas near windows and electrical fixtures.
Is hot water better for cleaning vinyl siding?
Hot water is not automatically better and can increase the risk of panel distortion, finish damage, or rapid detergent drying. Use the water temperature permitted by the machine and cleaner label, and avoid directing heated water at hot, sun-exposed vinyl.
Can vinegar remove mildew from vinyl siding?
Vinegar may help with small mineral or light organic deposits, but it is inconsistent against established mildew and can affect nearby finishes or plants. A labeled siding cleaner provides more predictable dilution, dwell time, and surface compatibility.
Can you use dish soap in a pressure washer?
Do not put ordinary dish soap into a pressure washer chemical tank unless the washer and product instructions specifically permit it. Dish soap can foam excessively, fail to inject correctly, leave residue, and create runoff problems; use a labeled exterior siding detergent instead.
What time of year is best for washing siding?
Mild spring or autumn weather usually provides better control than hot, sunny summer conditions. Choose a dry, calm day with temperatures above freezing, work in shaded sections, and allow the siding and wall components to dry afterward.
How can you prevent algae from returning?
Improve gutter drainage, trim vegetation away from the wall, reduce persistent irrigation overspray, and increase airflow near shaded elevations. Cleaning removes existing growth, but moisture management determines how quickly algae and mildew return.
The Bottom Line
Pressure washer vinyl siding cleaning works best as a controlled detergent-and-rinse process, not as high-pressure blasting. Start around 1,200-1,800 PSI with a wide fan tip, test an inconspicuous panel, keep the wand 18-24 inches away, apply cleaner from bottom to top, and rinse from top to bottom without spraying beneath the laps.
Use a soft-wash or manual method for oxidation, brittle panels, loose seams, and extensive organic growth. Protect plants and electrical components, follow the siding and detergent manufacturers’ instructions, and stop whenever water intrusion or surface damage appears.


