Soft washing a vinyl house means applying a properly labeled exterior-cleaning solution, allowing controlled dwell time, and rinsing with low-impact water flow rather than blasting the siding. A safe job usually takes 2-5 hours for an average home, and success depends more on keeping chemicals wet and controlling runoff than on using high pressure.
Key Facts at a Glance
- Vinyl siding should be cleaned with low-impact spray, typically below 300 PSI at the surface.
- Sodium hypochlorite can remove organic growth, but the final concentration must follow the product label and test patch.
- Pre-wet plants, keep the siding wet during dwell time, and flush landscaping after rinsing.
- Apply house-wash solution from the bottom upward, then rinse from the top downward.
- Never mix bleach with ammonia, acids, vinegar, or other cleaners.
- Soft washing does not repair oxidation, rust runoff, cracked panels, or water-damaged sheathing.
Before You Start: Time, Cost, and Equipment
A typical DIY vinyl-house wash requires 2-5 hours, $75-$350 in supplies or equipment rental, and at least one person on the ground managing hoses and runoff. A professional house wash commonly costs $300-$800, although height, access, regional labor rates, heavy growth, and detached structures can move the price substantially.
Soft washing is suitable for sound, unpainted vinyl with dirt, mildew, algae, and light moss staining. Stop and arrange an inspection if panels are cracked, loose, brittle, badly faded, or pulling away from the wall, because cleaning can expose defects or force water behind damaged cladding.
| Item | Typical specification | Why it matters |
|---|---|---|
| Soft-wash pump | 4-10 GPM, below 150 PSI | Delivers chemical solution with low impact |
| Pressure washer option | 1,500-4,000 PSI machine with injector | Use only a low-pressure delivery setting |
| Spray tip | 25-40 degree fan or manufacturer-approved soft-wash tip | Spreads flow and reduces concentrated impact |
| Water supply | 5/8-inch hose, 5-7 GPM preferred | Prevents pump starvation and uneven rinsing |
| PPE | Chemical-resistant gloves, goggles, long sleeves, boots | Limits splash and vapor exposure |
| Protection materials | Plastic, painter’s tape, hose guides, plant covers | Keeps solution away from openings and belongings |
Do not rely on a respirator as permission to work in unsafe vapor conditions. Read the Safety Data Sheet for the product, follow the label, provide ventilation, and keep children, pets, and bystanders away from the work area.
What should you inspect first?
Inspect the siding, windows, trim, gutters, vents, outlets, landscaping, and nearby painted surfaces before mixing any cleaner. Photograph pre-existing oxidation, rust streaks, failed caulk, open seams, and loose panels so a clean surface is not mistaken for a repaired one.
The Vinyl Siding Institute recommends following the siding manufacturer’s cleaning instructions, and manufacturer guidance often differs for insulated, textured, painted, or specialty vinyl. A small test patch in an inconspicuous location is mandatory when the product, siding color, or surface age is unfamiliar.
What Soft Washing Does to Vinyl Siding
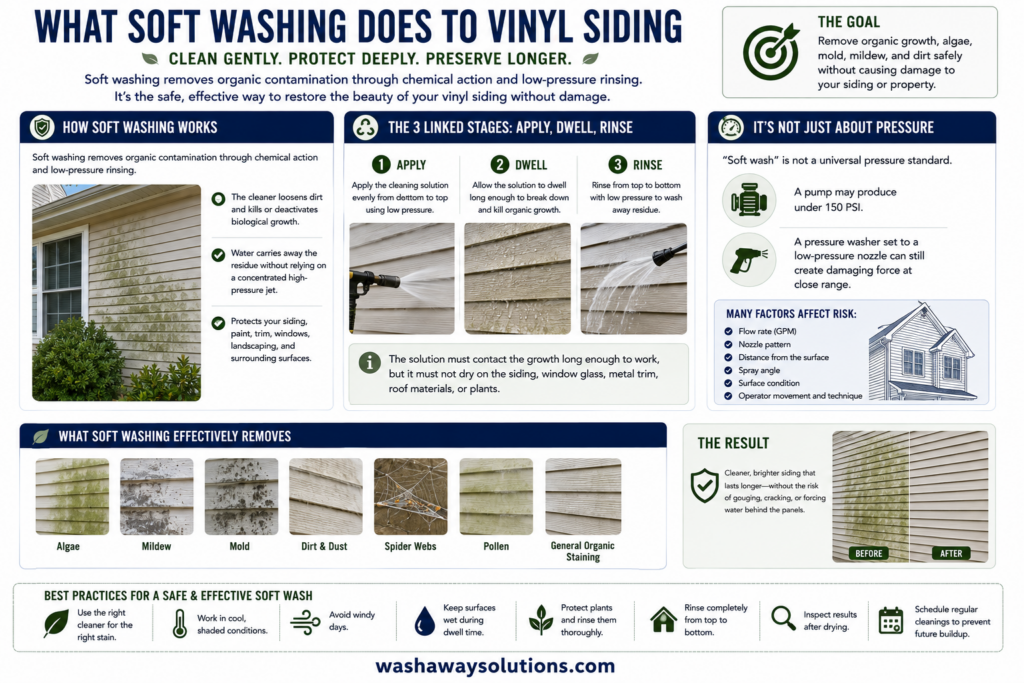
Soft washing removes organic contamination through chemical action and low-pressure rinsing. The cleaner loosens dirt and kills or deactivates biological growth, while water carries away the residue without depending on a concentrated high-pressure jet.
The method has three linked stages: apply, dwell, and rinse. The solution must contact the growth long enough to work, but it must not dry on the siding, window glass, metal trim, roof materials, or plants.
“Soft wash” is not a universal pressure standard. A pump may produce under 150 PSI, while a pressure washer set to a low-pressure nozzle can still create damaging force at close range. Flow rate, nozzle pattern, distance, spray angle, surface condition, and operator movement all affect risk.
Which growth responds to a house-wash solution?
Green algae, mildew, mold staining, and many organic black streaks usually respond to an appropriately labeled sodium-hypochlorite cleaner. Dirt and pollen may need only a mild detergent and water, while rust, artillery-spore marks, mineral deposits, and vinyl oxidation require separate diagnosis.
| Surface condition | Likely source | First treatment decision |
|---|---|---|
| Green film | Algae or organic growth | Labeled hypochlorite cleaner and low-pressure rinse |
| Black specks | Mold, mildew, artillery spores, or soot | Test patch, then identify source before stronger chemistry |
| Orange or brown streaks | Rust, irrigation minerals, or roof runoff | Use a compatible specialty stain remover |
| White chalk or dull color | Vinyl oxidation or weathering | Do not increase bleach strength; assess restoration limits |
| Gray loose dirt | Dust, pollen, and soil | Mild detergent or manufacturer-approved cleaner |
Chlorine is not a universal stain remover. Stronger solution cannot dissolve rust or restore oxidized plastic, and repeated chemical exposure can shorten the life of plants, finishes, and metal components.
How to Soft Wash a Vinyl House: The Safe Sequence
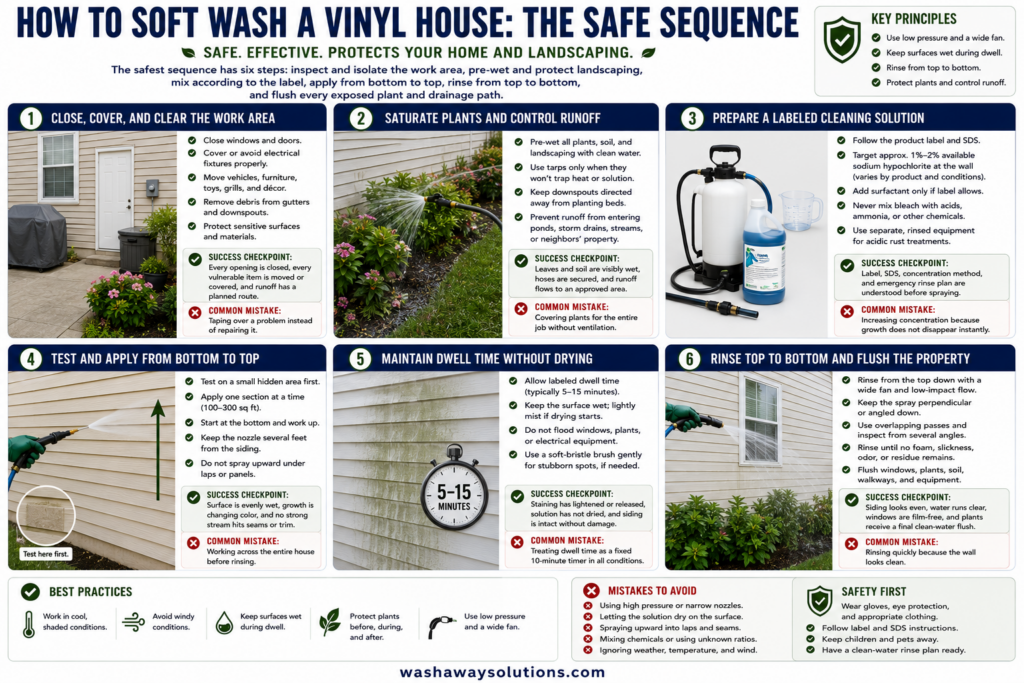
The safest sequence has six steps: inspect and isolate the work area, pre-wet and protect landscaping, mix according to the label, apply from bottom to top, rinse from top to bottom, and flush every exposed plant and drainage path.
Step 1: Close, cover, and clear the work area
Close windows and doors firmly. Turn off or cover exterior electrical equipment only in the manner permitted by the equipment manufacturer, and never spray directly into outlets, light fixtures, vents, door hardware, or open joints.
Move vehicles, furniture, toys, grills, decorations, and loose tools away from the wall. A 10-20 foot clearance is typical, but increase it when wind can carry mist or when the house has delicate finishes.
Remove debris from gutters and downspouts if the cleaning plan depends on runoff through them. Protect stained wood, natural stone, unsealed concrete, freshly painted surfaces, and outdoor fabrics because house-wash chemicals can discolor or degrade them.
Success checkpoint: Every opening is closed, every vulnerable item is moved or covered, and runoff has a planned route away from doors and storm drains.
Common mistake: Taping over a problem instead of repairing it. Open window seals, damaged caulk, and loose vents can admit water even during a gentle rinse.
Step 2: Saturate plants and control runoff
Water grass, shrubs, flowers, vines, and soil beside the house with clean water before applying any chemical. Pre-wetting reduces immediate absorption, but it does not make concentrated cleaner harmless to foliage.
Use tarps only when they will not trap heat or chemical-laden water against leaves. For sensitive plants, move containers, divert runoff, or hire a professional who can collect and manage solution more precisely.
Keep downspouts directed away from planting beds. Do not allow concentrated runoff to enter a pond, stream, storm drain, or neighbor’s property, and follow local wastewater rules where they apply.
Success checkpoint: Leaves and soil are visibly wet, hoses are secured, and runoff flows toward an approved drainage area.
Common mistake: Covering plants for the entire job without ventilation. Heat and trapped solution can damage foliage faster than brief, diluted exposure.
Step 3: Prepare a labeled cleaning solution
Use a commercial vinyl-safe exterior cleaner or sodium-hypochlorite product only according to its label. Professional house-wash mixtures commonly target approximately 1%-2% available sodium hypochlorite at the wall for established organic growth, but the correct amount depends on source strength, delivery dilution, temperature, sunlight, and the manufacturer’s instructions.
Do not copy a fixed recipe from another property. A 12.5% pool product, a 6% household bleach product, and a downstream injector do not deliver the same wall concentration, and measuring only the bucket volume ignores injector draw rate.
Add a compatible surfactant only when the product label permits it. Surfactant improves cling and reduces surface tension, but ordinary dish soap may increase foaming, affect plants, or leave residue on windows and siding.
Never mix sodium hypochlorite with vinegar, muriatic acid, oxalic acid, ammonia, toilet cleaner, or other chemicals. Acid and bleach can release toxic chlorine gas. Use separate, thoroughly rinsed equipment for acidic rust treatment.
Success checkpoint: The product label, Safety Data Sheet, wall concentration method, and emergency rinse plan are understood before spraying.
Common mistake: Increasing concentration because growth does not disappear instantly. Extend controlled dwell time or repeat a labeled application instead of improvising a stronger mixture.
Step 4: Test and apply from bottom to top
Test the prepared solution on a small hidden area. Observe the color, sheen, metal trim, caulk, nearby glass, and plant response before cleaning a visible wall.
Apply one manageable section at a time, usually 100-300 square feet. Start at the bottom and work upward with a wide fan, keeping the nozzle several feet from the siding and moving continuously.
Bottom-up application keeps the lower wall wet while upper sections are treated. If the operator starts at the top, dirty solution can run through dry lower areas and create vertical trails before the cleaner has equal contact.
Avoid spraying upward beneath the bottom edges and overlaps of vinyl panels. Direct the fan downward or straight toward the wall, because upward spray can drive water behind the siding.
Success checkpoint: The surface is evenly wet, growth is beginning to change color, and no concentrated stream is striking seams or trim.
Common mistake: Working across the entire house before rinsing. Sun, wind, and warm siding can dry the first sections, causing streaks and residue.
Step 5: Maintain dwell time without drying
Allow the cleaner to dwell for the product’s labeled period. A typical house-wash dwell time is 5-15 minutes, but hot sun, wind, low humidity, porous grime, and dark siding can shorten the safe window.
Keep the section visibly wet. Lightly mist the wall with the same approved solution or clean water when drying begins, but do not flood windows, plants, or electrical equipment.
Do not scrub aggressively as a default. If a small patch remains after adequate dwell, use a soft-bristle brush with gentle pressure, then rinse completely. Hard brushing can burnish dirt into textured vinyl or damage aged surfaces.
Success checkpoint: Organic staining has lightened or released, the solution has not dried, and the siding remains intact without softened caulk or discoloration.
Common mistake: Treating dwell time as a fixed 10-minute timer in every weather condition. Surface temperature and evaporation rate matter more than the clock alone.
Step 6: Rinse top to bottom and flush the property
Rinse from the top downward using a wide fan and low-impact flow. Keep the spray perpendicular or angled downward, never upward into laps, soffit vents, window channels, or trim joints.
Use overlapping horizontal passes, then inspect from several angles. Rinse until no foam, slickness, odor, or visible residue remains, paying special attention to corners, undersides of ledges, gutters, and areas behind shutters.
Flush windows with clean water, then rinse plants, soil, walkways, and equipment thoroughly. Remove covers only after the exterior is clear and the runoff has been diluted.
Success checkpoint: The siding has an even appearance, water runs clear, windows show no chemical film, and landscaping has received a final clean-water flush.
Common mistake: Rinsing quickly because the wall looks clean. Residual cleaner can dry into marks and continue affecting plants or metal after the operator leaves.
Which Equipment Method Fits the House?
A dedicated soft-wash pump gives the best control for large or delicate work, while a downstream injector costs less but may deliver weaker chemical concentration at long hose runs or high elevations. An X-Jet can draw stronger solution externally, but it requires careful handling and accurate technique.
| Delivery method | Typical output | Best use | Main limitation |
|---|---|---|---|
| Garden hose sprayer | 2-5 GPM, under 100 PSI | Light dirt and small single-story areas | Limited reach and chemical control |
| Downstream injector | 4-8 GPM, low-pressure tip | Budget DIY house washing | Draw ratio varies, often weaker at height |
| X-Jet-style nozzle | 3-8 GPM, external draw | Stronger remote application | More overspray and operator exposure |
| Dedicated diaphragm pump | 4-10 GPM, under 150 PSI | Large homes and repeat work | Higher equipment cost and chemical responsibility |
A pressure washer is only a delivery platform here. Remove turbo, zero-degree, and narrow high-pressure tips from the plan. Never assume a “soap nozzle” makes close-range spraying safe around brittle siding, windows, or electrical components.
What pressure is safe for vinyl siding?
A practical target is low-pressure chemical application and rinsing, often below 300 PSI at the surface, but no single PSI number guarantees safety. Vinyl manufacturer instructions, nozzle distance, spray angle, panel age, and water intrusion risk determine the acceptable setup.
Keep the wand moving and avoid concentrating flow on seams. Test the lowest effective setting first. If the siding flexes, rattles, lifts, or admits water, stop immediately.
Soft Washing Versus Pressure Washing
Soft washing is usually the safer choice for organic growth on vinyl because chemistry does most of the cleaning. High-pressure washing can remove surface dirt quickly, but a narrow jet may crack brittle panels, lift edges, strip oxidation unevenly, or drive water behind the cladding.
| Decision factor | Soft washing | High-pressure washing |
|---|---|---|
| Typical working pressure | Below 300 PSI at surface | 1,500-4,000 PSI machine output |
| Primary action | Chemical reaction and low-impact rinse | Mechanical force |
| Organic growth | Treats biological residue | Often removes visible layer only |
| Vinyl damage risk | Low when properly controlled | Moderate to high near seams |
| Plant exposure | Requires pre-wetting and flushing | Usually lower chemical risk |
| Typical result interval | 12-24 months, condition dependent | 6-12 months, condition dependent |
Pressure washing still has appropriate uses, including unpainted concrete, some masonry, and equipment designed for high-pressure cleaning. It is not automatically wrong, but it is a poor default for aged vinyl siding or any wall with loose overlaps.
What Stains Will Not Improve With Bleach?
Rust, mineral deposits, artillery-spore marks, and oxidation generally will not improve through stronger sodium hypochlorite. Identify the stain first, then use a compatible specialty product on a small test patch while protecting glass, metal, plants, and surrounding finishes.
Rust from well water or metal roof runoff may require an oxalic-acid-based product. Follow the label, wear the required PPE, and never apply an acid product to bleach-contaminated surfaces or equipment without thorough neutralization and rinsing according to the manufacturer’s procedure.
Oxidized vinyl looks chalky or dull after organic growth is removed because weathered plastic is now visible. Oxidation removal can change appearance, but it cannot always restore original color, and aggressive rubbing can create glossy patches.
Common Mistakes and How to Fix Them
| Failure | Likely cause | Recovery |
|---|---|---|
| White streaks | Cleaner dried or residue remained | Re-wet, use mild approved solution, rinse thoroughly |
| Green spots remain | Heavy growth or insufficient contact | Repeat labeled treatment on a small section |
| Chalky finish | Vinyl oxidation | Stop increasing bleach; assess restoration or replacement |
| Brown streaks remain | Rust or mineral contamination | Use a separate compatible stain treatment |
| Plant leaves wilt | Concentrated runoff or inadequate flushing | Rinse foliage and soil immediately with clean water |
| Water enters indoors | Upward spray or damaged seals | Stop, dry the area, inspect seams and openings |
Never “fix” a failed wash by immediately doubling chemical strength. First determine whether the problem is organic growth, oxidation, rust, insufficient dwell, poor rinsing, or a shadowed area that was never reached.
A counterintuitive practitioner rule is that more water can be safer than less water. High flow with low impact rinses residue efficiently, while a small amount of concentrated solution left on a wall or plant creates the greater chemical risk.
Another useful rule is to clean shaded elevations first in hot weather and sunny elevations first in cold weather only when the product label supports the temperature. The objective is consistent wetness, not loyalty to one compass direction.
Situations That Need a Different Plan
How do you soft wash a two-story vinyl house?
Use a ground-based long-reach system whenever possible instead of climbing a wet ladder while handling chemicals. A two-story house may need 6-10 GPM, longer hose runs, controlled overspray, and a second worker watching windows, plants, and runoff.
Do not extend a short pressure-washer wand beyond stable footing. Hire a professional when upper panels cannot be reached from the ground, wind carries mist toward neighboring property, or rooflines and electrical service create access hazards.
Can painted or dark vinyl be soft washed?
Painted and dark vinyl require a test patch and the coating manufacturer’s instructions. Strong oxidizers can lighten some coatings, expose uneven fading, or reveal chalking, while concentrated heat and sun increase drying risk.
Use the mildest labeled cleaner that can address the contamination. If the test patch changes color or sheen, stop and consult the siding or coating manufacturer.
What should you do in cold or windy weather?
Avoid freezing conditions, strong wind, and rapid evaporation. Typical workable conditions are above the product’s minimum temperature, with low enough wind to keep mist on the intended wall and enough shade or water supply to prevent drying.
Cold slows chemical reaction and can leave rinse water around trim. Wind increases overspray, plant exposure, and respiratory risk, so postponement is safer than compensating with stronger chemistry.
How Much Time and Money Does Soft Washing Take?
A typical single-story 2,000-square-foot home takes 2-4 hours when access is clear, while a two-story home with heavy growth may take 4-6 hours. DIY cost is often $75-$350 if basic hoses and protective equipment are already available; renting equipment and buying chemical-safe accessories can raise the total.
| Project condition | Typical DIY time | Typical professional price |
|---|---|---|
| Small single-story, light dirt | 1.5-3 hours | $200-$400 |
| Average 2,000-square-foot home | 2-5 hours | $300-$800 |
| Two-story home, moderate growth | 4-6 hours | $500-$1,000 |
| Heavy growth and detached areas | 5-8 hours | $700-$1,500 |
Prices are typical planning ranges, not universal rates. Local labor, insurance, access equipment, chemical recovery, house height, and the number of elevations can change the quote.
For maintenance, inspect annually and wash when organic growth returns rather than following a rigid calendar. Many homes need cleaning every 12-24 months, but shaded, damp, tree-covered elevations can require more frequent attention.
When Should You Hire a Professional?
Hire a professional when the home is tall, the siding is severely weathered, chemical runoff cannot be controlled, heavy biological growth covers multiple materials, or you lack chemical PPE and a reliable low-pressure delivery method.
Ask for a written scope that identifies the cleaning solution, surface-pressure approach, plant-protection plan, window protection, stain exclusions, and damage documentation. A responsible contractor should explain what the wash will not remove, including oxidation, rust, failed caulk, and damaged panels.
Soft washing is not a repair service. Cleaning can improve appearance while leaving the underlying moisture problem, deteriorated sheathing, or failed flashing unchanged.
Frequently Asked Questions
Can I use household bleach to clean vinyl siding?
Household bleach may contain sodium hypochlorite, but concentration, additives, and label directions vary by product. Use only a product labeled or approved for the intended exterior surface, dilute it as directed, test first, protect plants, and never mix it with acids, ammonia, vinegar, or other cleaners.
Should I brush vinyl siding before soft washing?
Do not dry-scrub vinyl siding before chemical application because abrasion can mark the surface and spread contamination. After proper dwell time, use a soft-bristle brush only on small areas that remain dirty, then rinse completely with low-impact water.
How often should vinyl siding be cleaned?
Most vinyl homes need cleaning every 12-24 months, while shaded or humid elevations may need attention sooner. Annual inspection is more useful than a fixed schedule because tree cover, irrigation overspray, climate, and drainage determine how quickly algae and mildew return.
Can soft washing remove black mold permanently?
Soft washing can remove visible organic growth and treat biological residue, but it cannot guarantee permanent prevention. Persistent moisture, blocked sunlight, leaking gutters, poor drainage, or contaminated porous materials can cause regrowth unless the underlying condition is corrected.
Is soft washing safe around windows?
Soft washing is generally compatible with sound, closed windows when the solution and spray method follow manufacturer instructions. Do not spray into failed seals, open weep holes, vents, or damaged trim, and rinse glass and window channels thoroughly after each section.
The Bottom Line
To soft wash a vinyl house safely, inspect the siding, protect openings and landscaping, use a labeled cleaner at the correct dilution, apply from bottom to top, maintain wet dwell time, and rinse from top to bottom with low-impact flow. The exact keyword, How to soft wash a vinyl house, describes a chemical-control process, not a high-pressure shortcut. Stop when the surface, weather, access, or runoff conditions make safe control impossible.


