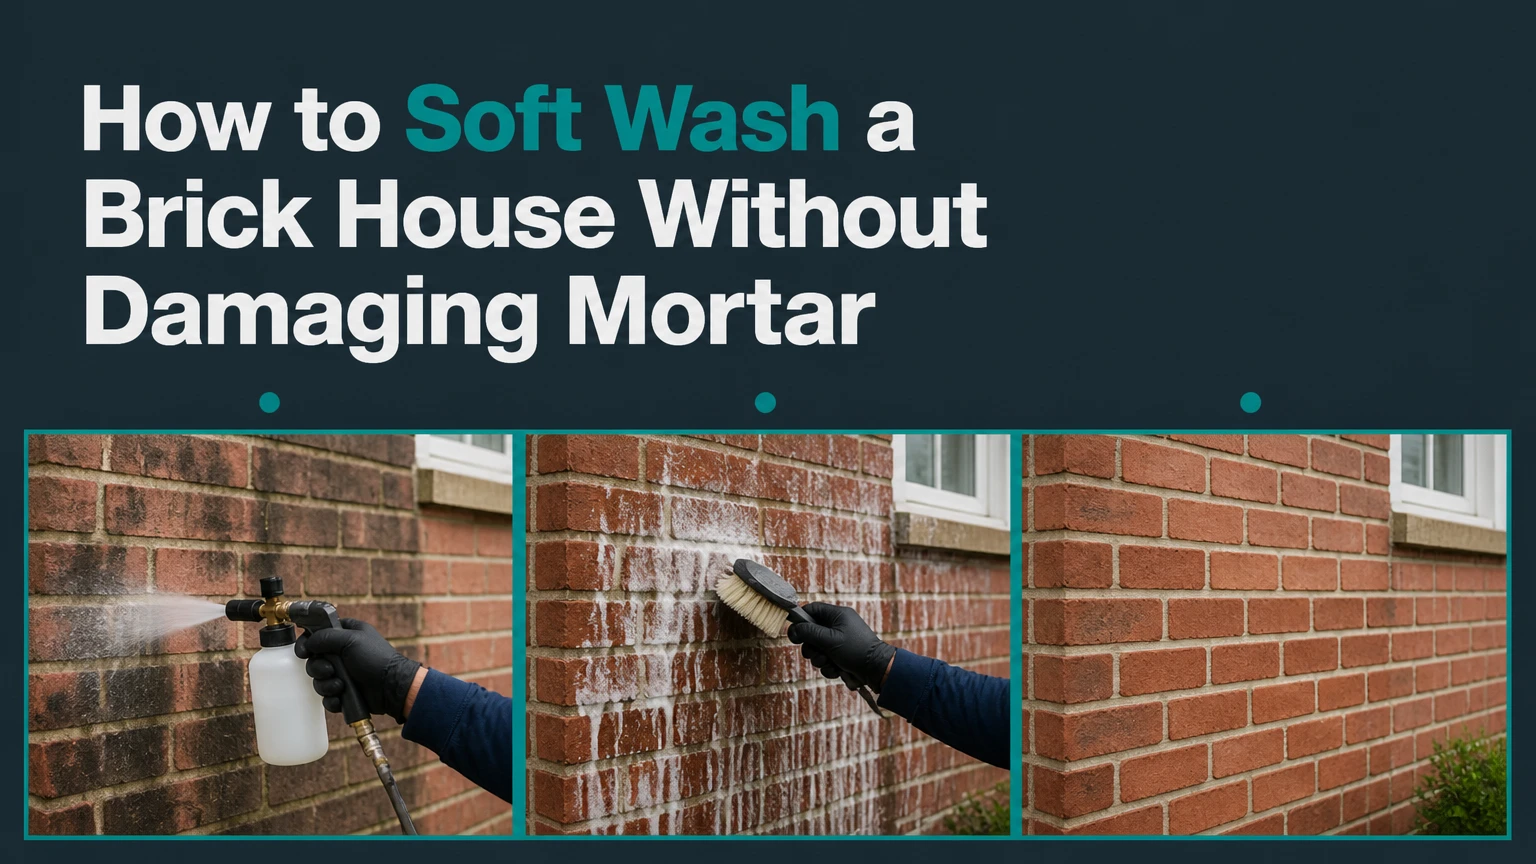
To soft wash a brick house, inspect and test the masonry, prepare a diluted sodium hypochlorite solution, protect the property, pre-wet plants, apply at low pressure, dwell for 10-15 minutes, rinse top-down, and flush runoff. Expect 2-6 hours for a typical home, moderate difficulty, and results that depend most on preventing the solution from drying.
Before You Start
Time, difficulty, and cost

Plan on 2-6 hours, depending on wall area, height, stain severity, hose length, and whether one person handles application while another manages rinsing. A single-story home with light algae is faster than a two-story home with dense growth.
DIY consumables and rental costs commonly total $60-$250, excluding equipment already owned. A professional masonry-safe wash often costs approximately $300-$1,000 or more, depending on region, access, house size, and restoration requirements. Treat these as typical planning ranges, not fixed quotes.
Tools and materials checklist
| Item | Quantity or specification | Typical cost | Purpose |
|---|---|---|---|
| Pressure washer | Gas or electric, used at low pressure | $100-$500 or rental | Supplies rinse water and draws chemical |
| Downstream injector | Compatible with washer; often about 10:1 | $30-$100 | Dilutes and applies solution |
| Black soap nozzle | 65° low-pressure tip | $10-$25 | Allows injector to draw |
| White rinse nozzle | 40° wide-angle tip | $10-$25 | Safer broad rinse |
| Garden hoses | 1 supply hose plus extra rinse hose | $25-$60 | Water supply and plant flushing |
| Pump sprayer | Chemical-resistant, 1-2 gallons | $20-$60 | Alternative application or spot treatment |
| Sodium hypochlorite | 2-3 gallons at 10%-12.5% | $10-$40 | Removes mold, algae, and organic growth |
| Surfactant | 4-6 fluid ounces, bleach-compatible | $5-$20 | Helps solution cling to vertical brick |
| Clean water | Enough for pre-wetting and rinsing | Varies | Dilution, rinsing, and runoff control |
| Plastic and painter’s tape | Enough for outlets and fixtures | $15-$40 | Protects sensitive equipment |
| PPE | Goggles, chemical gloves, suitable respirator | $30-$100 | Protects eyes, skin, and breathing |
| Nylon brush | Stiff, non-metallic | $5-$15 | Dry-brushing efflorescence or loose growth |
Use a respirator only as specified by its manufacturer and the product safety data sheet. Outdoor spraying still requires eye protection, chemical-resistant gloves, long sleeves, and closed footwear.
Conditions and prerequisite skills
Work on a calm, overcast day between approximately 10°C and 27°C when possible. Avoid strong wind, direct intense sun, freezing conditions, and rain likely within the dwell or rinse period.
You need to identify the washer’s gallons per minute, connect hoses without leaks, recognize low-pressure and rinse nozzles, and control overspray. If the wall requires a ladder, roof access, or a high-pressure extension wand, hire a professional rather than stretching from an unstable ladder.
Never mix sodium hypochlorite with acids, ammonia, vinegar, alcohol, or other cleaners. Chemical reactions can release toxic gas. Follow the bleach label and local wastewater rules.
Eight-Step Process at a Glance
| Step | Action | Typical time | Most common mistake |
|---|---|---|---|
| 1 | Inspect and test the masonry | 20-40 minutes | Treating unknown stains or fragile mortar |
| 2 | Calculate and mix the solution | 10-20 minutes | Guessing active strength or mixing incompatible chemicals |
| 3 | Mask fixtures and protect the site | 20-30 minutes | Leaving outlets, metal, or windows exposed |
| 4 | Pre-wet plants and nearby surfaces | 10 minutes per side | Applying bleach to dry vegetation |
| 5 | Apply chemical from bottom upward | 15-20 minutes per side | Using excessive pressure or spraying top-down |
| 6 | Control the 10-15 minute dwell | 10-15 minutes | Allowing solution to dry |
| 7 | Rinse top-down and flush runoff | 20-25 minutes per side | Leaving residue in joints or landscaping |
| 8 | Inspect, correct, and maintain | 20-40 minutes | Repeating bleach applications on non-organic stains |
Step 1: Inspect and Test the Brick
Inspect the brick, mortar, coatings, and surrounding property, then test a small hidden area before washing the full wall.
Look for cracked or missing mortar, loose bricks, spalling faces, open joints, failing caulk, damaged window seals, peeling paint, exposed metal, and holes around pipes or vents. Do not chemically wash a wall that already admits water through failed joints. Repair those defects first.
Identify the stain. Green film, black algae, and fuzzy mold are organic growth and usually respond to sodium hypochlorite. White powder may be efflorescence. Orange marks may be rust. Black carbon deposits may be soot. Mortar smears, paint, and mineral deposits need different treatments.
Choose a shaded test area about 1 square metre. Apply the planned solution with the same nozzle and distance you will use later. Wait through the intended dwell, rinse thoroughly, and inspect after the brick dries.
You’ll know it worked when the test area lightens evenly, the mortar remains intact, and no coating, color, or metal discoloration appears. Stop if brick grit, pigment, flakes, or mortar particles come away.
The common mistake is assuming every dark mark is mold. Do not increase bleach strength to solve rust or soot. Use a masonry specialist for historic, soft, painted, or heavily deteriorated brick.
Step 2: Calculate and Mix the Cleaning Solution
Mix a bleach-compatible solution that reaches approximately 1%-1.25% active sodium hypochlorite on the wall through a downstream injector.
A typical 10:1 injector draws one part chemical mix for about ten parts water, although actual draw rates vary by washer, hose length, nozzle, injector adjustment, and water pressure. Confirm the rate with a measured draw test rather than trusting the label alone.
For a field mix, place 2-3 gallons of 10%-12.5% sodium hypochlorite in a clean chemical container, add 4-6 ounces of bleach-compatible surfactant, and add water according to the injector and house area. Do not add soap directly to a pressure washer pump.
The applied strength can be estimated as:
Source concentration × proportion of bleach solution in the final spray = applied concentration.
For example, a 12.5% source diluted about 10:1 produces roughly 1.1% before accounting for injector variation. A 10% source produces about 0.9% at the same ratio, so a weak product may need a verified adjustment.
Mix outdoors in the shade. Add chemical to water when the product label directs that order, avoid splashing, and never use a metal container or metal sprayer that the label does not approve.
You’ll know it worked when the injector draws consistently, the solution reaches the wall as a wet fan, and the test patch responds without rapid fading or residue. Label the container.
The common mistake is using a strong pump-sprayer mixture through a downstream injector. Keep the concentration appropriate to the delivery system. Stronger is not automatically safer or more effective.
Step 3: Mask Fixtures and Protect the Site
Close the building, mask vulnerable fixtures, and shield every surface that should not contact the cleaning solution.
Shut and latch all windows and doors. Remove outdoor cushions, flags, toys, decorations, and potted plants. Cover exterior outlets, doorbells, cameras, light fixtures, speakers, and delicate control panels with plastic and painter’s tape. Covers are supplemental protection, not permission to flood the fixture.
Disconnect or cover irrigation controls, exposed low-voltage connections, and outdoor appliances. Keep chemical away from aluminum, unpainted steel, copper, wood, stained concrete, natural stone, and fabric. Move downspouts so concentrated runoff does not discharge onto plants or metal.
Inspect the wind direction. Position the spray so overspray moves away from neighboring property, vehicles, HVAC intakes, and open windows. Keep pets and children away until the wall and ground are fully rinsed.
You’ll know it worked when every outlet, camera, fixture, and movable object is either protected, removed, or outside the spray zone. Walk the perimeter before starting.
The common mistake is masking only the front wall. Overspray travels around corners, so protect adjacent walls and check the side opposite the spray direction.
Step 4: Pre-Wet Plants and Nearby Surfaces
Saturate all grass, shrubs, flowers, soil, and adjacent porous surfaces with clean water before applying the chemical.
Use a garden hose without a concentrated jet. Wet leaves from above and below, soak the soil around the plant root zone, and continue until water is visibly moving through the foliage. Give special attention to plants beneath windows, beside corners, and under downspouts.
Pre-wet nearby wood, painted surfaces, and masonry that may receive accidental overspray, but do not use water to push chemical toward a drain, pond, or neighboring property. Block or redirect runoff where local rules require it.
Keep a hose running at low flow during application so a second person can rinse accidental contact immediately. If you work alone, apply one small section at a time and keep the hose within reach.
You’ll know it worked when leaves and soil are uniformly wet and no dry plant surfaces remain near the spray path. Re-wet plants if the wall process takes longer than expected.
The common mistake is wetting vegetation once and then spending an hour masking. Pre-wet immediately before chemical application, and post-rinse again afterward.
Step 5: Apply the Solution From Bottom Upward
Apply the diluted solution with a low-pressure black 65° soap tip, working in manageable sections from the bottom of the wall upward.
Start the pressure washer with clean water, confirm there are no leaks, and submerge the injector pickup tube in the prepared solution. Install the black soap nozzle, then test the draw on the ground. Begin approximately 12-18 inches from the brick, widening the distance if the surface is fragile.
Work in sections roughly 1-2 metres wide. Keep the wand moving and use overlapping horizontal or vertical passes. Apply enough solution to wet the brick uniformly without creating heavy streams. Bottom-up application prevents dirty chemical runoff from forming light tracks on dry masonry above.
Do not use the red 0° or yellow 15° tips. Do not blast mortar, joints, window seals, vents, or damaged areas. Low pressure means the chemical does most of the cleaning; the spray should distribute the solution, not cut into the wall.
You’ll know it worked when the wall is evenly wet, the solution clings briefly, and organic growth begins to lose its green or black appearance during the first few minutes.
The common mistake is moving too fast and leaving dry stripes. Reduce section size and overlap passes rather than increasing pressure.
Step 6: Control the 10-15 Minute Dwell
Let the solution dwell for 10-15 minutes while keeping every treated area visibly wet.
Start timing after each section is fully coated, not when the first spray touches the wall. Watch the surface continuously, especially on sun-facing walls, wind-exposed corners, recessed brick, and areas above hot paving.
If the film begins to dry, mist it lightly with clean water. Do not apply a large rinse that washes the chemical away immediately. On a hot or windy day, shorten sections so you can complete application and dwell control without losing wet coverage.
The solution should loosen organic growth, but it does not need to foam or produce dramatic bubbling. Avoid extending dwell beyond the tested period simply because a stain remains. Repeated exposure can affect mortar, metal, plants, and coatings.
You’ll know it worked when growth wipes or rinses away more easily, the brick remains wet, and no white crystalline film forms before rinsing.
The common mistake is walking away during dwell. Stay with the wall. Dry bleach can leave residue and may make the final appearance worse.
Step 7: Rinse the Wall Top Down and Flush Runoff
Switch to clean water, install a white 40° rinse nozzle, and rinse every wall from the top downward with broad, low-impact passes.
Remove or bypass the chemical pickup line so the washer supplies clean water. Use the white 40° nozzle where possible; a green 25° tip may be used only with greater distance and care on sound masonry. Keep the nozzle at least 12-18 inches from the brick, and increase distance for old mortar or soft brick.
Begin at the highest treated area and work downward. Rinse window ledges, corners, recesses, mortar joints, sills, and the base of the wall until no slippery film or visible foam remains. Use overlapping passes, but do not force water into cracks, vents, or failed joints.
After the wall is clear, flood nearby plants, soil, and hardscape with clean water for at least 5 minutes. Rinse metal fixtures and any surface that received overspray. Collect or redirect runoff when required by local regulations.
You’ll know it worked when rinse water runs clear, the brick feels clean rather than slick, and no bleach odor or foam remains around the foundation.
The common mistake is stopping when the brick looks clean. Residue often hides in recessed joints and below sills, where it can damage plants or leave pale deposits later.
Step 8: Inspect, Correct, and Maintain the Result
Inspect the dry wall the next day, correct only the remaining stain type, and schedule gentle maintenance before growth becomes heavy.
Let the brick dry naturally, then check for uneven clean tracks, white deposits, remaining organic growth, damaged mortar, and plant stress. Compare the result with the test patch rather than judging only while the wall is wet.
If small green areas remain, re-wet plants, test the solution strength, and spot-treat those areas. Do not automatically increase the concentration across the entire house. If white powder appears, first determine whether it is removable chemical residue or efflorescence.
For bleach residue, rinse the area heavily with clean water. For dry efflorescence, use a stiff nylon brush without water, because additional moisture can reactivate salt movement through the masonry. Persistent efflorescence indicates a moisture problem that washing alone cannot solve.
You’ll know the project succeeded when the brick dries evenly, organic growth is removed, mortar remains sound, and landscaping shows no chemical injury over the following several days.
The common mistake is scheduling an immediate second full wash. Allow the wall to dry and diagnose the remaining mark first.
Common Mistakes and How to Fix Them

The injector will not draw chemical
Confirm that the pickup tube is submerged and not kinked. Install the high-flow black soap tip, because a narrow or high-pressure nozzle creates backpressure that prevents injection. Check the injector’s screen, ball, and check valve for debris or dried chemical.
Flush the injector with clean water after use. If the internal ball sticks, gently tap the injector body, then retest. Replace the injector if it still will not draw. Never compensate by pouring chemical into the pressure washer pump.
Green or black growth remains
The source bleach may be old, diluted, or below its labeled strength. The injector may also draw less than its nominal 10:1 ratio. Verify the solution with a measured draw test and repeat the small test patch.
For isolated stubborn organic spots, a pump sprayer can deliver a stronger 2%-3% spot treatment, commonly approximated as one part pool-strength bleach to three parts water. Treat this as a typical practitioner ratio, not a universal label instruction. Keep the dwell controlled, protect plants, and rinse fully.
If the mark does not respond, it may be rust, soot, paint, or mineral staining. Stop increasing bleach.
White powder appears after drying
Heavy water exposure can move soluble salts through brick and leave efflorescence. Dried bleach residue can also create a pale film. Rinse suspected residue with clean water and inspect again after drying.
Dry-brush confirmed efflorescence with nylon. Do not pressure-wash it aggressively or repeatedly soak the wall. If it returns, inspect gutters, flashing, rising damp, and cracks because the moisture source must be corrected.
Mortar becomes sandy or brick faces flake
Stop immediately. The pressure, chemical exposure, or existing masonry condition is unsuitable for DIY washing. Do not try to repair the appearance with a stronger rinse.
Allow the wall to dry, photograph the damage, and have a qualified masonry contractor assess repointing, spalling, or failed brick faces. Historic masonry often needs low-impact cleaning and conservation methods rather than routine house washing.
Plants develop brown or bleached leaves
Immediately flood the foliage and soil with clean water. Continue rinsing until runoff no longer has a chemical smell, while preventing concentrated water from reaching ponds or neighboring property.
Remove contaminated fabric or dead leaves only after rinsing. Monitor plants for several days. Severe exposure may require an arborist or horticulturist, especially for ornamental shrubs and young trees.
Clean tracks or streaks appear
This usually results from applying chemical top-down, allowing uneven dwell, or rinsing incomplete sections. Re-wet the affected wall, apply solution to a complete manageable section, and maintain consistent overlap.
Do not correct streaks with a close high-pressure nozzle. Pressure can permanently expose aggregate, erode mortar, or create a different texture.
Variations for Different Brick Houses and Equipment
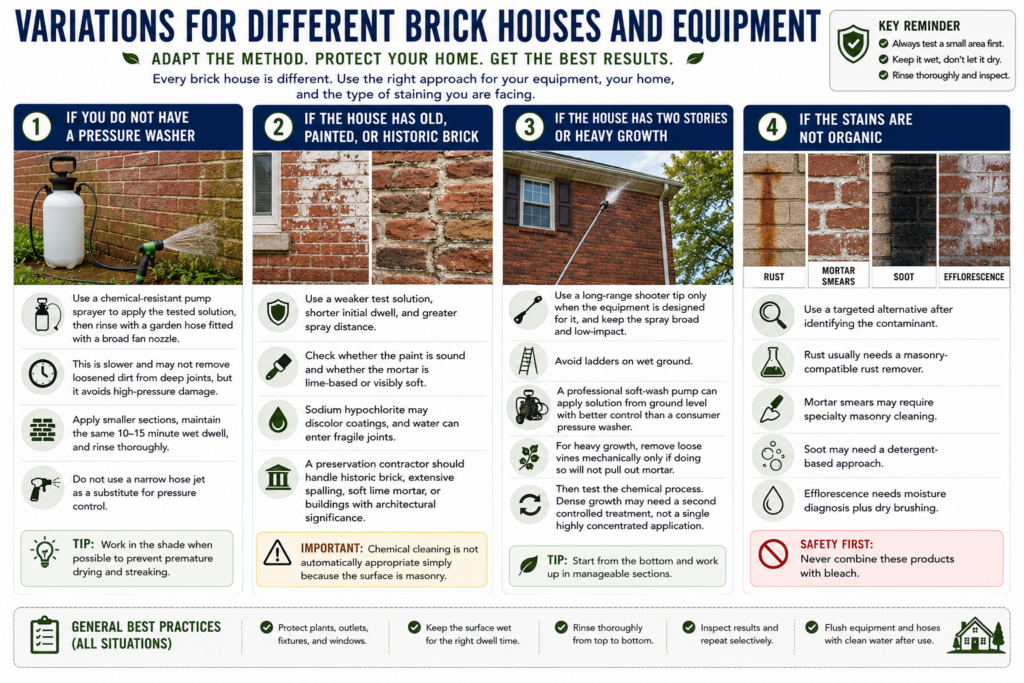
If you do not have a pressure washer
Use a chemical-resistant pump sprayer to apply the tested solution, then rinse with a garden hose fitted with a broad fan nozzle. This is slower and may not remove loosened dirt from deep joints, but it avoids high-pressure damage.
Apply smaller sections, maintain the same 10-15 minute wet dwell, and rinse thoroughly. Do not use a narrow hose jet as a substitute for pressure control.
If the house has old, painted, or historic brick
Use a weaker test solution, shorter initial dwell, and greater spray distance. Check whether the paint is sound and whether the mortar is lime-based or visibly soft. Sodium hypochlorite may discolor coatings, and water can enter fragile joints.
A preservation contractor should handle historic brick, extensive spalling, soft lime mortar, or buildings with architectural significance. Chemical cleaning is not automatically appropriate simply because the surface is masonry.
If the house has two stories or heavy growth
Use a long-range shooter tip only when the equipment is designed for it, and keep the spray broad and low-impact. Avoid ladders on wet ground. A professional soft-wash pump can apply solution from ground level with better control than a consumer pressure washer.
For heavy growth, remove loose vines mechanically only if doing so will not pull out mortar. Then test the chemical process. Dense growth may need a second controlled treatment, not a single highly concentrated application.
If the stains are not organic
Use a targeted alternative after identifying the contaminant. Rust usually needs a masonry-compatible rust remover. Mortar smears may require specialty masonry cleaning. Soot may need a detergent-based approach, and efflorescence needs moisture diagnosis plus dry brushing.
Never combine these products with bleach. Read the label, perform a compatibility test, and rinse one product completely before using a different treatment on another day.
How Long Does It Take and What Does It Cost?
| Project condition | Typical labor time | Typical DIY cost | Main cost driver |
|---|---|---|---|
| Small, one-story, light algae | 2-3 hours | $60-$150 | Existing washer and hoses |
| Average two-story home | 4-6 hours | $100-$250 | Access, masking, and rinse water |
| Dense growth or difficult access | 6+ hours | $150-$350 | Extra treatment and equipment |
| Professional service | 2-5 hours on site | $300-$1,000+ | Area, height, repairs, and region |
The overview’s per-side figures provide a useful work estimate: pre-wetting takes about 10 minutes per side, chemical application 15-20 minutes, dwell 10-15 minutes, and rinsing 20-25 minutes. Add setup, masking, hose movement, spot correction, and cleanup.
Chemical volume depends on wall area, porosity, injector draw, and overspray. The stated 2-3 gallons of 10%-12.5% sodium hypochlorite is a typical starting quantity for an average home, not a guaranteed amount. Buy enough for the planned work, but do not store mixed solution for later use because sodium hypochlorite loses strength.
Frequently Asked Questions
Can bleach damage brick?
It can damage surrounding plants, metal, coatings, and already-failing masonry when misused. Sound brick generally tolerates a controlled, diluted application better than aggressive pressure, but concentration, dwell, drying, and rinsing determine the risk. Always test first, keep the solution wet, protect adjacent materials, and follow the product label.
Should I pressure wash brick before soft washing?
Usually no. High pressure can erode old mortar and damage the fired outer face of brick. Apply the low-pressure chemical solution first, let it loosen organic growth, and rinse with a broad fan. Use mechanical brushing only for loose deposits that will not pull mortar from joints.
How far should the nozzle be from brick?
Start at least 12-18 inches away and increase distance for old, soft, painted, or damaged masonry. The correct distance is the farthest position that distributes the solution or rinse evenly. If the brick surface changes texture, mortar washes out, or water enters joints, stop and increase distance.
Can I use household bleach?
Household bleach can have a different sodium hypochlorite concentration and may contain additives unsuitable for some equipment or surfaces. Pool chlorinating liquid is commonly used because it is available in approximately 10%-12.5% strengths, but the label and safety data sheet control. Never assume two bleach products are interchangeable.
Why does brick look darker after washing?
Wet brick naturally appears darker, and it may remain darker while moisture leaves porous masonry. Uneven dark areas can also indicate trapped water, incomplete rinsing, or a coating change. Wait until the wall is fully dry before judging color. Persistent dampness requires investigation of drainage, flashing, gutters, and failed joints.
How often should a brick house be soft washed?
There is no universal schedule. Inspect annually and clean when organic growth returns, commonly every 2-5 years in damp or shaded conditions. Improve drainage, trim vegetation away from walls, and repair leaking gutters first. Preventive maintenance reduces the chemical strength and dwell time needed for the next cleaning.
Conclusion
A successful How to soft wash brick house project uses chemistry and controlled water, not brute pressure: inspect first, test the mix, protect the site, pre-wet plants, apply bottom-up, keep the dwell wet, rinse top-down, and flush runoff. If the brick or mortar is historic, soft, painted, or already failing, stop at the test stage and use a masonry professional.


