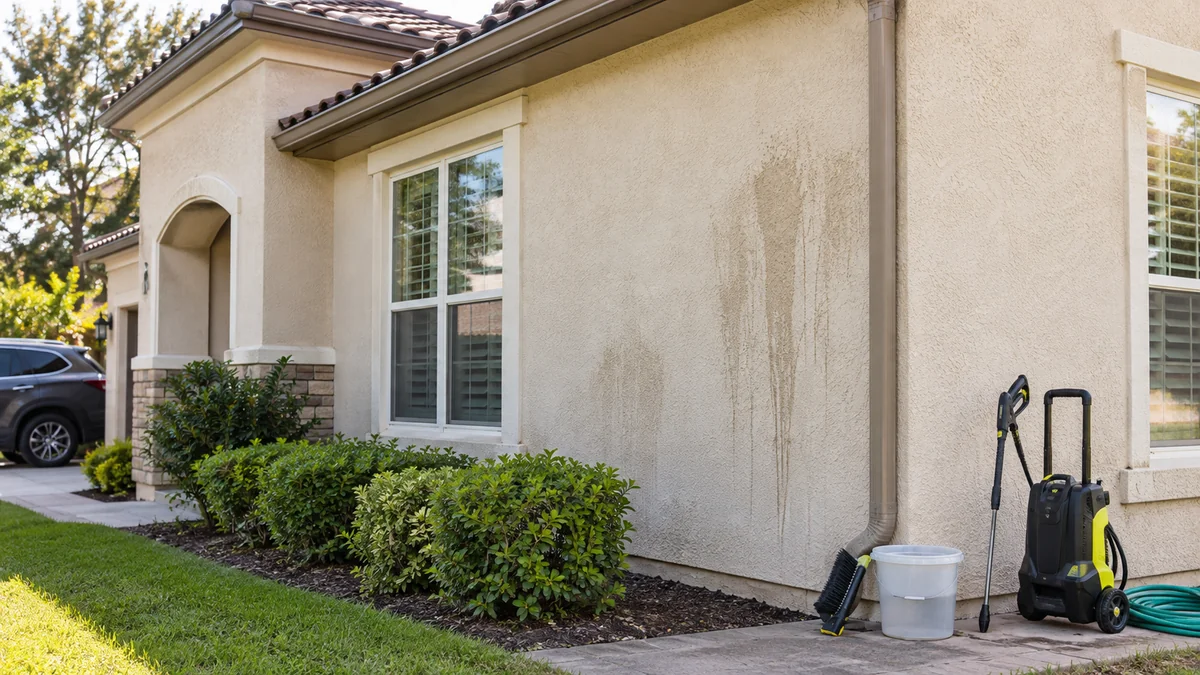
Hard water spotting on exterior stucco is best removed with source control, a small test patch, thorough pre-wetting, a compatible mineral cleaner, soft brushing, and a low-impact rinse. Avoid aggressive pressure and strong acids, because stucco absorbs water and alkaline finishes can etch, discolor, or conceal deeper moisture damage.
Key Facts at a Glance
- Hard water spots usually contain calcium carbonate, magnesium compounds, silica, or other dissolved minerals left behind after evaporation.
- White deposits on stucco can also be efflorescence, paint oxidation, mortar residue, or deteriorating material, so cleaner selection should follow identification.
- Vinegar may dissolve light calcium scale, but its acidity can dull cement-based finishes, damage sensitive coatings, and affect nearby metals.
- There is no universal safe pressure rating for stucco; a garden hose is the lowest-risk starting point, while machine washing requires an experienced operator and test area.
- A recurring spot pattern usually indicates an unresolved sprinkler, gutter, downspout, roof, or masonry drainage problem.
- A typical DIY cleaning project costs $20-$75 and takes 2-6 hours, excluding repairs and drying time.
What Causes Hard Water Spots on Exterior Stucco?
Hard water spots form when mineral-rich water repeatedly wets stucco and evaporates before the dissolved minerals can be rinsed away. Calcium and magnesium salts remain as white dots, vertical streaks, rings, or crusty deposits, especially below sprinkler heads, hose bibs, roof edges, and leaking gutters.
Exterior stucco contains cementitious binders, sand, lime, pigments, and air voids. Those pores absorb water, allowing minerals to move slightly below the surface before crystallizing during drying. Repeated wetting produces a harder deposit than a single splash.
The stain pattern often identifies the source:
| Pattern on stucco | Likely source | Confirmation clue | First correction |
|---|---|---|---|
| Repeated semicircles 1-4 feet above grade | Lawn sprinkler overspray | Spots align with spray arc | Redirect or replace sprinkler head |
| Vertical streak below roofline | Gutter overflow or roof runoff | Streak follows fascia or downspout | Clean gutter and extend downspout |
| Small rings near hose bib | Faucet leakage or hose connection | Deposit surrounds plumbing fixture | Repair washer, valve, or fitting |
| Broad irregular band near pavement | Splashback or irrigation overspray | Lower wall stays wet after watering | Move emitters and improve drainage |
| White powder on newer masonry | Efflorescence | Deposit returns after rain or drying | Investigate moisture movement before cleaning |
Hard water deposits are not identical to efflorescence. Efflorescence originates from soluble salts moving through masonry or stucco and may return even after surface cleaning, while sprinkler scale is deposited directly from external water. Both can appear white.
Is the White Residue Really Hard Water Scale?
The white residue may be hard water scale, efflorescence, oxidation, or failing stucco, so identification should precede chemical treatment. A mineral deposit often feels gritty or slightly raised, softens at its edge after controlled wetting, and becomes less visible when saturated.
Use a discreet test area no larger than 12 inches square. Photograph the dry surface, rinse it with clean water, and observe whether the mark disappears temporarily or remains unchanged. A deposit that disappears when wet may be surface powder or oxidation rather than bonded scale.
A small amount of white vinegar on a cotton swab can indicate carbonate minerals because mild acid may fizz or soften calcium carbonate. Do not treat that reaction as proof that vinegar is safe for the entire wall. The test itself can lighten pigment or alter a cement finish.
Stop and seek an inspection when you see brown rust marks, bulging, soft areas, open cracks, delamination, exposed mesh, persistent dampness, or staining that emerges from inside the wall. Surface cleaning will not correct corroded lath, failed flashing, or water trapped behind a stucco assembly.
Before You Start: Tools, Time, and Safety
A small, intact, unpainted area may be suitable for careful DIY cleaning. Painted stucco, synthetic stucco, historic finishes, large walls, recurring dampness, and deposits accompanied by cracks deserve greater caution because the visible stain can be a symptom of a larger wall-system problem.
| Project factor | Typical DIY range or specification | Professional alternative |
|---|---|---|
| Cleaning time | 2-6 hours for 100-300 square feet | 2-5 labor hours, depending on access |
| Drying and evaluation | 24-72 hours | Same, with moisture inspection if needed |
| Basic materials | $20-$75 | Included in service price |
| Garden hose rinse | 30-60 psi typical household supply | Metered low-impact rinse |
| Test patch | 12 by 12 inches | Multiple patches on different finishes |
| PPE | Gloves, eye protection, long sleeves | Chemical-resistant PPE and runoff controls |
Prepare a pump sprayer, clean water, soft nylon or natural-fiber brush, buckets, masking materials, garden hose, drop cloths, and the selected cleaner. Use eye protection and gloves. Keep children and pets away from wet chemicals.
Never mix acids with bleach, ammonia, or other cleaners. Protect aluminum, galvanized steel, natural stone, glass, painted trim, and plants from chemical contact. Rinse foliage before and after cleaning when a product label permits exterior use.
Step 1: Find and Stop the Water Source
Correct the water source before cleaning, because untreated overspray can recreate visible deposits within days or weeks. Run irrigation briefly while observing the wall from several angles, then inspect gutters, downspouts, hose connections, roof valleys, and exterior plumbing.
Adjust sprinkler heads so the spray stops short of the stucco. Replace tilted heads, reduce excessive arc, install drip irrigation where practical, and extend downspouts several feet away from the foundation. Clean gutters before the next rain event.
You will know the source is controlled when the wall remains dry during a normal irrigation cycle and no fresh droplets strike the stucco. The common mistake is cleaning first and diagnosing later, which makes a successful removal look like a failed treatment.
Step 2: Inspect, Photograph, and Repair the Surface
Inspect stucco for cracks, holes, loose material, blistering paint, exposed reinforcement, rust staining, and failed sealant before applying water. Photograph the area in dry light, because wet stucco temporarily changes color and can hide uneven cleaning.
Do not fill active cracks with ordinary interior caulk. Minor joints may accept a compatible exterior elastomeric sealant, but cracks through the stucco field, recurring cracks, gaps around windows, and damaged control joints require a repair method compatible with the specific stucco system.
Allow patching materials to cure according to the product label. A shallow sealant joint may need roughly 24-48 hours, while cementitious or deeper repairs can require several days and favorable weather.
You will know the surface is ready when repairs are firm, bonded, and fully cured. The common mistake is sealing a wet crack, trapping moisture behind the repair.
Step 3: Pre-Wet the Stucco and Protect Adjacent Areas
Pre-wet the wall with clean water from a garden hose, beginning at the bottom and moving upward. Bottom-up wetting reduces uneven absorption and helps prevent dirty, concentrated runoff from the upper wall drying into a dry lower section.
Keep the spray broad and gentle. Do not aim a narrow jet directly at cracks, window joints, vents, electrical fixtures, or damaged finish. Cover or wet nearby plants, and protect metal and glass when the cleaner requires it.
Work in manageable sections of approximately 25-50 square feet. Stucco dries at different rates according to texture, sun exposure, and porosity, so sectioning prevents cleaner from drying before rinsing.
You will know the wall is ready when the surface is uniformly damp without standing water. The common mistake is wetting only the visible stain while leaving surrounding stucco dry.
Step 4: Choose and Test a Mineral Cleaner
Choose the mildest product that can address the deposit, and test it on an inconspicuous area for color change, texture change, residue, and uneven drying. Product labels and the stucco manufacturer’s guidance override generic recipes because finishes vary substantially.
| Cleaner or method | Suitable deposit | Typical starting use | Main risk |
|---|---|---|---|
| Clean water and soft brush | Fresh dust, loose salts, light spotting | 1-2 rinse-and-brush passes | May not dissolve bonded scale |
| White vinegar diluted 1:3 with water | Small, light carbonate deposits on compatible unpainted stucco | 2-5 minute test dwell | Etching, pigment change, metal corrosion |
| pH-neutral mineral cleaner | Light to moderate scale on sensitive finishes | Label dilution and 3-10 minute dwell | Insufficient strength for thick crust |
| Manufacturer-approved masonry descaler | Heavy calcium deposits | Label dilution, controlled dwell | Over-etching if too strong or dry |
| Borax and soap solution | Dirt mixed with light organic residue | 1/2 cup Borax plus 2 tablespoons soap per 2 gallons water, only if compatible | Film, residue, limited scale removal |
The frequently suggested 1:3 vinegar mixture is a cautious starting point, not a universal stucco-safe formula. Vinegar can dissolve calcium carbonate while also reacting with alkaline cementitious material. Painted stucco and synthetic stucco should not receive vinegar unless the coating manufacturer approves it.
Borax is not a reliable replacement for an acidic descaler. It may assist with soil and some organic residue, but its alkaline chemistry does not dissolve thick calcium carbonate crust as efficiently as an appropriate acid-based product.
Apply the cleaner with a pump sprayer or soft brush. Keep the section visibly wet for the label’s dwell time, often 3-10 minutes, and never allow the product to dry.
Step 5: Agitate Without Removing Stucco Texture
Use a soft nylon, flagged-tip masonry, or vehicle-washing brush with light pressure. Work in short overlapping strokes rather than scrubbing aggressively in one location, because repeated abrasion can polish raised texture and create a visible patch.
For thick crust, allow chemistry and repeated short applications to do the work. A second controlled treatment is safer than one strong mixture or prolonged scrubbing.
You will know the method is working when the deposit softens, the brush picks up a chalky residue, and the underlying texture remains unchanged. The common mistake is switching to a wire brush, abrasive pad, scraper, or melamine sponge when the first pass is slow.
Step 6: Rinse From the Top Down
Rinse from the top downward with clean water after the dwell period. The downward flow carries loosened minerals away from cleaned areas, while repeated passes prevent chemical residue from drying in the stucco pores.
Use enough water to remove cleaner and suspended deposits, but avoid concentrating the stream at joints or cracks. Rinse nearby plants, soil, windows, and metal according to the cleaner’s label and local discharge requirements.
Inspect the wall while wet and again after 24-72 hours. Temporary patchiness is common because textured stucco dries unevenly, but permanent light spots, halos, or texture changes indicate an incompatible chemical or uneven application.
You will know rinsing is complete when the runoff is clear, the surface feels free of slick residue, and no cleaner odor remains. The common mistake is stopping when the wall looks visually clean while leaving dissolved salts behind.
Which Removal Method Is Safest?
The safest removal method is the least aggressive process that removes the deposit without changing stucco color or texture. Clean water is safest for loose residue, a tested mild cleaner suits light scale, and a professional masonry-cleaning product is more appropriate for thick or widespread mineral crust.
| Situation | Preferred approach | Avoid | Typical result |
|---|---|---|---|
| Fresh sprinkler dots on unpainted stucco | Water, soft brush, source correction | Strong acid | Often improves in one session |
| Thin white rings on painted stucco | Coating-approved neutral cleaner | Unapproved vinegar or descaler | Lower risk of paint dulling |
| Several years of hard crust | Test-approved masonry descaler | Long dwell and heavy scrubbing | May require 2-3 applications |
| White powder returning after rain | Moisture investigation | Repeated surface washing | Cleaning alone may not last |
| Rust-colored marks near cracks | Stucco-system inspection | Acid cleaning and painting over | Requires source and substrate repair |
The most important trade-off is speed versus surface risk. Stronger chemistry and pressure can shorten labor time, but they also reduce the margin for operator error.
Can You Pressure Wash Exterior Stucco?
Pressure washing can damage exterior stucco when water impact exceeds the finish’s strength or drives water through cracks, joints, and porous areas. A garden hose is the conservative starting point; machine washing should be limited to trained operators using broad spray patterns, appropriate distance, and a verified test patch.
A universal 800-1,500 PSI safety limit is not reliable. Pressure at the pump is not the same as impact at the wall, and nozzle angle, orifice size, distance, flow rate, substrate condition, and dwell in one location all change the result. Some contractors use low-pressure soft-wash systems, while others use carefully controlled machine rinsing.
Do not use a zero-degree nozzle, turbo nozzle, rotating surface cleaner, or close-range jet on stucco. Avoid holding any spray at a crack, corner, window perimeter, or repair.
The practical rule is simple: use the lowest impact that produces adequate rinsing, and stop immediately if texture erodes, aggregate appears, water enters indoors, or the wall develops a darker subsurface patch.
What If the Spots Do Not Come Off?
Persistent spots usually mean the diagnosis, chemistry, or moisture source is wrong rather than the scrubbing force being too low. Repeat only after the first section has dried and been inspected, and use a different tested method only when the product is compatible with the finish.
Common explanations include:
- Efflorescence: salts are migrating from behind the surface and will return until moisture movement is corrected.
- Paint oxidation: chalky pigment transfers to a cloth and will not behave like calcium scale.
- Rusting lath: orange or brown marks indicate possible metal corrosion behind the stucco.
- Silica or cement residue: these deposits may require a specialty restoration product.
- Surface erosion: the stain may be gone, but damaged texture now catches light and looks discolored.
- Biological growth: algae and mildew need an appropriate biocidal cleaner, not repeated acid treatment.
Do not apply increasingly strong acid to an unidentified stain. A professional can compare dry and wet appearance, use moisture readings, inspect flashing and drainage, and distinguish surface scale from wall-system failure.
How Much Does Stucco Spot Removal Cost?
A small DIY cleaning project typically costs $20-$75, while professional exterior stucco cleaning commonly costs about $200-$600 for an accessible residential section. Larger elevations, lift access, painted finishes, extensive masking, specialty chemistry, and repairs can increase the total substantially.
| Work scope | Typical cost range | Typical duration | Main cost variable |
|---|---|---|---|
| Small DIY test and spot cleaning | $20-$75 | 2-6 hours | Cleaner and access |
| Professional single-wall cleaning | $200-$600 | 2-5 hours | Area and finish sensitivity |
| Multi-story or heavily crusted wall | $600-$1,500+ | 1-2 days | Lift, labor, repeat treatments |
| Minor crack or sealant repair | $150-$600 | 1-3 days including cure | Number and depth of cracks |
| Moisture or stucco-system repair | $1,000-$5,000+ | Several days to weeks | Hidden sheathing, lath, flashing |
These are typical planning ranges, not fixed national prices. Obtain a written scope that identifies the cleaner, pressure or rinse method, test-patch procedure, plant protection, repairs, and whether the contractor guarantees removal or only cleaning labor.
A cleaning guarantee cannot reasonably promise that efflorescence will never return when the wall still receives moisture. The source correction and repair scope matter as much as the wash itself.
How Do You Prevent Hard Water Stains From Returning?
Prevent recurrence by keeping irrigation and roof water off the stucco, maintaining drainage, and checking the wall after rain or watering. Cleaning removes deposits, but source control removes the mechanism that creates them.
Use these maintenance measures:
- Aim sprinkler heads away from walls and reduce overspray.
- Replace leaking hose bib washers and irrigation fittings.
- Clean gutters at least twice yearly and after heavy leaf fall.
- Extend downspouts away from the foundation and stucco.
- Correct ponding, splashback, and soil graded toward the wall.
- Inspect caulked joints, window edges, and roof-to-wall transitions annually.
- Photograph recurring stains after storms to track movement and growth.
- Consider drip irrigation near walls instead of spray irrigation.
A water softener may reduce calcium and magnesium in household plumbing, but it does not automatically solve outdoor irrigation water. Irrigation water often bypasses the indoor softener, so changing sprinkler placement is usually more effective.
When Should a Professional Clean or Repair the Stucco?
Hire a professional when the wall has cracks, rust, bulging, soft areas, painted or historic finishes, multiple stories, widespread crust, or stains that return after source correction. Professional evaluation is also appropriate when chemical runoff could affect delicate landscaping, metal cladding, or neighboring property.
A qualified contractor should explain the proposed chemistry, show a test patch, identify the rinse method, and distinguish cleaning from repair. Ask whether the worker has cleaned the same stucco type, including acrylic, cement-based, EIFS, and integral-color finishes.
A professional is not automatically safer. An operator who begins with a high-pressure nozzle, cannot name the product pH, refuses a test patch, or promises a universal PSI limit presents a preventable risk.
Common Mistakes and How to Fix Them
| Mistake | What happens | Recovery |
|---|---|---|
| Using a turbo or zero-degree nozzle | Texture erodes and water enters cracks | Stop, let the wall dry, document damage |
| Applying vinegar to painted stucco | Coating dulls or changes color | Rinse promptly and consult coating guidance |
| Letting cleaner dry | Streaks and concentrated residue remain | Re-wet, rinse thoroughly, and reassess |
| Cleaning in hot direct sun | Dwell time becomes uneven | Work in shade, early morning, or cool overcast weather |
| Scrubbing with wire | Raised texture becomes polished | Stop abrasion; obtain repair advice if visible |
| Ignoring recurring runoff | Deposits return quickly | Correct sprinklers, gutters, or drainage first |
The most counterintuitive mistake is assuming a stronger cleaner is more professional. Experienced restoration work generally reduces chemical strength, contact time, and spray impact until the test patch proves the process effective.
Frequently Asked Questions
Can baking soda remove hard water stains from stucco?
Baking soda is not an efficient calcium-scale remover because its mildly alkaline chemistry does not dissolve carbonate deposits. It may provide limited gentle abrasion, but rubbing a porous stucco finish can create a polished patch. Use clean water or a tested compatible cleaner instead, and correct the water source before treating the surface.
Is CLR safe for exterior stucco?
CLR and similar acidic descalers should not be assumed safe for exterior stucco. Their formulation can etch cementitious material, discolor integral pigments, corrode nearby metals, and harm plants. Use only a product whose label or manufacturer specifically permits the stucco type, and perform a small test patch with controlled dwell and immediate rinsing.
Can hard water permanently damage stucco?
Hard water deposits can permanently alter stucco when repeated moisture causes erosion, cracking, corrosion of embedded lath, or damage behind the finish. The mineral residue itself is often removable, but recurring wetting can create deeper problems. Rust, bulging, soft areas, and indoor dampness require inspection rather than additional surface cleaning.
How long should stucco dry before painting?
Stucco should be dry and fully cured before painting, but the required period depends on whether the surface was newly repaired or merely washed. A washed wall commonly needs at least 24-72 hours of favorable drying, while new cementitious repairs may require several weeks. Follow the coating and repair-material manufacturer’s moisture limits.
Will sealing stucco prevent hard water spots?
A compatible breathable sealer may reduce water absorption, but it will not stop mineral deposits caused by direct sprinkler spray or gutter leaks. Sealing a damp, cracked, or contaminated wall can trap moisture and complicate future repairs. Correct drainage and irrigation first, confirm the surface is sound, then use only a stucco-compatible breathable treatment.
Can I remove hard water stains in winter?
Winter cleaning is possible only when the cleaner, stucco, and rinse water can remain above the product’s minimum temperature and freeze risk is absent. Freeze-thaw conditions can expand trapped water in cracks and damage the finish. In cold climates, choose a mild dry-weather window and allow complete drying before temperatures fall.
The Bottom Line
To deal with hard water spotting on exterior stucco, stop the sprinkler or runoff source, inspect for cracks and moisture damage, pre-wet the wall, test the mildest compatible cleaner, agitate with a soft brush, and rinse thoroughly from top to bottom. Avoid assuming that vinegar or a particular PSI is universally safe. The correct method depends on stucco type, stain chemistry, surface condition, and water source.