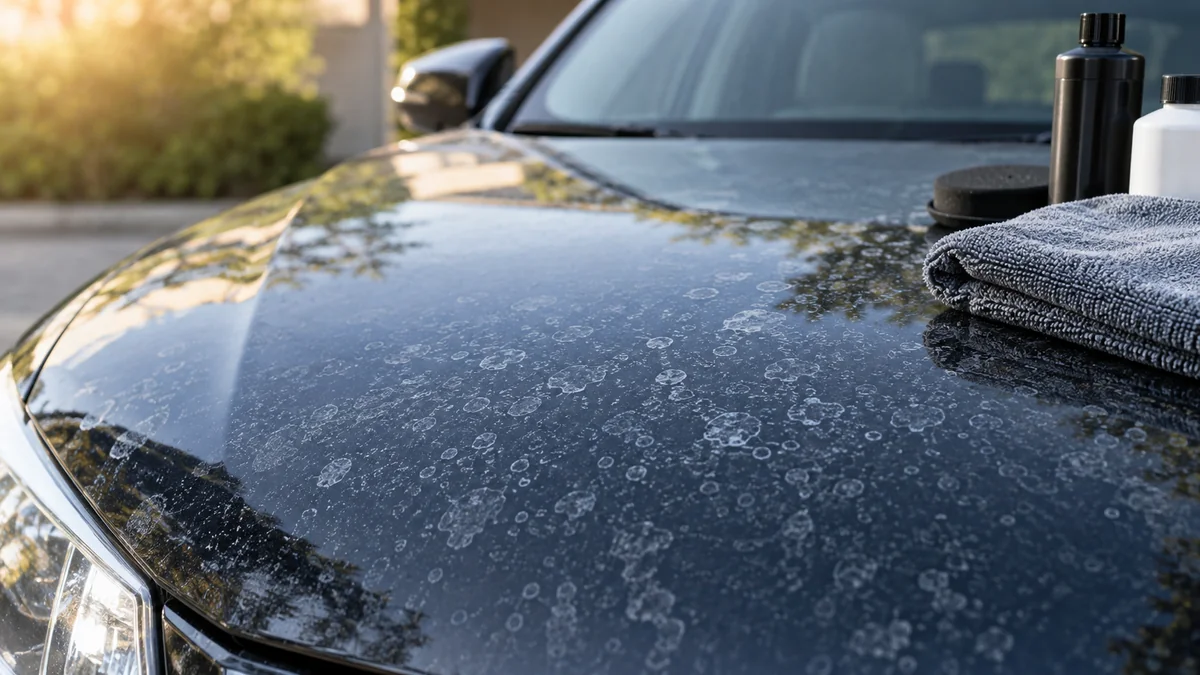
To remove etched water spots from car paint, first dissolve and rinse away mineral deposits, then polish only the remaining clear-coat crater with a dual-action machine. Fresh deposits may disappear in 10-30 minutes; true etching requires paint correction and may be unsafe to remove completely if the depression is deep.
Key Facts at a Glance
- Etched water spots are physical depressions in the clear coat, not removable residue sitting on top.
- Automotive mineral-removal products can dissolve calcium and magnesium deposits, but they cannot replace missing clear coat.
- Clay removes bonded contamination, although it does not level a crater and can create marring.
- A dual-action polisher and a mild compound are the safest practical DIY correction combination.
- A fingernail-catching mark may be too deep to chase safely with more polishing.
- Typical DIY correction costs $35-$150 and takes 2-6 hours, including washing and inspection.
What Are Etched Water Spots?
Etched water spots are mineral or acidic impressions that have chemically damaged the vehicle’s clear coat. Water evaporates, dissolved minerals become concentrated, and heat accelerates the reaction; alkaline deposits from hard water and acidic contaminants from rain can leave rings, dull patches, or crater-shaped marks.
A surface deposit is different. A deposit feels chalky or rough and sits above the finish, while an etch remains visible after the residue has been dissolved and the panel has been wiped clean. The distinction determines whether you need chemistry, mechanical decontamination, polishing, or professional refinishing.
How Do You Identify Etched Water Spots?
Use three checks: appearance, touch, and a small chemical test. Inspect the panel in shade first, then use a focused LED light after the surface is clean.
| Observation | Likely condition | First treatment | Safe expectation |
|---|---|---|---|
| White, chalky ring | Type 1 surface deposit | Mineral remover | Usually disappears |
| Rough ring after washing | Type 2 bonded scale | Chemical remover, then clay if needed | Usually smooths |
| Dull shadow after chemical removal | Type 3 etching | Test-spot polishing | May improve or disappear |
| Fingernail catches in mark | Deep clear-coat loss | Professional inspection | Full removal may be unsafe |
| Spot returns after oily polish residue dries | Incomplete inspection | IPA or panel-prep wipe | Reinspect when cool |
A fingertip can detect texture, but it cannot reliably measure crater depth. Never use the fingernail test as permission to polish aggressively; a catching edge is a warning to stop and assess the panel.
Why Do Water Spots Etch Automotive Paint?
Water spots etch automotive paint because evaporation concentrates reactive minerals and contaminants against a thin clear-coat film. Direct sunlight raises panel temperature, accelerates evaporation, and can intensify the chemical attack before the vehicle owner notices the marks.
Common sources include lawn sprinklers, untreated tap water, automatic car-wash rinse water, construction dust mixed with rain, and bird-dropping residue. Sprinkler water is often especially troublesome because repeated droplets land in the same area and dry before the vehicle is washed.
Clear coat is typically only a few dozen micrometres thick, although thickness varies by manufacturer, panel, repair history, and paint system. That limited material explains why aggressive sanding or repeated compounding can create a larger defect than the original water spot.
Which Water-Spot Removal Method Should You Use?
Choose the least aggressive method that removes the actual defect. Chemical cleaners dissolve deposits, clay removes bonded particles, and polishing levels a small amount of clear coat around an etch.
| Method | Suitable damage | Typical cost | Typical time | Main risk |
|---|---|---|---|---|
| Automotive mineral remover | Type 1 deposits | $15-$30 | 15-30 minutes | Staining if allowed to dry |
| Diluted white vinegar | Fresh, light deposits | $2-$6 | 10-20 minutes | Trim or coating damage |
| Fine clay bar | Type 2 bonded scale | $10-$25 | 30-60 minutes | Marring and stripped wax |
| DA machine polish | Type 3 light etching | $35-$150 DIY | 2-6 hours | Clear-coat thinning |
| Professional correction | Multiple or deep etches | $150-$500+ | 4-10 hours | Cost and limited removal |
| Wet sanding or repainting | Severe damage | $300-$1,500+ | 1-5 days | Permanent material removal |
A chemical remover is the best first choice for surface minerals. A dual-action polisher is the best practical correction tool for shallow etching, while wet sanding belongs to experienced professionals because it removes material much faster.
Before You Start
Prepare the vehicle before applying acid or abrasives. Work in shade, keep the panel cool, and test every chemical and polishing combination on a small inconspicuous area.
Materials and Conditions
- pH-balanced automotive shampoo
- Two wash buckets with grit guards
- Plush microfiber drying towels
- Automotive mineral or water-spot remover
- Chemical-resistant nitrile gloves and eye protection
- Clay bar or synthetic clay towel, only if contamination remains
- Dedicated clay lubricant
- Dual-action polisher for etching
- One polishing pad and one cutting pad
- Compound or finishing polish
- Panel-prep spray or diluted isopropyl alcohol
- Paint sealant, wax, or coating-compatible protection
Typical preparation takes 30-60 minutes. Do not begin if the paint is hot enough that water flashes dry immediately, if wind is blowing dust onto the vehicle, or if rain will prevent thorough rinsing.
Step 1: Wash and Dry the Paint
Wash the vehicle thoroughly with a pH-balanced car shampoo, then dry it completely before diagnosing the spots. A clean, cool surface prevents grit from becoming abrasive and ensures that remaining rings are not simply dirt or detergent residue.
Use the two-bucket method and a clean microfiber mitt. Rinse the panel from top to bottom, and avoid household dish soap because repeated use can remove existing wax or sealant.
Dry with forced air or a plush towel rather than allowing rinse water to evaporate. You will know the wash worked when the panel feels clean, shows no loose grit, and no new mineral rings appear as the water leaves.
Common mistake: inspecting wet paint under diffuse light. Water temporarily fills shallow defects and can make etching look absent.
Step 2: Decontaminate Without Grinding Minerals
Remove bonded contamination only after washing, using generous clay lubricant and light pressure over a small section. Clay can smooth Type 2 scale, but it cannot repair a crater and may create fine marring that requires polishing.
Work a 2-by-2-foot section with straight, overlapping motions. Stop when the clay glides smoothly and the surface feels clean through a thin plastic bag or clean fingertip.
Fold contaminated clay frequently, and discard it if it falls onto the ground. Synthetic clay towels are faster on large vehicles, but they can produce more marring when used with insufficient lubricant.
Common mistake: claying aggressively to force off mineral rings. If the surface remains rough after light clay passes, use a chemical mineral remover rather than more pressure.
Step 3: Dissolve Mineral Deposits
Apply an automotive water-spot or mineral remover to a cool panel, allow the label-specified dwell time, and rinse before the product dries. These acidic formulations break down alkaline mineral deposits; they do not repair missing clear coat.
Use a few drops on a microfiber applicator or apply the product according to its packaging. Work on one small section for approximately 30-60 seconds, then rinse thoroughly and dry. Keep the product away from unpainted trim, anodized metal, porous stone, and damaged paint unless the manufacturer approves those surfaces.
Repeat once if the deposits remain. Do not continually increase dwell time to compensate for a mark that has already become an etch.
Success checkpoint: the panel feels smooth, and the white ring disappears when viewed after drying.
Common mistake: allowing acid to dry in sunlight. Dried residue can stain trim, haze sensitive finishes, or create a second correction problem.
Are Household Acids Safe?
Diluted white vinegar can help with fresh, light mineral deposits, but it is not a reliable treatment for etched clear coat. A conservative starting mixture is one part white vinegar to one part distilled water, used briefly on cool, uncoated paint and rinsed immediately.
Vinegar is weaker and less controlled than a purpose-made automotive product. Never mix vinegar with bleach, ammonia, or other cleaners, and do not use it on ceramic coatings, sensitive trim, or hot paint without confirming compatibility.
Step 4: Inspect the Paint After Chemical Removal
Inspect the dry panel under a focused LED light after removing polishing oils and chemical residue. If the ring is gone, protect the paint; if a dull outline remains, the clear coat is probably etched.
A panel-prep spray or suitable isopropyl alcohol mixture can reveal whether polish oils are hiding defects. Use light pressure and a clean towel, then allow the panel to cool before judging the result.
Heat can temporarily improve the appearance of a defect by softening or expanding the clear coat. Reinspect after the panel returns to ambient temperature, ideally after 15-30 minutes.
Step 5: Polish a True Etch With a DA Machine
Use a dual-action polisher, a moderate foam pad, and a small test spot before correcting the whole panel. Machine polishing removes a controlled amount of surrounding clear coat so the surface becomes optically level with the shallow depression.
Start with a mild polish and polishing pad. Use approximately four pea-sized drops on a clean pad, work a 2-by-2-foot section at a moderate machine speed, and make four slow crosshatch passes with light to moderate pressure.
Wipe the residue, inspect under focused light, and use panel prep to remove fillers. If the defect improves but remains visible, make one further test-spot pass with a slightly stronger combination before escalating across the vehicle.
Success checkpoint: the ring is reduced after residue removal, not merely hidden by oils.
Common mistake: beginning with a heavy compound everywhere. A test spot often shows that a finishing polish can solve a shallow etch with less clear-coat removal.
When Should You Stop Polishing?
Stop when the mark catches a fingernail, reaches a sharp boundary, lies near a body edge, or shows little improvement after two controlled passes. Complete removal is not always the correct objective because clear-coat loss cannot be polished back.
Edges and body creases carry less paint and receive more pad pressure. Keep the pad moving, reduce pressure near edges, and avoid chasing a defect that may require sanding, measuring, or repainting.
If the Vehicle Has Ceramic Coating
Treat a ceramic-coated vehicle as a coated surface first, not as ordinary clear coat. A compatible coating-maintenance mineral remover may remove surface deposits, but clay and polishing can degrade or remove the coating.
Follow the coating manufacturer’s chemical compatibility instructions. If the spot remains after a safe chemical treatment, a professional may need to polish and recoat the affected area rather than repeatedly applying stronger chemicals.
A coating does not make paint immune to water spotting. It changes the maintenance and repair sequence, but concentrated sprinkler water can still leave deposits or attack exposed areas.
Typical Time and Cost
DIY correction usually costs $35-$150 when the owner already has wash equipment, while professional correction commonly costs $150-$500 or more depending on vehicle size, paint condition, and the number of panels.
| Repair level | Materials or service | Typical time | Typical cost |
|---|---|---|---|
| Fresh deposits | Shampoo, vinegar or remover, towels | 30-60 minutes | $5-$30 |
| Bonded scale | Remover, clay, lubricant | 1-2 hours | $25-$60 |
| Light etching | DA rental or purchase, polish, pads | 2-6 hours | $75-$250 |
| Several etched panels | Professional paint correction | 4-10 hours | $150-$500 |
| Deep etching or clear-coat failure | Body-shop repair | 1-5 days | $300-$1,500+ |
A low-cost chemical treatment is preferable when it works because it removes contamination without sacrificing clear coat. A professional quote becomes sensible when the defect is widespread, the vehicle has valuable original paint, or the owner lacks a machine-polishing test panel.
Common Mistakes and How to Fix Them
Polishing Before Removing Minerals
Hard mineral particles can drag across paint and create marring. Rewash the panel, use a compatible chemical remover, rinse completely, and inspect before polishing again.
Letting Acid Dry
Dried chemical residue can stain plastic trim and sensitive finishes. Rinse immediately, wash the affected area, and stop using the product if the surface develops haze or discoloration.
Using a Rotary Buffer as a Beginner
A rotary machine can generate concentrated heat and rotary trails quickly. Use a dual-action machine for DIY work, keep the pad flat, and make a test spot before increasing cutting power.
Hiding the Defect With Glaze
Glazes and oily polishes can temporarily fill or mask etching. Remove the oils with panel prep and judge the correction under direct light before applying protection.
Repeating Aggressive Passes Indefinitely
A water spot may be deeper than the safe correction limit. Measure paint thickness when possible, stop after limited test passes, and refer severe damage to a detailer or body shop.
Preventing New Etched Water Spots
Prevent new etching by removing water before evaporation and reducing mineral exposure. Dry the vehicle after washing, avoid parking beside active sprinklers, and rinse water spots promptly when the car is cool.
| Prevention action | Practical interval | Benefit | Limitation |
|---|---|---|---|
| Dry after washing | Every wash | Prevents mineral concentration | Requires time or drying aid |
| Avoid sprinklers | Every parking event | Removes the main repeat-exposure source | Not always possible |
| Use filtered or softened rinse water | Each wash | Reduces calcium residue | Equipment cost varies |
| Apply sealant or wax | Every 2-4 months | Makes deposits easier to remove | Does not prevent etching completely |
| Maintain ceramic coating | Per product instructions | Improves chemical resistance | Requires compatible cleaners |
Protection improves cleanability, not immunity. A wax, sealant, or ceramic coating cannot compensate for repeated hot sprinkler water drying on the paint.
FAQ
Can toothpaste remove etched water spots?
Toothpaste is an inconsistent abrasive and is not a controlled automotive paint-correction product. It may create haze or uneven gloss while failing to remove a deeper crater. Use a dedicated automotive polish on a test spot instead.
Will WD-40 remove water spots from car paint?
WD-40 can loosen some residue and make a panel appear cleaner, but it does not dissolve or level clear-coat etching. Its oily film can also hide the defect temporarily, so it should not replace a mineral remover or paint polish.
Can a car wash remove etched water spots?
A normal car wash can remove loose dirt and some fresh deposits, but it cannot repair a clear-coat depression. After washing, use a chemical mineral remover for residue and a controlled polish for remaining shallow etching.
Do water spots damage the base coat?
Most water spots begin in the clear coat. Base-coat damage becomes possible when etching or aggressive correction removes enough clear coat to expose the color layer, producing dullness, color change, or visible primer in severe cases.
How long can water spots sit before they etch?
There is no reliable universal deadline because water chemistry, temperature, sunlight, coating condition, and paint type differ. Fresh deposits can etch during a single hot drying cycle, while protected paint may tolerate longer exposure.
Should a professional remove deep water spots?
Professional help is appropriate when a fingernail catches, the defect covers multiple panels, the paint has prior repairs, or two careful test passes produce little improvement. A professional can assess paint thickness and choose correction or refinishing.
The Bottom Line
The safest answer to how to remove etched water spots from car paint is to diagnose before abrading. Wash and dry the vehicle, dissolve mineral deposits, clay only bonded contamination, and use a dual-action polish on the remaining shallow etch. Stop before clear-coat failure, then protect the corrected paint and prevent fresh sprinkler or tap-water residue from drying on the panel.


