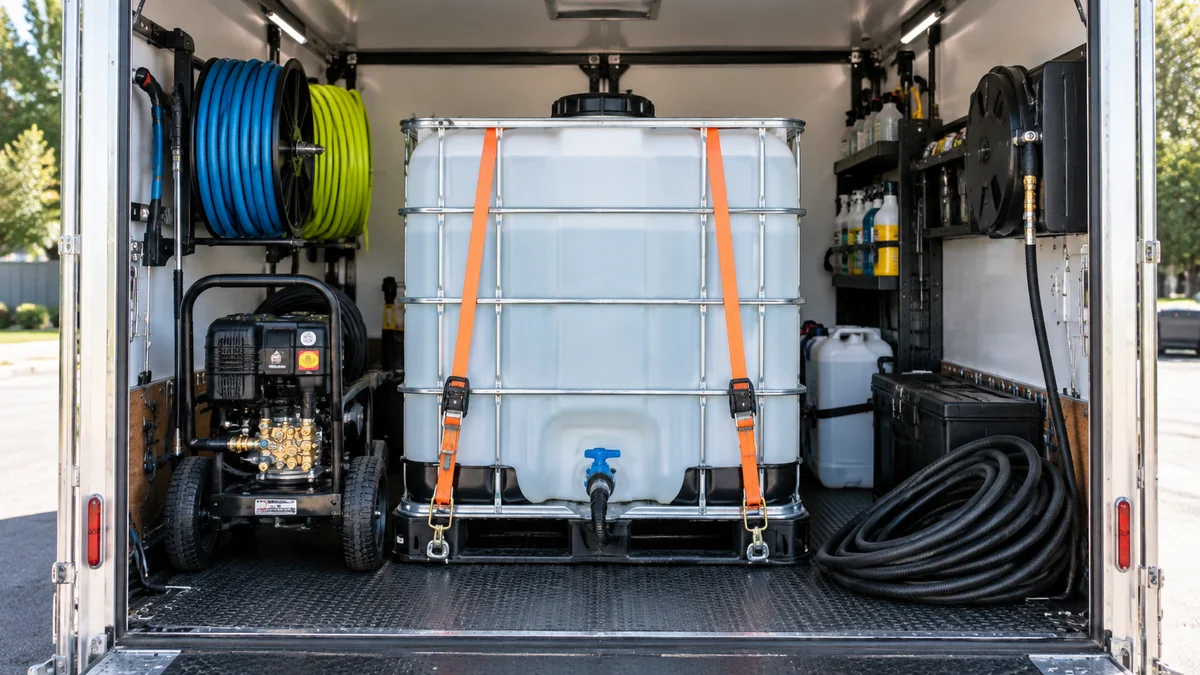
A mobile detailing water tank supplies independent water to a pressure washer, extractor, or low-water wash system. To set one up safely, calculate payload, choose a baffled tank, mount it over the axle, install a vented outlet with a shutoff and filter, and add a demand pump when gravity cannot meet the machine’s inlet-flow requirement.
Key facts
Water weighs 8.34 pounds per US gallon, so a full 100-gallon tank contains about 834 pounds of water.
A 50-100 gallon tank suits many part-time and full-time van or truck setups, but payload and axle ratings decide the safe limit.
A 1-inch tank outlet with a short, unrestricted suction hose reduces inlet starvation better than a 1/2-inch garden hose.
A pressure washer must receive adequate water volume at its inlet; a tank does not automatically provide sufficient pressure.
A vented cap, coarse inlet strainer, shutoff valve, and properly sized hose are foundational components.
UV-resistant polyethylene slows sunlight damage, but opaque storage and fresh water are more reliable algae controls.
What Equipment Does a Mobile Detailing Water Tank Need?
A mobile detailing water system normally includes a polyethylene tank, fill cap, vent, bottom outlet, shutoff valve, strainer, suction hose, pump if required, pressure washer, and electrical protection. The tank stores water; it does not create the inlet pressure that every pressure washer needs.
A practical system has two separate water paths. The fill path uses a large top opening or fill hose, while the outlet path carries water from the lowest practical tank port to the machine. Keeping the outlet short and above the vehicle’s protected floor area makes leaks easier to detect and repair.
The tank should be manufactured for vehicle use, with molded baffles or a shape that limits liquid movement. A translucent household rain barrel is a poor substitute because it may lack structural support, mounting provisions, chemical compatibility, and safe vehicle tie-down points.
How Much Water Does Mobile Detailing Require?
Typical water use ranges from 5-15 gallons per vehicle for an efficient maintenance wash and 15-30 gallons for a conventional pressure-washer detail with wheel cleaning, foam, rinsing, and final cleanup. Soil level, rinse technique, pressure-washer flow, and whether water reclamation is used create larger differences than the vehicle’s size alone.
| Work style | Typical water per vehicle | Vehicles from 50 gallons | Vehicles from 100 gallons |
|---|---|---|---|
| Rinseless wash | 2-4 gal | 12-25 | 25-50 |
| Efficient maintenance wash | 5-10 gal | 5-10 | 10-20 |
| Pressure-washer detail | 10-20 gal | 2-5 | 5-10 |
| Heavy soil and wheels | 20-30 gal | 1-2 | 3-5 |
These figures are practitioner planning ranges, not guaranteed outputs. A pressure washer rated at 2.0 GPM can theoretically use 120 gallons per hour while its trigger is continuously active, although real detailing includes pauses, chemical dwell time, wiping, and repositioning.
Calculate required capacity with this formula:
Required gallons = vehicles × gallons per vehicle + reserve gallons
A 6-car schedule using 12 gallons per vehicle plus a 20% reserve requires about 86 gallons. A 100-gallon tank therefore offers useful operating margin, while a 50-gallon tank would require a refill or a lower-water process.
Which Tank Size and Shape Should You Choose?
The best tank is the smallest tank that covers the planned route while remaining within payload and axle limits. A larger tank increases independence but reduces cargo capacity and changes braking, suspension, tire loading, and handling.
| Tank configuration | Typical capacity | Filled water weight | Practical use |
|---|---|---|---|
| Slimline upright | 50-100 gal | 417-834 lb | Small van, pickup, part-time route |
| Horizontal leg tank | 100-250 gal | 834-2,085 lb | Trailer or high-payload work vehicle |
| Skid or combo unit | 50-150 gal | 417-1,251 lb | Integrated pressure washer and generator |
| Compact auxiliary tank | 25-40 gal | 209-334 lb | Rinseless work or limited refill access |
Add the tank’s empty weight, pressure washer, generator, hose reels, chemicals, tools, occupants, and cargo. The resulting loaded weight must remain below the vehicle’s GVWR, and each axle must remain below its GAWR. A 200-gallon tank places approximately 1,668 pounds of water in the vehicle before equipment is added, which exceeds the useful payload of many half-ton vans and pickups.
Use the manufacturer’s tank load rating and vehicle documentation rather than suspension appearance. Helper springs can reduce sag, but they do not increase the legal GVWR, tire rating, brake capacity, or axle rating.
Where Should the Tank Sit?
Place the tank low, close to the vehicle’s longitudinal center, and preferably over or slightly forward of the rear axle when the vehicle manufacturer permits that loading pattern. Avoid a rear overhang position because it increases axle leverage and can unload the steering axle.
Measure both floor length and door clearance. A tank that fits through the door may still block emergency exits, restrict equipment access, or prevent inspection of fittings. Keep the outlet and service components reachable without removing the tank.
Should You Use Gravity Feed or a 12V Pump?
Use gravity feed when the pressure washer manufacturer permits tank operation and the tank outlet can provide the required inlet flow without air entering the line. Use a 12V demand pump when the machine needs positive inlet pressure, the tank sits low, or the hose run contains elevation and restrictions.
Gravity feed is simpler and quieter, with fewer electrical failure points. Its weakness is limited pressure head. A tank outlet only a few inches above the pump inlet may not overcome a fine filter, narrow fitting, long hose, or partially closed valve.
A demand pump should meet or exceed the pressure washer’s inlet-flow requirement. Many mobile systems use a 12V pump rated around 4.0-5.5 GPM, but the correct specification comes from the pressure washer manual, not from a generic pump label.
| Feed method | Typical flow capability | Advantages | Limitations |
|---|---|---|---|
| Gravity only | 1-5 GPM, system-dependent | Simple, quiet, low cost | Sensitive to hose restriction and tank height |
| 12V demand pump | 4-5.5 GPM typical | Positive supply, flexible layout | Requires wiring, fuse, strainer, maintenance |
| 120V transfer pump | 5-10 GPM typical | High flow for fixed operations | Needs inverter or shore power |
| Client garden hose | 3-10 GPM typical | No onboard water weight | Depends on permission and site pressure |
A pump rated at 5 GPM does not guarantee 5 GPM at the pressure washer. Actual output falls as discharge pressure, lift, hose length, and filter resistance increase. Install a pump inlet strainer, use the supplied wire gauge, and protect the circuit with a fuse near the battery.
What Parts Are Needed for the Plumbing?
Use a large outlet, full-port shutoff valve, coarse strainer, kink-resistant suction hose, and fittings that preserve internal diameter. A common arrangement is a 1-inch tank bulkhead, 1-inch ball valve, 1-inch strainer, then a short reducer only where the pump or pressure washer requires it.
| Component | Typical specification | Function | Installation rule |
|---|---|---|---|
| Tank bulkhead | 1-inch NPT or manufacturer size | Seals tank outlet | Use compatible gasket and thread type |
| Ball valve | 1-inch full-port | Isolates tank | Install immediately after bulkhead |
| Inlet strainer | 20-50 mesh | Stops debris | Mount before pump, clean routinely |
| Suction hose | 3/4-1 inch ID | Carries inlet water | Keep short, smooth, and kink-free |
| Demand pump | 4-5.5 GPM, 12V DC | Adds inlet pressure | Fuse and wire to manufacturer specification |
| Pressure regulator | Pump-compatible | Limits excessive pressure | Use only when the pump system requires it |
Thread sealant must match the fitting material and the manufacturer’s instructions. PTFE tape belongs on compatible tapered pipe threads, not between a bulkhead gasket and tank wall. Do not overtighten plastic fittings, because excessive torque can deform the tank wall or split the fitting.
How Do You Set Up the Tank Step by Step?
A typical installation takes 2-4 hours after all parts have arrived, excluding custom brackets, floor reinforcement, electrical routing, and leak-repair time. The factor that determines success is not installation speed; it is adequate payload capacity and unrestricted water delivery to the machine.
Before You Start
| Requirement | Typical planning value |
|---|---|
| Installation time | 2-4 hours |
| Tank capacity | 50-100 gallons for many vans |
| Water weight | 8.34 lb per gallon |
| Outlet size | 1 inch preferred for suction systems |
| Pump size | 4-5.5 GPM when required |
| Typical hardware budget | $350-$1,500 before vehicle work |
Confirm the vehicle GVWR, GAWR, tire ratings, tank mounting instructions, pressure-washer inlet requirements, pump voltage, hose sizes, and local rules for water discharge. Gather a baffled tank, mounting bands or brackets, ratchet straps rated for the load, ball valve, strainer, hose, clamps, fittings, sealant, fuse, wiring, and a leak-test water supply.
Step 1: Calculate Payload and Select the Tank
Multiply tank capacity by 8.34 to calculate water weight, then add every permanent and carried load. Select a smaller tank or larger vehicle if the loaded calculation approaches the GVWR or axle rating.
Success checkpoint: the fully loaded vehicle remains below GVWR and both axle ratings with a documented margin.
Common mistake: calculating only the tank water and ignoring the generator, reels, occupants, chemicals, and tools.
Step 2: Position the Tank Over the Axle Area
Place the tank low and central, keeping clear of wiring, fuel components, exhaust heat, doors, and emergency exits. Use a level floor or a manufacturer-approved support system that spreads the load rather than concentrating it at a few thin floor points.
Success checkpoint: the tank cannot contact sharp edges or move toward a door during braking.
Common mistake: placing a heavy tank at the extreme rear because it is convenient to load.
Step 3: Secure the Tank to the Vehicle
Use steel bands, a manufacturer-approved skid, or load-rated restraints attached to structural mounting points. Ratchet straps alone are acceptable only when they are correctly rated, protected from cutting, and anchored to suitable structure; cargo hooks in thin interior trim are not structural anchors.
A 100-gallon tank contains 834 pounds of moving water. Braking forces can multiply the effective load, especially when the tank is partially full and liquid movement is unrestricted.
Success checkpoint: the tank does not shift when pushed forcefully in every direction.
Common mistake: securing a tank to plywood flooring without checking the floor’s attachment to the vehicle structure.
Step 4: Install the Outlet and Shutoff Valve
Use the lowest manufacturer-provided outlet, install the correct gasket, and tighten the bulkhead according to the tank instructions. Install a full-port ball valve immediately downstream so the tank can be isolated for service.
Most bulkhead nuts use conventional threads, although designs vary by manufacturer. Do not assume a leak is caused by a left-handed nut. Inspect the gasket, tank wall, fitting compatibility, and tightening force first.
Success checkpoint: the valve closes fully and the bulkhead remains dry during a low-level test.
Common mistake: using excessive PTFE tape to compensate for a damaged gasket or mismatched thread.
Step 5: Add the Strainer and Water Hose
Install a cleanable strainer before the pump, with the flow arrow pointing toward the pump. Use 3/4-inch or 1-inch suction hose, keep it short, and avoid tight bends, low spots that trap air, and ordinary garden hose that can collapse under suction.
Success checkpoint: water reaches the pump without visible bubbles, hose collapse, or a rattling strainer.
Common mistake: placing a fine filter on the suction side and creating a pressure drop that starves the pump.
Step 6: Install the Pump and Electrical Protection
Mount the 12V demand pump on a vibration-resistant surface near the tank, ideally below the tank’s water level when the manufacturer allows it. Wire the pump through an appropriately sized fuse, switch, and ground connection; follow the pump maker’s wire-size chart rather than guessing from the motor label.
A demand pump should stop when the trigger is released if its pressure switch is functioning. An accumulator tank can reduce rapid cycling in some systems, but it does not repair an undersized hose or clogged strainer.
Success checkpoint: the pump primes, stops at shutoff, and does not overheat during several on-off cycles.
Common mistake: powering a 12V pump through a small accessory socket that overheats under continuous current.
Step 7: Vent the Tank and Install the Fill System
The tank must admit air as water leaves. Use the manufacturer’s vented cap or a properly protected vent that prevents water entry while allowing air exchange; never operate a sealed tank outlet system.
An optional float valve can stop an incoming hose at a set level, but it is not a complete overflow system. Install an accessible manual shutoff, use an air gap or approved backflow protection where required, and never leave a pressurized fill hose unattended.
Success checkpoint: water flows continuously without tank deformation, vacuum noise, or pump starvation.
Common mistake: drilling an unprotected vent low on the tank where spilled water can enter the vehicle.
Step 8: Flush, Prime, and Test the System
Fill the tank with clean water, open the outlet valve slowly, flush debris through the hose, and prime the pump according to its manual. Inspect every fitting while the pump cycles and while the pressure washer runs at full demand.
Success checkpoint: the pressure washer maintains stable operation for at least five minutes without sputtering or visible leaks.
Common mistake: testing only with the pressure washer trigger released, when the system has almost no flow demand.
How Do You Maintain Water Quality and the Tank?
Use opaque storage, keep the fill cap closed, and avoid leaving warm water in sunlight for long periods. UV-resistant polyethylene slows degradation, but it does not prevent algae when light, heat, and nutrients are present.
Drain the tank when the vehicle will sit for an extended period. At a practical maintenance interval, inspect the tank, cap, vent, bulkhead, valve, strainer, hose, pump, straps, and electrical connections weekly, then clean the tank according to the tank and cleaning-product manufacturer’s instructions.
Do not add automotive chemicals, bleach, or disinfectants without confirming material compatibility and required flushing. Water intended for vehicle washing is not automatically potable, and potable-water rules may apply if the same equipment is used for drinking-water transport.
What Does a Mobile Detailing Water Setup Cost?
Typical equipment-only cost ranges from $350 for a basic 50-gallon gravity system to more than $2,000 for an integrated skid with a tank, pressure washer, generator mounts, pump, and plumbing. Vehicle reinforcement, professional fabrication, electrical work, and taxes can materially increase the total.
| Setup level | Tank and plumbing cost | Pump or equipment cost | Typical total |
|---|---|---|---|
| 50-gallon gravity setup | $150-$400 | $0-$500 | $350-$900 |
| 90-100 gallon pumped setup | $250-$650 | $150-$700 | $600-$1,500 |
| 100-150 gallon skid | $500-$1,200 | $500-$1,500 | $1,000-$2,700 |
| 200-gallon trailer system | $400-$900 | $1,000-$3,000 | $1,500-$4,500 |
A low purchase price is not economical if the system overloads the vehicle or repeatedly starves the pressure washer. A smaller tank paired with a refill plan can cost less and handle better than an oversized tank used at partial fill.
What Are the Common Problems and Fixes?
The Pressure Washer Sputters or Loses Pressure
Check the tank vent, water level, outlet valve, suction hose, strainer, and every connection on the inlet side. Air leaks before the pump can cause sputtering even when no water visibly leaks out.
Clean the strainer and flush plastic shavings left from installation. If the fault remains, compare the pump’s actual flow under load with the pressure washer’s specified inlet requirement.
The Pump Runs Continuously
A pump that never stops usually has an open downstream valve, a leak, inadequate pressure, a blocked inlet, or a failed pressure switch. Close the spray trigger and inspect the system methodically rather than letting the motor run until it overheats.
The Bulkhead Leaks
Drain the tank, remove the fitting, inspect the gasket and tank wall, and reinstall the assembly squarely. Sealant cannot correct a split tank, distorted gasket, cross-threaded fitting, or incompatible bulkhead.
The Tank Sloshes During Braking
Use a properly baffled vehicle tank and keep the load secured. A half-full tank can be more destabilizing than a full tank because the free surface allows greater liquid movement.
Loose “baffle balls” are not a universal repair. They may be incompatible with the tank opening, difficult to clean, and ineffective compared with molded internal baffles or a correctly designed tank.
Water Turns Green or Smells
Drain the tank, clean it with a compatible product, flush it thoroughly, and reduce light exposure. Do not mask the problem with fragrances or unverified chemicals that can leave residue on paint.
Which Setup Fits Your Vehicle and Workload?
Small SUV or Pickup
Choose a 25-50 gallon tank for rinseless or low-water work when payload is limited. A 50-gallon tank weighs 417 pounds full, before the container and equipment, so tie-downs and axle loading still require inspection.
Cargo Van With a Daily Route
A 90-100 gallon baffled tank with a 12V pump is a practical configuration when the van’s payload supports it. This arrangement provides roughly 5-10 pressure-washer vehicles at 10-20 gallons each, with the actual count determined by technique and reserve planning.
Trailer or High-Payload Work Truck
A 150-250 gallon horizontal tank can support commercial vehicles and high-volume washing, but the trailer axle, coupler, tires, brakes, and tongue weight must be rated for the filled load. A 250-gallon tank carries about 2,085 pounds of water alone.
Sites With Reliable Client Water
A hose connection or hybrid system may be safer and cheaper when customers consistently provide suitable water. Carrying a small emergency tank preserves independence without permanently transporting several hundred pounds on every route.
FAQ
Can I Put a Water Tank in a Regular Van?
Yes, if the filled tank, equipment, passengers, and cargo remain within the van’s GVWR, axle ratings, tire ratings, and mounting requirements. A regular van may physically hold a 100-gallon tank while lacking the payload or floor structure to carry it safely. Confirm the ratings before purchasing the tank.
What Hose Size Should Connect the Tank to the Pump?
Use a 3/4-inch or 1-inch internal-diameter suction hose for many mobile detailing systems, with 1 inch preferred for longer runs or higher-flow equipment. The pressure washer or pump manual controls the final requirement. A narrow hose, sharp bends, or restrictive fittings can cause cavitation.
Can I Use Rainwater in a Detailing Tank?
Rainwater can contain sediment, organic material, roof residue, and minerals that clog strainers or mark paint. Use it only after appropriate filtration and testing, and confirm local rules. Municipal or properly treated water is more predictable for professional work, especially when a pressure washer has fine inlet components.
How Often Should I Clean a Mobile Detailing Tank?
Inspect the tank and strainer weekly, and clean the tank whenever sediment, odor, discoloration, or biological growth appears. Empty storage during extended downtime reduces contamination. The exact cleaning product and interval depend on water quality, temperature, tank material, and the manufacturer’s maintenance instructions.
Is a Float Valve Necessary?
A float valve is optional and useful when a hose fills the tank at a fixed location, but it does not eliminate overflow risk. Use a manual shutoff, visible overflow control, and required backflow protection. Never leave a filling tank unattended, even when a float valve is installed.
Do I Need Water-Reclamation Equipment?
Water reclamation is valuable where local rules restrict wash-water discharge or where storm drains could receive detergent and sediment. Reclamation adds tanks, filters, pumps, weight, and maintenance. Check local environmental requirements before operating, because discharge rules differ by municipality and work site.
The Bottom Line
To set up a water tank for mobile detailing, select the smallest baffled polyethylene tank that meets the route’s water demand, verify the vehicle’s loaded GVWR and axle limits, mount the tank low and centrally, and secure it to structural points. Use a vented 1-inch outlet path, a full-port valve, a cleanable strainer, and a short large-diameter hose. Add a fused 12V demand pump when gravity cannot satisfy the pressure washer’s inlet requirement. Test the system under full flow before taking it to a customer.