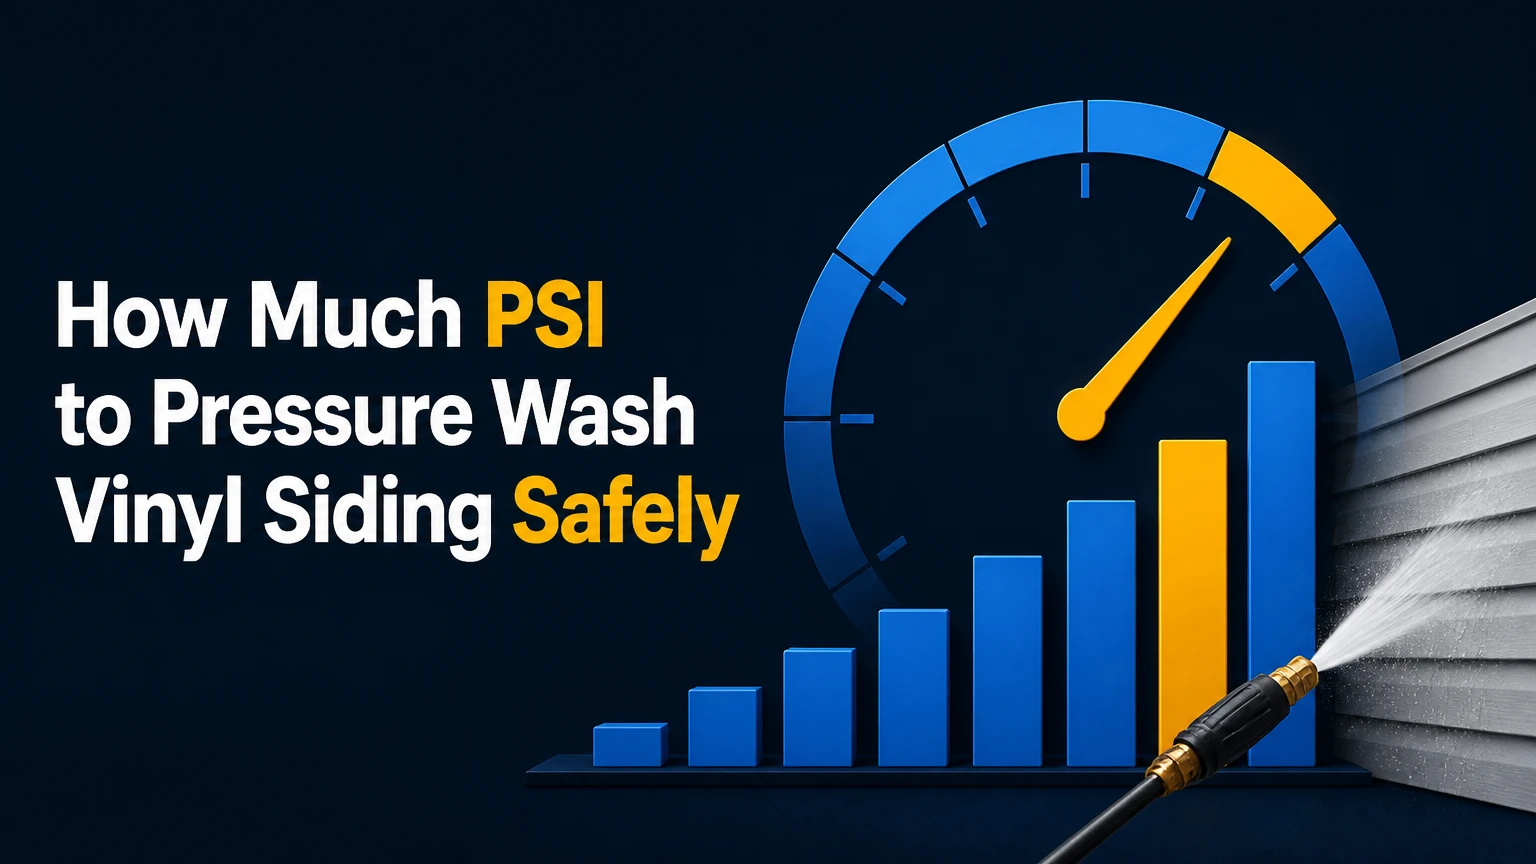
The practical pressure range for washing vinyl siding is usually 1,000-1,600 PSI at the surface, with 1,300-1,600 PSI commonly used for sound, residential siding and a wide-angle nozzle. Start lower, keep the wand 12-24 inches away, spray downward, and let detergent remove the grime. Pressure above 2,000 PSI increases the risk of cracking panels and driving water behind overlaps.
Key Facts at a Glance
- A 1,000-1,300 PSI starting setting is safer for older, brittle, thin, or previously damaged vinyl siding.
- A 1,300-1,600 PSI working range is suitable for many intact vinyl siding installations when used with a 25-degree or 40-degree nozzle.
- A pressure washer’s advertised PSI is its maximum rating, not necessarily the pressure reaching the siding.
- A 40-degree nozzle, 12-24 inch working distance, and downward spray angle reduce concentrated impact.
- Detergent and dwell time remove mold, algae, pollen, and traffic film more safely than high pressure alone.
- Never use a 0-degree red nozzle on vinyl siding, and do not spray upward into panel seams.
What PSI Is Safe for Vinyl Siding?
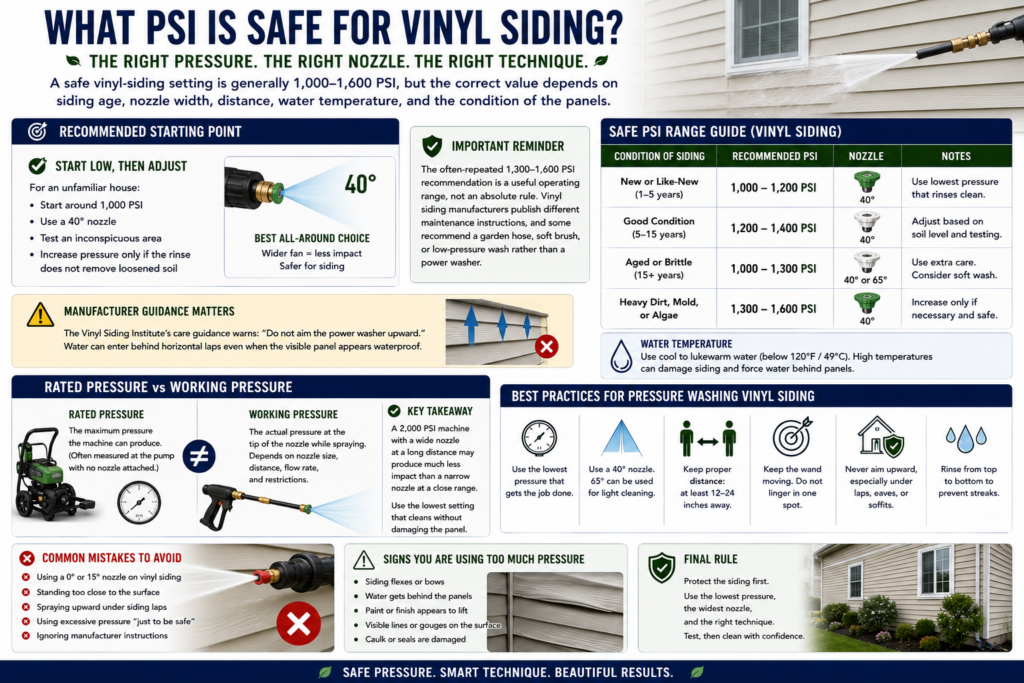
A safe vinyl-siding setting is generally 1,000-1,600 PSI, but the correct value depends on siding age, nozzle width, distance, water temperature, and the condition of the panels. For an unfamiliar house, begin around 1,000 PSI with a 40-degree nozzle, test an inconspicuous area, and increase pressure only when the rinse does not remove loosened soil.
The often-repeated 1,300-1,600 PSI recommendation is a useful operating range, not an absolute rule. Vinyl siding manufacturers publish different maintenance instructions, and some recommend a garden hose, soft brush, or low-pressure wash rather than a power washer. The Vinyl Siding Institute’s care guidance warns: “Do not aim the power washer upward.” That instruction matters because water can enter behind horizontal laps even when the visible panel appears waterproof.
The most important distinction is between rated pressure and working pressure. A 2,000 PSI electric machine may produce considerably less pressure through a wide nozzle at a long distance, while a narrow nozzle on a lower-rated machine can create a sharply concentrated stream. Use the lowest setting that cleans the surface without flexing, lifting, or marking the panel.
Is 2,000 PSI Too Much for Vinyl Siding?
Two thousand PSI is not automatically destructive, but it is unnecessarily aggressive for most vinyl siding and leaves little margin for error. A narrow tip, short distance, damaged panel, or upward angle can cause harm well below that number, while a wide nozzle used from farther away may be less forceful at the siding.
| Condition | Starting pressure | Nozzle | Working distance |
|---|---|---|---|
| New, intact vinyl siding | 1,200 PSI | 40-degree white | 18-24 inches |
| Typical residential siding | 1,300 PSI | 25-degree green | 18-24 inches |
| Aged or brittle siding | 800-1,000 PSI | 40-degree white | 24-36 inches |
| Heavy organic staining | 1,000-1,300 PSI plus detergent | 25-degree green | 18-30 inches |
| Painted or previously repaired siding | 600-1,000 PSI | 40-degree white | 24-36 inches |
A machine set to 2,500-4,000 PSI can still be used by an experienced operator if pressure is reduced through the machine’s regulator, a wide nozzle, a downstream injector, or greater distance. A homeowner should not rely on a nozzle alone to tame an oversized gas machine without testing the actual result.
How Do PSI, GPM, and Nozzle Angle Work Together?
PSI measures water force, GPM measures water volume, and the nozzle determines how concentrated that force becomes. Vinyl siding cleaning works best when detergent loosens contamination and sufficient GPM carries the contamination away, rather than when high PSI strips the surface mechanically.
PSI, or pounds per square inch, describes pressure. GPM, or gallons per minute, describes flow. Cleaning effectiveness depends on both, often expressed by contractors as cleaning units:
Cleaning units = PSI × GPM
A 1,300 PSI machine flowing 1.8 GPM produces about 2,340 cleaning units before losses from the hose, gun, nozzle, and distance. That figure does not mean the siding receives a uniform 2,340 units, but it explains why a higher-flow machine can rinse faster without requiring a sharper stream.
A wide nozzle spreads water across a larger area. A 40-degree tip is gentler than a 25-degree tip at the same distance and pressure. A black soap nozzle normally applies detergent at low pressure, while a red 0-degree nozzle concentrates water into a dangerous point and should not be used on vinyl.
Which Pressure Washer and Nozzle Should You Use?
For most homeowners, an electric pressure washer producing approximately 1,300-2,000 maximum PSI and 1.2-2.0 GPM is easier to control than a high-output gas machine. Use a 40-degree nozzle for the initial rinse and delicate areas, then use a 25-degree nozzle only when the wider spray does not remove loosened dirt.
| Equipment option | Typical output | Best siding use | Main limitation |
|---|---|---|---|
| Electric pressure washer | 1,300-2,000 PSI, 1.2-2.0 GPM | One-story homes and controlled rinsing | Slower coverage on large homes |
| Gas pressure washer | 2,500-4,000 PSI, 2.5-4.0 GPM | Experienced operators and fast rinsing | Excess pressure can damage panels |
| Soft-wash pump | 150-500 PSI, high chemical volume | Mold, algae, and two-story house washing | Requires chemical handling and runoff control |
| Garden hose with siding cleaner | 40-80 PSI, 5-10 GPM typical household flow | Light dust and routine maintenance | Limited removal of embedded organic staining |
A practical equipment rule is to buy or rent for flow and control, not the highest PSI printed on the box. High GPM shortens rinsing time, but a gas washer with a 3,500 PSI rating should be regulated before it reaches vinyl.
How Does Soft Washing Compare With Pressure Washing?
Soft washing is safer for fragile, oxidized, tall, or heavily stained siding because it uses chemical action at roughly 150-500 PSI. Standard pressure washing is more accessible for light dirt on intact panels, but it transfers more risk to the operator’s distance, angle, and nozzle control.
Soft washing typically applies a diluted detergent or sodium hypochlorite solution with surfactant, allows several minutes of dwell time, and rinses with low mechanical pressure. Organic growth is chemically treated instead of being scraped from the panel by force. Sodium hypochlorite can damage plants, metals, fabrics, and painted surfaces, so pre-rinsing and post-rinsing are mandatory.
| Cleaning method | Typical pressure | Organic growth result | Suitable height | Operator risk |
|---|---|---|---|---|
| Garden hose wash | 40-80 PSI | Removes loose dust | One story | Low |
| Electric pressure wash | 1,000-1,600 PSI | Removes treated growth and soil | One to two stories with extension | Moderate |
| Gas pressure wash | 1,500-2,500 PSI after regulation | Fast rinse on sound siding | Ground-level work | High |
| Soft wash | 150-500 PSI | Chemically kills algae and mildew | Two to three stories from ground | Chemical exposure and runoff |
Soft washing is not risk-free. It is not appropriate to spray a bleach solution near unprotected landscaping, aluminum, electrical equipment, or a neighbor’s property. Pressure washing is not automatically wrong either; it is effective when used as a controlled rinse after chemistry has done most of the cleaning.
How Do You Pressure Wash Vinyl Siding?
A typical 2,000-square-foot house takes 3-6 hours for a careful DIY wash, including setup, plant protection, detergent dwell time, and cleanup. The factor that most determines success is controlled water direction, not maximum pressure.
Before You Start
| Requirement | Typical specification |
|---|---|
| Time | 3-6 hours for a 2,000-square-foot home |
| Difficulty | Moderate for one story, high for two stories |
| Equipment | 1,000-1,600 PSI working pressure, 1.2-2.0 GPM |
| Nozzles | 40-degree white, 25-degree green, black soap nozzle |
| Cleaning solution | Manufacturer-approved siding detergent, mixed as labeled |
| Protection | Garden hose, plastic sheeting, gloves, eye protection |
| Prerequisites | Sound panels, closed windows, stable footing, test patch |
Do not pressure wash loose, cracked, warped, or visibly perforated panels before repairing them. Keep ladders out of the process whenever possible because a pressure-washer recoil can upset balance.
Step 1: Inspect and Protect the House
Close windows and doors, disconnect outdoor electronics, cover sensitive electrical outlets according to local safety guidance, and move furniture away from the wall. Check caulk joints, dryer vents, hose bibs, window trim, and panel overlaps for openings.
Pre-rinse grass, shrubs, and flowers with clean water. Wet leaves absorb less diluted detergent than dry leaves, but water alone does not make plants immune to bleach or strong alkaline cleaners.
Success checkpoint: Every opening is closed, every fragile object is moved, and nearby plants are visibly saturated with clean water.
Common mistake: Starting at the siding before noticing a damaged seam or open window screen.
Step 2: Test the Lowest Effective Pressure
Set the machine to approximately 1,000 PSI if adjustable, install the 40-degree nozzle, and test behind a downspout or in another inconspicuous location. Hold the wand 24 inches away, keep it moving, and inspect the panel after it dries for distortion, gloss change, or embedded water marks.
Increase toward 1,300-1,600 PSI only if the detergent and wide spray cannot rinse away the loosened soil. Never begin by placing the nozzle close to the wall.
Success checkpoint: The test area looks clean without panel flexing, surface scoring, color change, or water entering behind the siding.
Common mistake: Testing only while the panel is wet, when oxidation and streaks are difficult to see.
Step 3: Apply Detergent From Bottom to Top
Install the black soap nozzle or use a downstream injector, then apply a siding-safe detergent from the bottom upward. The bottom-up direction helps prevent dirty vertical streaks from forming when solution runs across dry, contaminated sections.
Follow the product label for dilution. Do not combine bleach with ammonia, acids, solvents, or other cleaners. A surfactant helps the solution cling to vertical panels instead of immediately running onto the ground.
Success checkpoint: The siding is evenly wet, with no rapidly drying patches and no concentrated runoff pooling around plants.
Common mistake: Applying detergent in direct sun or high wind, which shortens dwell time and increases overspray.
Step 4: Allow Five to Ten Minutes of Dwell Time
Let the detergent work for approximately 5-10 minutes, but do not allow it to dry. Reapply a light amount to areas that begin drying, particularly south-facing walls and dark panels that heat quickly.
Mildew, algae, pollen, and atmospheric film respond differently to chemistry. A black or green organic stain may need a second treatment rather than higher pressure, while oxidation and chalk are not reliably solved by detergent.
Success checkpoint: Surface contamination wipes or rinses away easily without aggressive wand movement.
Common mistake: Assuming a longer dwell always improves cleaning. Dried cleaner can leave residue and create uneven color.
Step 5: Rinse From Top to Bottom
Switch to the 40-degree nozzle first. Rinse from the highest cleaned section downward, using overlapping horizontal passes and a straight-on or slightly downward angle. Keep the wand 12-24 inches away, increasing the distance for brittle panels or strong machines.
Use the 25-degree nozzle only where necessary, and keep the spray moving. Do not direct water upward beneath laps, into soffit vents, behind window trim, or toward door and window weep holes.
Success checkpoint: Water flows downward across the face of the siding, and no dirty stripe remains below a trim line.
Common mistake: Holding the nozzle stationary to remove one stubborn mark, which can etch the finish or deform the panel.
Step 6: Flush Plants and Inspect the Wall
Rinse all landscaping again with clean water, especially leaves, soil around foundation plants, and areas receiving runoff. Inspect windows, crawl-space vents, electrical equipment, hose connections, and interior walls near the washed exterior.
Walk around the house after the siding dries. Look for loose panels, new streaks, chalky patches, lifted edges, and water behind trim.
Success checkpoint: Plants are fully flushed, runoff has stopped, and the interior shows no dampness or leakage.
Common mistake: Ending the job when the visible siding looks clean without checking the wall penetrations and foundation edge.
What Nozzle, Distance, and Angle Prevent Damage?
A 40-degree nozzle at 18-24 inches is the safest general starting combination for intact vinyl siding. A 25-degree nozzle can improve rinsing on stubborn contamination, but the operator should step back, reduce pressure, and maintain a downward angle before narrowing the spray.
| Nozzle | Spray pattern | Vinyl-siding recommendation | Typical use |
|---|---|---|---|
| 0-degree red | 0 degrees | Do not use | Concrete and specialized spot work |
| 15-degree yellow | 15 degrees | Generally avoid | Hard masonry at controlled distance |
| 25-degree green | 25 degrees | Limited use at 18-24 inches | Rinsing sound, dirty siding |
| 40-degree white | 40 degrees | Preferred starting nozzle | General siding rinse |
| Soap black | Low-pressure fan | Use for detergent | Applying labeled siding cleaner |
Spray perpendicular to the panel face or slightly downward. Horizontal water directed into an overlap can bypass the drainage design, while upward water can enter behind the cladding and wet sheathing or insulation.
An expert rule of thumb is to move the wand closer only after reducing pressure, never closer because the surface is difficult. Impact rises quickly as distance shrinks, and a nozzle that seems harmless from 24 inches can mark vinyl at 4-6 inches.
What Are the Main Failure Modes?
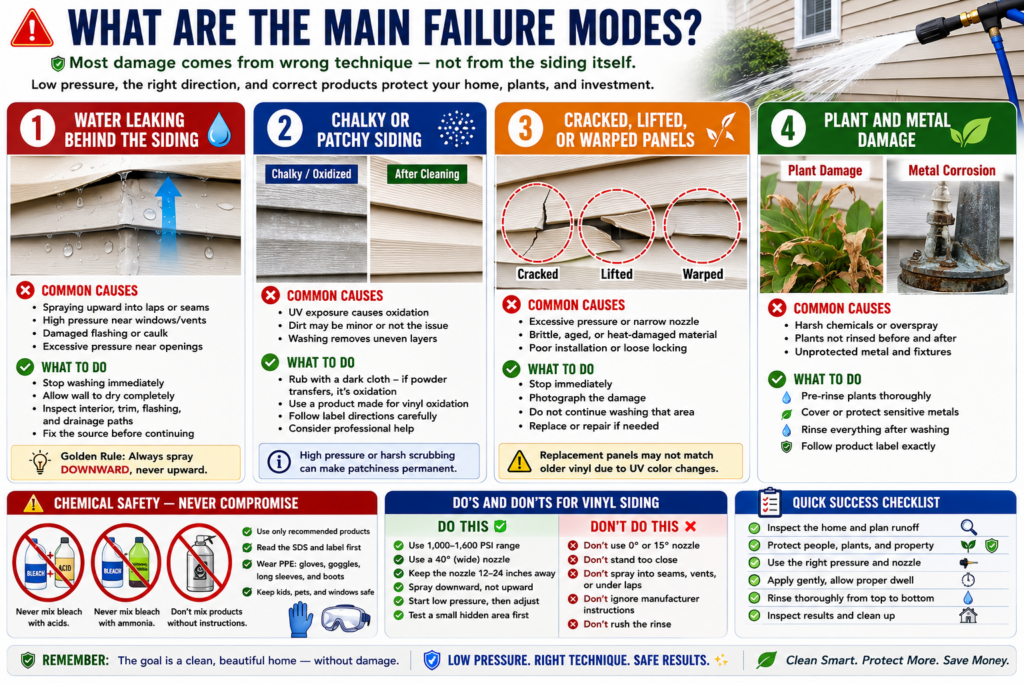
Most vinyl-siding damage comes from concentrated impact, water intrusion, chemical misuse, or pre-existing oxidation rather than from a correct low-pressure rinse. The following problems require different fixes, so repeating the wash at higher PSI can make each one worse.
Water Leaking Behind the Siding
Water behind siding usually results from upward spraying, direct spraying into joints, damaged flashing, or excessive pressure near windows and vents. Stop washing, allow the wall to dry, and inspect the interior, trim, flashing, and drainage paths before continuing.
The Vinyl Siding Institute and manufacturers commonly emphasize downward spray direction because vinyl panels are designed to shed rain from above, not resist a pressurized stream driven underneath the lap.
Chalky or Patchy Siding
Chalky white residue usually indicates oxidation from ultraviolet exposure, not ordinary dirt. Pressure washing can remove oxidation unevenly and reveal brighter patches, creating a blotchy appearance that detergent cannot correct.
Test for oxidation by rubbing a dry, inconspicuous area with a clean dark cloth. If powder transfers, use a product specifically labeled for vinyl oxidation and follow its instructions, or hire a siding-cleaning professional. Abrasive scrubbing and high pressure can permanently worsen the color variation.
Cracked, Lifted, or Warped Panels
Cracking, lifting, and warping indicate excessive impact, brittle material, heat distortion, or an existing installation problem. Stop immediately and photograph the area, because continuing can spread a split through the panel or unhook adjacent courses.
Replacement panels may not match older vinyl because UV exposure changes color over time. A repair estimate should account for panel availability, color matching, and whether the locking strip remains intact.
Plant or Metal Damage
Bleach-based cleaners can burn foliage and corrode unprotected aluminum, copper, light fixtures, and painted hardware. Pre-rinse plants, cover sensitive metal, control overspray, and flush everything after cleaning.
Never mix sodium hypochlorite with acids or ammonia. Toxic gases can form, and a siding project is not an appropriate setting for improvised chemical combinations.
How Much Does Vinyl Siding Cleaning Cost?
Typical DIY costs range from $40-$80 for a rental or $90-$300 to purchase a basic electric washer, while professional house washing commonly costs $250-$800 or more, depending on size, stories, access, local labor, and treatment requirements. Siding-only estimates often fall around $0.20-$0.50 per square foot, but companies price small jobs with minimum charges.
| Project type | Typical price | Typical duration | Main cost variable |
|---|---|---|---|
| DIY electric washer purchase | $90-$300 | 3-6 hours | Equipment already owned |
| Gas washer rental | $40-$80 per day | 2-5 hours | Rental class and transport |
| One-story professional wash | $250-$400 | 1-2 hours | Home size and minimum fee |
| Two-story professional wash | $400-$800+ | 1-3 hours | Height, access, and soft-wash chemistry |
| Siding-only service | $0.20-$0.50 per square foot | 1-3 hours | Surface area and staining |
Professional time estimates assume commercial equipment, setup, plant protection, and rinsing. A low quote may exclude oxidation treatment, heavy organic growth, detached structures, or difficult rear elevations.
When Should You Hire a Professional?
Hire an insured professional when the home is three or more stories, siding is heavily oxidized or brittle, water cannot be kept out of openings, or chemical treatment is required near delicate landscaping and neighboring property. Professional equipment can reach higher elevations from the ground, but operator training and liability coverage matter more than machine size.
A professional is also appropriate when a two-story home requires ladder work. A live pressure wand adds recoil and hose hazards, and a ladder does not provide a stable platform for controlled spray direction.
Which Method Fits Each Situation?
| Situation | Recommended method | Working pressure | Reason |
|---|---|---|---|
| Light dust on one-story siding | Garden hose or electric rinse | 40-1,000 PSI | Low impact is sufficient |
| Typical dirt on sound vinyl | Detergent plus electric wash | 1,000-1,600 PSI | Controlled mechanical rinse |
| Green algae or mildew | Soft wash followed by rinse | 150-500 PSI | Chemistry treats organic growth |
| Brittle, chalky siding | Professional low-pressure cleaning | 150-1,000 PSI | Limits finish loss and cracking |
| Three-story exterior | Insured professional service | 150-500 PSI typical | Reduces ladder and overspray hazards |
The best method is the one that removes the contamination with the least force and the fewest access hazards. That is why many professional house-washing crews use a soft-wash process even when their equipment could produce much higher pressure.
FAQ
Can I Pressure Wash Vinyl Siding With a Garden Hose?
Yes, a garden hose can clean loose dust, pollen, and light surface dirt, especially when paired with a siding-cleaner attachment. Household hose pressure is commonly around 40-80 PSI, so the method is gentle but may not remove embedded algae, oxidation, or heavy traffic film without brushing or chemical dwell time.
How Often Should Vinyl Siding Be Washed?
Most homes need vinyl siding cleaning every 1-3 years, although shaded, humid, tree-covered, or coastal properties may need annual washing. Clean sooner when algae spreads, mildew returns, or pollen accumulates in textured areas. Frequent high-pressure cleaning is not better maintenance because repeated impact can shorten the finish’s service life.
Can I Use Hot Water on Vinyl Siding?
Use only the water temperature permitted by the pressure-washer and siding-cleaner manufacturers. Excessive heat can soften, distort, or warp vinyl panels, particularly in direct sunlight. Cold or ordinary warm tap water is the safer default for residential vinyl unless a product label specifically allows heated cleaning.
Does Pressure Washing Remove Mold From Vinyl Siding?
Pressure washing can remove visible mold, mildew, and algae, but water pressure alone may leave biological residue and can spread contaminated runoff. A properly diluted siding-safe cleaner, suitable dwell time, and low-pressure rinse produce a more complete result. Persistent growth may indicate shade, moisture, blocked gutters, or poor drainage.
Can I Pressure Wash Painted Vinyl Siding?
You can clean painted vinyl siding, but use lower pressure, a 40-degree nozzle, and a test patch because paint may be less firmly bonded than the original factory finish. Begin around 600-1,000 PSI, avoid concentrated spray, and stop if pigment transfers to the rinse water or the coating changes sheen.
What Should I Do if Water Gets Behind Vinyl Siding?
Stop spraying and allow the wall to dry before checking the interior, window trim, flashing, soffits, and siding laps. Look for damp drywall, staining, musty odor, or soft trim. If symptoms persist, contact a siding or building-envelope professional rather than sealing drainage openings that are designed to let incidental water escape.
The Bottom Line
For how much PSI to pressure wash vinyl siding, begin at 1,000-1,300 PSI, use a 40-degree nozzle from 18-24 inches away, and increase toward 1,300-1,600 PSI only when the siding is sound and detergent has loosened the soil. Keep every pass downward, avoid seams and weep holes, and never use a 0-degree tip. Soft washing at 150-500 PSI is the safer choice for organic growth, oxidation, fragile panels, and tall homes.
Title tag: How Much PSI to Pressure Wash Vinyl Siding: Safe Range
Meta description: Start at 1,000-1,300 PSI, choose a 40-degree nozzle, and avoid water intrusion. Compare tools, costs, steps, and fixes before you wash.


