To clean vinyl siding without scrubbing, apply a siding-safe soft-wash solution, let it dissolve algae, mildew, and grime for 5-10 minutes, then rinse with a garden hose from top to bottom. The result depends more on keeping the solution wet and choosing the correct chemical than on water pressure.
Key Facts at a Glance
- A garden hose rinse can remove chemically loosened dirt without a pressure washer.
- Apply cleaning solution from bottom to top, then rinse from top to bottom.
- Never allow a bleach or detergent solution to dry on vinyl siding.
- Household chlorine bleach must never be mixed with ammonia, acids, or other cleaners.
- Typical DIY material cost ranges from $8-$40, depending on the cleaner and sprayer.
- Oxidation, rust, and mineral deposits may not respond to a no-scrub biological cleaner.
What Does No-Scrub Vinyl Siding Cleaning Mean?
No-scrub vinyl siding cleaning is a low-pressure chemical washing process that uses surfactants and an oxidizing or biocidal ingredient to loosen contamination before a garden hose removes it. The method is appropriate for routine dirt, green algae, mildew, and many surface mold stains, but it cannot repair oxidized plastic or remove every mineral deposit.
Soft washing has two separate jobs. The cleaning solution changes or loosens the contaminant, while the rinse carries the residue away. A hose without sufficient dwell time often leaves stains behind, and a strong spray without chemical treatment can force water behind siding laps.
The Vinyl Siding Institute recommends following the siding manufacturer’s cleaning instructions because color, finish, installation condition, and warranty requirements vary. CertainTeed, for example, provides manufacturer-specific guidance for vinyl siding and warns against using harsh techniques that can damage the surface.
How does the cleaning solution work?
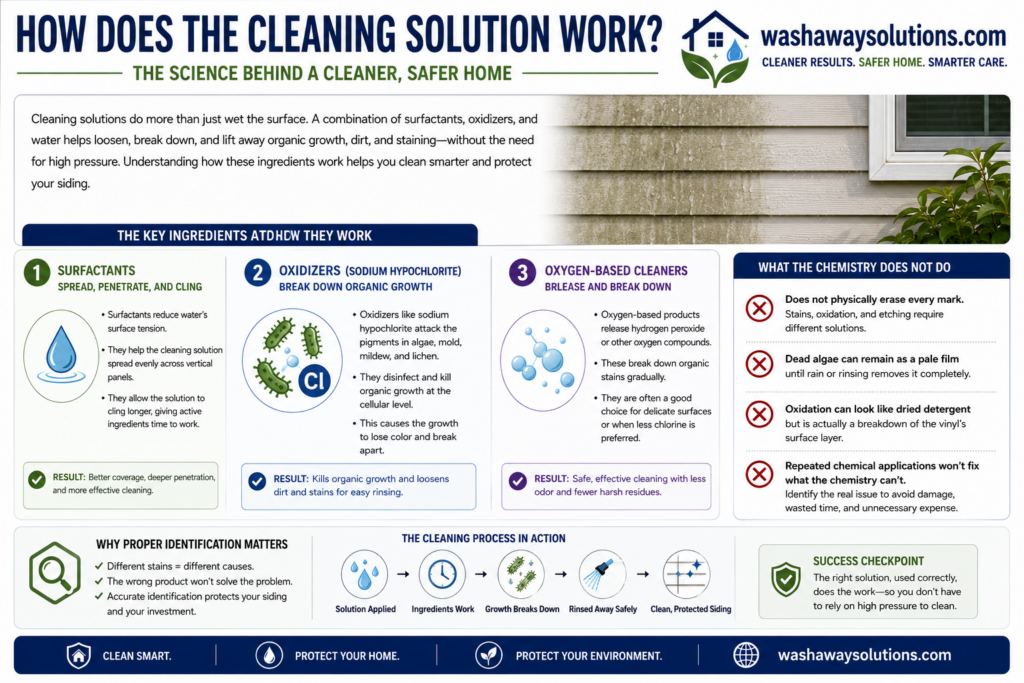
Surfactants reduce water’s surface tension, helping a diluted cleaner spread across vertical panels and cling long enough to work. Oxidizers such as sodium hypochlorite attack organic pigments and growth, while oxygen-based products release peroxide compounds that gradually break down some organic staining.
The chemistry does not physically erase every mark. Dead algae can remain as a pale film until rain or rinsing removes it, and oxidation can look similar to dried detergent. Correct identification prevents repeated chemical applications that cannot solve the underlying defect.
Before You Start: Tools, Time, and Safety
A typical one-story vinyl siding wash takes 1-3 hours, including preparation and plant rinsing, and costs $8-$40 in materials. The minimum setup is a garden hose, low-pressure spray nozzle, pump sprayer or hose-end applicator, protective eyewear, chemical-resistant gloves, and a siding-compatible cleaner.
| Requirement | Typical specification | Why it matters |
|---|---|---|
| Work time | 1-3 hours for 1,500-2,000 square feet | Includes setup, application, dwell, rinsing |
| Cleaner volume | 1-2 gallons of diluted solution per 500 square feet | Covers a manageable wet section |
| Water source | 50-100 feet of garden hose | Reaches corners without ladder movement |
| Sprayer | 1-2 gallon pump sprayer | Allows controlled application |
| Protective gear | Nitrile or neoprene gloves, goggles, closed shoes | Limits skin and eye contact |
| Weather | 50-85°F, overcast, low wind | Slows drying and chemical drift |
| Surface test | 2-by-2-foot hidden area | Identifies discoloration or finish damage |
Close windows and exterior doors. Turn off or cover outdoor electrical receptacles, security cameras, doorbells, and low-voltage lighting. Move furniture, grills, toys, and pet bowls away from the rinse path.
Inspect the siding before applying cleaner. Loose panels, cracked corners, missing caulk, damaged utility penetrations, and open seams can allow water behind the cladding. Chemical cleaning will not correct installation defects.
Keep children and pets away until the siding, surrounding ground, and plants are thoroughly rinsed. Product labels control the required re-entry period, dilution, and disposal instructions.
Which Cleaner Should You Use?
The best vinyl siding cleaner depends on the contaminant and the surrounding landscape. A diluted chlorine product works fastest on heavy green algae and mildew, oxygen bleach is a slower option for lighter organic soil, and a labeled ready-to-use product reduces measuring errors.
| Cleaner type | Typical active ingredient | Typical cost | Best use | Main limitation |
|---|---|---|---|---|
| Chlorine solution | Sodium hypochlorite | $8-$15 | Heavy green algae, mildew | Plant and fabric damage |
| Oxygen bleach | Sodium percarbonate | $10-$25 | Light organic dirt, routine washing | Slower and less effective on entrenched stains |
| Ready-to-use spray | Product-specific biocide or surfactant | $15-$40 | Small areas and convenience | Higher cost per treated square foot |
| No-rinse biocide | Quaternary ammonium compound or labeled proprietary blend | $25-$50 | Gradual treatment and prevention | Results may take days or weeks |
Is chlorine bleach safe for vinyl siding?
Chlorine bleach can be used on many vinyl siding surfaces when the product label and siding manufacturer permit it, but concentrated or improperly mixed bleach can damage plants, fabrics, metals, sealants, and some finishes. Never assume that a stronger solution produces a better result.
A practical starting point is a diluted solution within the cleaner manufacturer’s stated range, often approximately 1 part household bleach to 10-20 parts water for exterior organic growth, plus a small amount of compatible surfactant if the label allows it. Household bleach strength varies, so a fixed recipe is less reliable than the product directions.
Do not use the commonly repeated mixture of one-third bleach, two-thirds water, and dish soap as a universal formula. That concentration is unnecessarily aggressive for many jobs, and ordinary dish soap may leave residue or harm nearby aquatic environments.
Is oxygen bleach safer for plants and pets?
Oxygen bleach generally creates fewer chlorine-fume and discoloration concerns, but it is not automatically harmless to plants, pets, waterways, or skin. Sodium percarbonate is alkaline in solution, and concentrated powder or runoff can irritate tissue.
Dissolve the powder completely in warm water according to the package instructions. Undissolved granules can settle on dark siding, clog a sprayer, or create concentrated spots. Oxygen bleach is a reasonable choice for light-to-moderate organic soil when a slower treatment is acceptable.
How to Clean Vinyl Siding Without Scrubbing
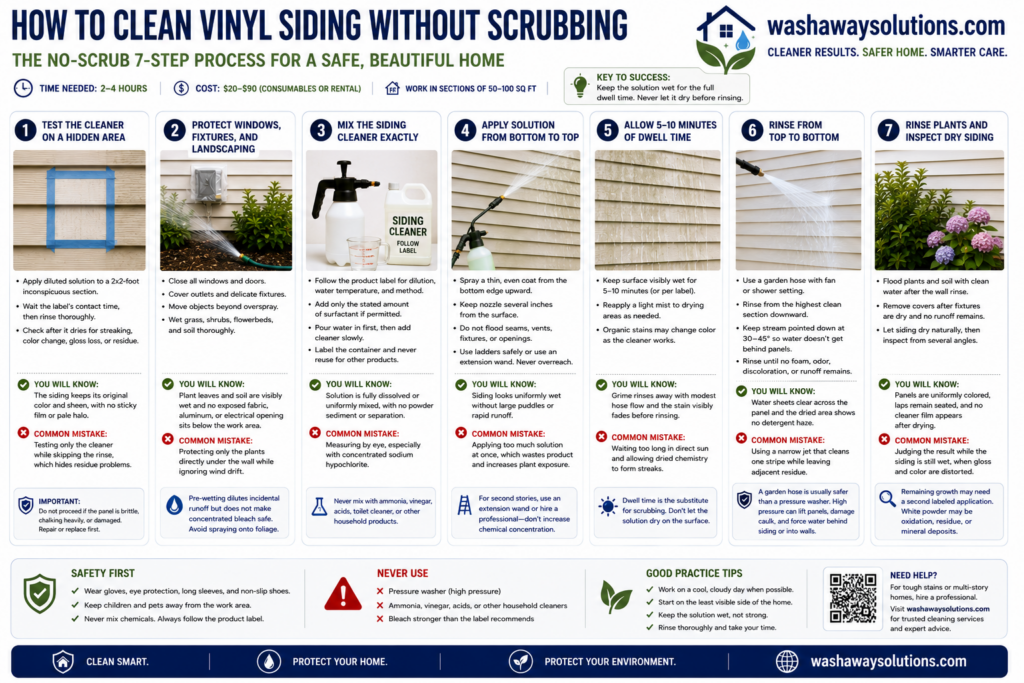
The no-scrub process has seven stages: test, protect, pre-wet, apply, dwell, rinse, and inspect. Work in sections of roughly 50-100 square feet so the solution remains wet for the full contact time and never dries before rinsing.
Step 1: Test the cleaner on a hidden area
Apply the diluted solution to a 2-by-2-foot inconspicuous section, wait the label’s contact time, and rinse thoroughly. Check the area after it dries, because streaking, color change, gloss loss, or residue may appear only after evaporation.
You will know the test worked when the siding retains its original color and sheen, with no sticky film or pale halo. A common mistake is testing only the cleaner while skipping the rinse, which hides residue problems.
Do not proceed if the panel is brittle, chalking heavily, or visibly damaged. Replace or repair compromised siding first, or use a professional who can control water entry.
Step 2: Protect windows, fixtures, and landscaping
Close all windows and doors, cover outlets and delicate metal fixtures, and move movable objects beyond the overspray zone. Wet grass, shrubs, flowerbeds, and nearby soil thoroughly with clean water before applying cleaner.
Pre-wetting dilutes incidental runoff at the plant surface. It does not make concentrated bleach safe, so avoid spraying directly onto foliage and keep the nozzle pointed at the siding.
You will know the perimeter is ready when plant leaves and soil are visibly wet and no exposed fabric, aluminum, or electrical opening sits below the work area. A common mistake is protecting only the plants directly under the wall while ignoring wind drift.
Step 3: Mix the siding cleaner exactly
Use the product label’s dilution, water temperature, and application method. If a label permits a surfactant, add only the stated amount. Do not improvise with ammonia, vinegar, toilet cleaner, acids, or other household products.
Pour water into the sprayer first, then add the measured cleaner slowly to reduce splashing. Label the container and never reuse a chemical sprayer for garden fertilizer or other incompatible products.
You will know the solution is ready when the ingredients are fully dissolved or uniformly mixed, with no powder sediment or unexplained separation. A common mistake is measuring by eye, especially when using concentrated sodium hypochlorite.
Step 4: Apply solution from bottom to top
Spray a thin, even coat from the bottom edge upward, keeping the nozzle several inches from the surface. Bottom-to-top application helps prevent dirty solution from running down dry panels and leaving vertical tide marks.
Do not flood seams, vents, light fixtures, or openings. Use a ladder only on stable, level ground, and never stretch sideways while holding a chemical sprayer. For a second story, use an extension wand or hire a professional rather than increasing chemical concentration.
You will know the coverage is sufficient when the siding looks uniformly wet without large puddles or rapid runoff. A common mistake is applying too much solution at once, which wastes product and increases plant exposure.
Step 5: Allow 5-10 minutes of dwell time
Keep the surface visibly wet for 5-10 minutes, or follow the product label if it specifies a different interval. Reapply a light mist to drying areas, especially on warm, sunny, windy days.
Dwell time is the main substitute for physical scrubbing. Organic stains may change from green or black to gray, tan, or white as the active ingredient works, but color change alone does not prove that all residue has detached.
You will know the solution has worked when grime rinses away with modest hose flow and the stain visibly fades before rinsing. A common mistake is waiting too long in direct sun and allowing dried chemistry to form streaks.
Step 6: Rinse from top to bottom
Use a garden hose with a fan or shower setting and rinse from the highest clean section downward. Keep the stream pointed downward at roughly a 30-45-degree angle so water does not enter the lower edge of horizontal panels.
A garden hose is usually safer than a pressure washer because vinyl siding contains overlapping laps, weep holes, trim channels, and utility penetrations. High-pressure water can lift panels, damage caulk, drive moisture behind the cladding, and force water into wall openings.
Rinse until no foam, odor, discoloration, or visible runoff remains. You will know the rinse is complete when water sheets clear across the panel and the dried area shows no detergent haze. A common mistake is using a narrow jet that cleans one stripe while leaving adjacent residue.
Step 7: Rinse plants and inspect dry siding
Flood surrounding plants and soil with clean water after the wall rinse, paying attention to low spots where solution collected. Remove covers only after nearby fixtures are dry and no runoff remains.
Allow the siding to dry naturally, then inspect it from several angles. Remaining green or black material may need a second labeled application, while a white powder may indicate oxidation, dried residue, or mineral deposits rather than living growth.
You will know the job is complete when the panels are uniformly colored, the laps remain seated, and no cleaner film appears after drying. A common mistake is judging the result while the siding is still wet, when gloss and color are temporarily distorted.
How Do Cleaning Methods Compare?
Chlorine provides the fastest visible change on biological growth, while oxygen bleach offers a lower-odor alternative for lighter contamination. A no-rinse biocide is convenient for tall or difficult areas, but delayed results make it a poor choice when the homeowner needs immediate cosmetic improvement.
| Decision factor | Chlorine solution | Oxygen bleach | Ready-to-use spray | No-rinse biocide |
|---|---|---|---|---|
| Visible response | 5-15 minutes | 15-30 minutes | 5-20 minutes | 1-4 weeks |
| Typical DIY cost | $8-$15 | $10-$25 | $15-$40 | $25-$50 |
| Plant exposure risk | High if concentrated | Moderate if concentrated | Label-dependent | Label-dependent |
| Rinse requirement | Usually required | Usually required | Label-dependent | Often none |
| Best stain | Green algae, mildew | Light organic soil | Small maintenance areas | Gradual regrowth control |
| Mixing error risk | High | Moderate | Low | Low |
| Second-story suitability | Requires controlled reach | Requires controlled reach | Hose-end reach | Product-specific reach |
Why is a garden hose better than a pressure washer?
A garden hose is better for routine vinyl siding when chemical treatment has already loosened the contamination. Low pressure reduces the chance of forcing water behind laps, dislodging panels, damaging trim, or injecting water into vents and electrical penetrations.
A pressure washer can have a legitimate role when used by an experienced operator at low pressure, with a wide spray pattern and a downward angle. The machine does not make the cleaner more effective, however, and its narrow high-velocity stream creates unnecessary risk on old, loose, or brittle siding.
What Should You Do in Difficult Situations?
Difficult siding conditions require a change in process rather than a stronger chemical mix. Shade, smaller work sections, a longer label-approved dwell time, or professional access usually solves the problem more safely than increasing concentration.
How do you clean second-story vinyl siding?
Use a hose-end applicator or extension wand that reaches the wall from the ground, then rinse with a wide spray pattern from above downward. Do not stand on a roof, lean a ladder against the siding, or use a stronger chemical mix to compensate for poor reach.
For a two-story home, divide the wall into 50-75 square-foot sections. A professional is the safer option when the upper wall cannot be rinsed thoroughly from the ground, because chemical residue and water entry become difficult to control.
How do you clean siding near ponds or sensitive plants?
Use the least aggressive labeled product, shield delicate foliage, prevent runoff from entering the pond, and avoid chlorine unless the product label and local environmental requirements clearly permit the application. Pre-wetting plants reduces contact but does not neutralize chemical discharge.
Create a clean-water diversion path with temporary plastic sheeting only where it will not trap runoff against the foundation. Never allow concentrated cleaner to collect in a storm drain, stream, or fish pond.
Can you clean vinyl siding in winter or full sun?
Clean vinyl siding when temperatures remain above the product label’s minimum, commonly 50°F for water-based exterior cleaners, and avoid freezing conditions during the rinse and drying period. Full sun is workable only if small sections stay wet, but overcast conditions provide better control.
Cold weather slows chemical reactions and can leave water trapped in seams. Hot, windy weather accelerates drying and increases drift, so the operator should reduce section size rather than extend dwell time beyond the label.
Common Problems and How to Fix Them
| Symptom | Likely cause | Corrective action | Avoid next time |
|---|---|---|---|
| Green stain turns pale but remains | Growth is dead but bonded to surface | Rinse again, or repeat label-approved treatment after drying | Do not immediately increase concentration |
| White chalky film | Vinyl oxidation or dried cleaner | Rinse with clean water; test a manufacturer-approved cleaner | Prevent solution from drying |
| Brown streaks | Dirty runoff or rust contamination | Rewash with a mild siding cleaner; identify metal source | Apply evenly from bottom upward |
| Yellow or bleached foliage | Chemical overspray or runoff | Rinse foliage and soil repeatedly; remove damaged leaves | Pre-wet, shield, and control drift |
| Black dots remain | Embedded mold, oxidation, or unrelated stain | Test a small area and identify the material before retreating | Do not assume every dark mark is mildew |
| Siding looks dull | Oxidation or abrasive cleaning | Stop scrubbing and consult the siding manufacturer | Avoid abrasive pads and harsh solvents |
White vinegar is not a universal fix for chalky siding. Vinegar can help with some mineral or alkaline residues, but oxidation is degraded vinyl, not removable soap scum, and acid may affect adjacent metals or sealants. Test any vinegar solution on an inconspicuous area and follow the siding manufacturer’s instructions.
Bleach must never be mixed with ammonia, acids, vinegar, toilet-bowl cleaner, or other products. The CDC warns that mixing bleach with certain cleaners can release dangerous gases; chemical containers should remain labeled, and ventilation and eye protection are basic controls.
How Much Time and Money Does It Take?
Typical DIY material cost is $8-$15 for a basic chlorine treatment, $10-$25 for oxygen bleach, and $15-$50 for commercial or no-rinse products. A first-time homeowner should budget 2-4 hours for a full exterior because setup, hose movement, plant protection, and inspection take longer than the spraying itself.
| Project scope | Typical solution needed | DIY time | Typical material cost |
|---|---|---|---|
| One stained wall, 300-500 sq. ft. | 1 gallon diluted cleaner | 30-60 minutes | $5-$15 |
| One-story exterior, 1,500 sq. ft. | 3-5 gallons diluted cleaner | 2-4 hours | $15-$40 |
| Two-story exterior, 2,000 sq. ft. | 4-7 gallons diluted cleaner | 3-6 hours | $25-$60 |
| Small annual maintenance wash | 1-2 gallons ready-to-use product | 30-90 minutes | $15-$40 |
Coverage depends on siding texture, sprayer output, wind, and the amount of organic growth. Measure a test section first, then scale the actual consumption instead of trusting a generic square-foot estimate.
How Can You Prevent Algae From Returning?
Vinyl siding stays cleaner when moisture, shade, and organic debris are reduced around the wall. Clean gutters, extend downspouts, trim vegetation away from the siding, repair leaking hose bibs, and keep mulch from touching the lower panels.
A typical maintenance interval is once every 1-3 years, but north-facing walls under trees may need annual inspection. A dry, sunny wall may remain presentable for several years, while persistent moisture can produce new growth within one season.
No-rinse products may slow regrowth, but claims of one-year protection depend on climate, shade, rainfall, and the specific formulation. Treat those timeframes as product-specific promises, not a guarantee for every house.
When Should You Hire a Professional?
Hire a professional when siding is above safe ground reach, panels are loose or brittle, runoff could enter a pond, extensive black growth covers porous materials, or the house has difficult electrical and architectural details. Professional cleaning is also sensible when the cause of staining is uncertain.
A contractor should explain the chemical, dilution, application method, rinse plan, plant-protection process, and insurance coverage. Reject proposals that promise to remove oxidation with pressure alone or that recommend spraying concentrated bleach without discussing runoff.
Soft washing is not appropriate for every exterior stain. It is effective for biological growth and surface dirt, but rust, artillery-spore spots, asphalt residue, hard-water scale, and oxidized vinyl require different diagnosis and sometimes replacement or specialty treatment.
FAQ
Will rain remove dead algae from vinyl siding?
Rain may gradually remove dead algae, especially from lightly textured siding, but a thorough garden-hose rinse produces a faster and more predictable result. If the stain changes color after treatment but remains visible, rinse the surface after the dwell period rather than relying on weeks of weather.
How often should vinyl siding be washed?
Most homes need cleaning every 1-3 years, while shaded, damp, tree-covered walls may need annual washing. Inspect the north and east elevations each spring, because early algae and mildew can usually be removed with a milder solution and shorter application time.
Can dish soap clean vinyl siding without scrubbing?
Dish soap can loosen light dirt when diluted, but it is usually insufficient for established algae, mildew, or mold. Dishwashing formulas may also create excessive foam and leave residue, so use a siding cleaner or an approved surfactant at the product’s stated rate.
Does soft washing remove oxidation from vinyl siding?
Soft washing does not reverse vinyl oxidation. Oxidation is surface degradation caused by weather and ultraviolet exposure, and it often appears as a chalky film or uneven fading; aggressive pressure or repeated bleach applications can worsen the appearance.
What is the safest cleaner around dogs?
The safest choice is a labeled exterior product used exactly as directed, with dogs kept away during application and until the siding and ground are rinsed and dry. Oxygen-based products may reduce chlorine concerns, but concentrated oxygen bleach can still irritate paws, eyes, and skin.
Should dark vinyl siding be cleaned differently?
Dark vinyl siding should be tested carefully because heat causes faster drying and makes streaks more visible. Work in shade or on an overcast day, use smaller sections, maintain the label dilution, and rinse before the surface becomes dry.
The Bottom Line
The reliable way to clean vinyl siding without scrubbing is to use a properly diluted, siding-compatible cleaner, protect and pre-wet the surrounding landscape, apply from bottom to top, maintain 5-10 minutes of wet dwell time, and rinse from top to bottom with a garden hose. Choose chlorine for heavy biological growth only when runoff can be controlled, oxygen bleach for lighter organic soil, and a labeled commercial product when accurate application matters more than the lowest cost. When the stain is oxidation, rust, or mineral scale, stop increasing chemical strength and diagnose the surface instead.


