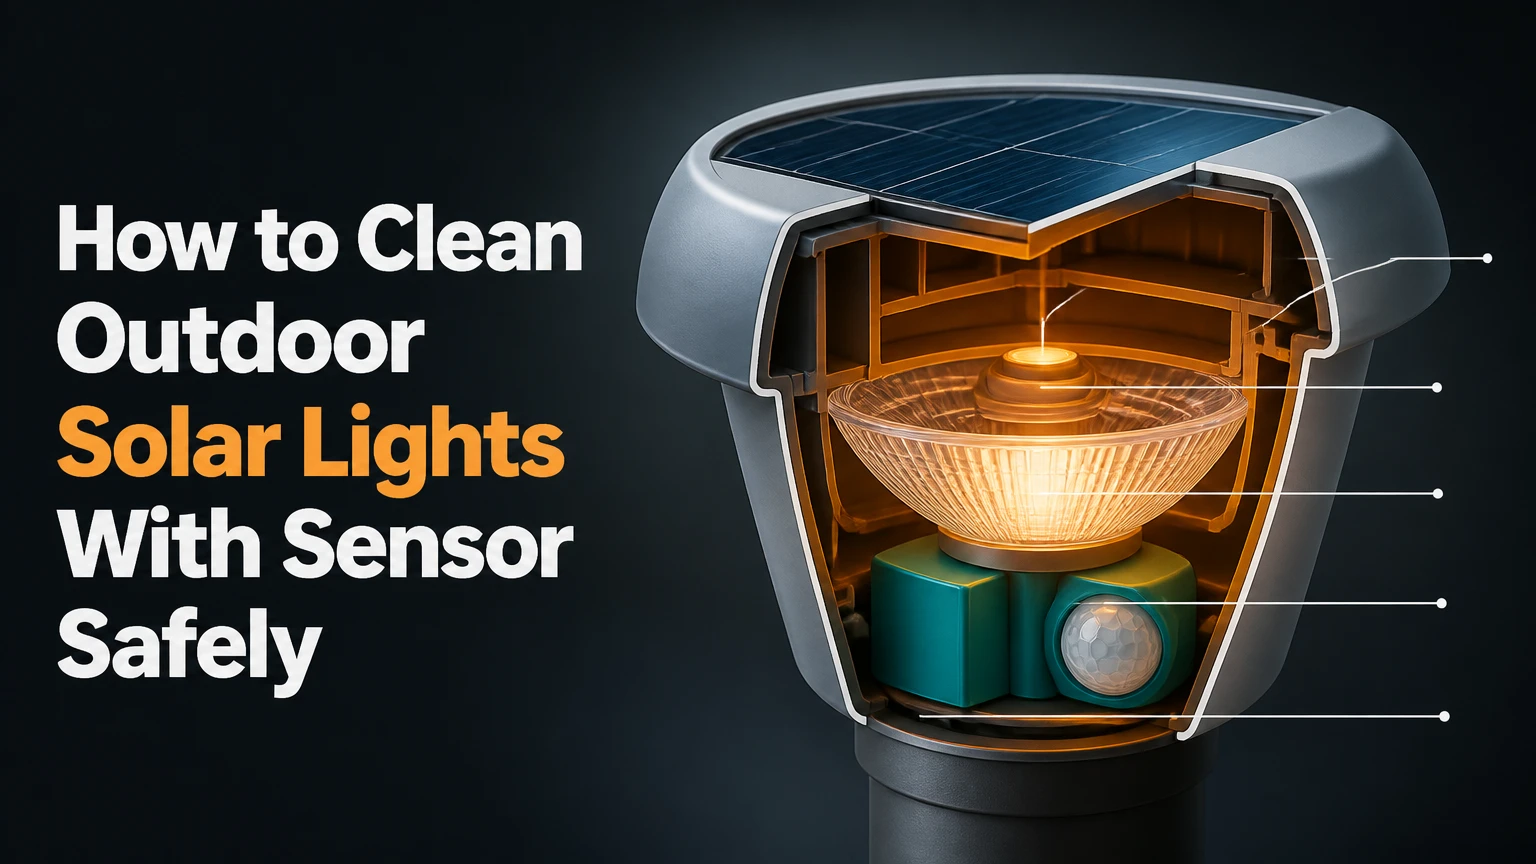
To clean outdoor solar lights with sensor, switch the fixture off, remove loose debris, wipe the solar panel and sensor with a damp microfiber cloth, clean the LED cover, and dry every surface before restarting. The job usually takes 5-10 minutes per light and needs water, mild dish soap, and soft cloths.
Key Facts
- A clean solar panel charges the battery more efficiently because dust and deposits reduce light reaching the photovoltaic cells.
- A PIR sensor detects movement through changes in infrared radiation, while a photodiode detects ambient brightness.
- Use a damp microfiber cloth, not a pressure washer, abrasive pad, ammonia cleaner, or bleach.
- Clean ordinary fixtures every 3-6 months, but inspect coastal, dusty, or pollen-heavy fixtures monthly.
- Battery corrosion requires a separate dry-contact procedure after the battery compartment is opened.
- A clean light that remains dim usually has a worn rechargeable battery, insufficient sunlight, or a clouded panel cover.
How to Clean Outdoor Solar Lights With Sensor
Cleaning an outdoor solar sensor light means servicing four separate surfaces: the photovoltaic panel, sensor lens, LED cover, and external housing. Each surface affects a different part of performance, so wiping only the top panel may leave a dirty PIR lens or opaque LED cover that still causes poor operation.
Most integrated fixtures contain a solar cell, charge controller, rechargeable battery, sensor, and LED array. During daylight, the panel produces direct current and the charge circuit stores energy; at night, a photodiode activates dusk mode or a PIR sensor responds to movement, allowing the battery to power the LEDs.
The safest routine uses very little water. Outdoor fixtures may have an IP rating, but an IP65 housing is not permission to direct high-pressure water at seals, switches, or joints. The manufacturer’s cleaning instructions take priority because some low-cost lights have exposed switches or poorly sealed battery compartments.
What you need before starting
Gather the materials below before touching the fixture. Soft tools prevent micro-scratches that scatter sunlight across the panel and distort the transparent plastic in front of the sensor.
| Item | Typical quantity | Purpose | Avoid |
|---|---|---|---|
| Microfiber cloth | 2 cloths per fixture | Panel, sensor, housing, drying | Paper towels with wood fibers |
| Soft nylon brush | 1 brush | Cobwebs, sand, dried leaves | Wire or stiff-bristle brush |
| Mild dish soap | 1 teaspoon in 500 ml water | Routine grime removal | Bleach, ammonia, solvent |
| Clean water | 500 ml | Dampening and final wipe | Saltwater or dirty rinse water |
| Cotton swabs | 2-4 | Battery terminals and crevices | Wet swab inside circuit areas |
| Nitrile gloves | 1 pair | Battery and corrosion handling | Bare hands around leaking cells |
Work in shade during a cool part of the day. A small outdoor panel does not normally crack from ordinary cool water alone, but a very hot panel can experience thermal stress, and hot surfaces dry soap before it is removed.
Switch the fixture to OFF before cleaning. If the light is mounted above shoulder height, use a stable platform on level ground rather than stretching from a ladder. A fixture that requires roof access, electrical disconnection, or work near overhead wiring belongs with a qualified professional.
Step-by-Step Cleaning Process
The complete process has seven steps. Routine cleaning takes 5-10 minutes per fixture; a battery compartment inspection can add 10 minutes, and oxidation repair may require replacement rather than further cleaning.
Step 1: Switch off and inspect the fixture
Set the physical switch to OFF, allow a recently lit fixture to cool, and check the housing for cracks, loose screws, exposed wires, or a missing gasket. Do not spray a light with a cracked cover or open battery door.
You will know this step worked when: the light cannot activate during handling and no damaged seal or exposed conductor is visible.
Common mistake: pressing the switch while wiping the housing, then assuming the light has developed a fault when it does not turn on later.
Step 2: Remove dry debris first
Use a dry microfiber cloth or soft nylon brush to remove sand, dust, leaves, cobwebs, pollen, and loose bird droppings. Brush from the panel outward, and use a separate pass for the sensor lens and LED cover.
Dry removal matters because grit trapped under a wet cloth can act like fine sandpaper. Hardened droppings should be softened with a damp cloth for several minutes rather than scraped with a fingernail, card, or blade.
You will know this step worked when: no loose particles remain on the wiping path and dried debris has softened without scratching the plastic.
Common mistake: wiping desert dust with a wet cloth immediately, which drags abrasive particles across the panel.
Step 3: Wash the solar panel and housing
Mix approximately 1 teaspoon of mild, non-abrasive dish soap with 500 ml of lukewarm water. Dip a microfiber cloth into the solution and wring it until damp, then wipe the panel with straight overlapping passes or gentle circles.
Do not pour the solution onto the fixture. Keep liquid away from the switch, seams, charging port, and battery door. Wipe the housing separately, using a second damp cloth when the first one becomes gritty.
Mineral spotting may need two or three damp passes. A short contact time is safer than a strong chemical. For a detached glass solar panel, a clean-water wipe can remove residue after washing, but integrated fixtures should receive only a controlled damp wipe.
You will know this step worked when: the panel has no visible film, greasy streaks, or loose deposits when viewed from a low angle.
Common mistake: using household glass cleaner because the panel looks like a window. Ammonia and solvents can attack plastic coatings, printed markings, and seals.
Step 4: Clean the PIR or dusk sensor
Identify the sensor before wiping it. A PIR sensor usually sits behind a white or frosted Fresnel lens with ridges or concentric sections. A dusk sensor often uses a small clear window or dark photodiode opening near the panel.
Use a barely damp microfiber corner to wipe the lens once, then dry it immediately. Do not press hard on a Fresnel lens because scratches, residue, or a displaced lens can change the motion detection pattern. Keep soap out of ridges and do not insert cotton swabs into the sensor opening.
A cloudy or yellowed sensor cover is not the same problem as surface dirt. Mild plastic haze may improve with cleaning, but deep ultraviolet damage usually requires a replacement cover or entire fixture. Toothpaste is not a universally safe polish because its abrasives vary, and rubbing can remove a protective coating or leave residue in Fresnel ridges.
You will know this step worked when: the lens is clear, dry, and free of streaks when inspected from several angles.
Common mistake: treating the sensor like glass and polishing it aggressively. Sensor geometry matters more than cosmetic shine.
Step 5: Clean the LED cover and underside
Wipe the transparent or frosted LED diffuser, underside, and mounting bracket with the same mild solution. Dirt on the LED cover reduces apparent brightness even when the battery and panel work correctly.
Check drain openings and lower edges for insect nests, mud, or trapped moisture. Clear only accessible debris with a dry brush. Never probe a sealed LED module with metal because the tool can damage the lens, circuit board, or gasket.
You will know this step worked when: the diffuser looks evenly clear or evenly frosted and no dark dirt band remains around the lower edge.
Common mistake: cleaning the panel while ignoring the downward-facing LED lens, then diagnosing reduced light output as a battery failure.
Step 6: Inspect the battery compartment separately
Open the battery compartment only if the manual permits it and the fixture is dry. Remove rechargeable cells using insulated handling, and check for white, blue, or green deposits, rust, swollen cells, cracked insulation, or a burnt smell.
For light terminal corrosion, disconnect the cells and use a cotton swab lightly moistened with white vinegar on the metal contact only. Keep the liquid away from the circuit board. After the residue loosens, wipe with a water-dampened swab, then dry fully with a clean cloth and leave the compartment open until no moisture remains.
Do not sand heavily corroded contacts. Fine abrasive paper can remove plating and shorten contact life. Replace a leaking, swollen, or physically damaged battery instead of cleaning it. Match the original chemistry, voltage, size, connector, and approximate capacity, such as AA NiMH cells at the manufacturer’s specified voltage.
You will know this step worked when: contacts are dry, mechanically firm, and free of loose corrosion before batteries return.
Common mistake: reinstalling batteries while vinegar or rinse water remains inside the compartment.
Step 7: Dry, restart, and recharge
Buff the panel, sensor, LED cover, and housing with a dry lint-free cloth. Close the battery door firmly, confirm the gasket is seated, and set the switch to ON.
Allow the fixture to receive a full day of unobstructed sunlight before judging nighttime runtime. A light cleaned in late afternoon may appear weak that evening because cleaning does not instantly refill a depleted battery.
You will know this step worked when: the light responds after darkness simulation and operates normally after a clear charging period.
Common mistake: testing performance immediately after cleaning under a tree, wall shadow, or cloudy sky.
Which Cleaning Method Is Safest?
Mild soap and water is the best routine method for most outdoor solar lights. Vinegar can help with mineral residue on a cloth, but it should never pool around seals, switches, battery doors, or circuit boards; baking soda paste is more abrasive and has a narrower use case.
| Method | Mixing or use value | Suitable surface | Main risk | Typical cost |
|---|---|---|---|---|
| Mild soap solution | 1 tsp per 500 ml water | Panel, housing, LED diffuser | Soap film if not wiped off | $0.05-$0.25 |
| Plain distilled water | 500 ml per fixture | Final wipe, light dust | Poor grease removal | $0.10-$0.40 |
| Diluted white vinegar | 1 part vinegar to 3 parts water on cloth | Mineral marks on glass or hard plastic | Seal and coating damage if pooled | $0.20-$0.60 |
| Baking soda paste | 1 tsp soda with drops of water | Stubborn exterior residue only | Abrasion and residue in ridges | $0.05-$0.15 |
| Commercial plastic cleaner | Label-directed amount | Compatible acrylic or polycarbonate | Chemical haze or yellowing | $5-$12 bottle |
Never use steel wool, scouring pads, razor blades, bleach, acetone, paint thinner, or ammonia cleaner. A pressure washer is also unsuitable because concentrated water can pass a gasket even when the fixture is rated for rain.
A practitioner rule of thumb is simple: if a product would be too harsh for eyeglasses or a camera lens, it is too harsh for a solar sensor lens. Glass panels tolerate more cleaning options than polycarbonate covers, but the sensor lens remains the most delicate component.
How Often Should Solar Sensor Lights Be Cleaned?
Clean outdoor solar lights every 3-6 months in ordinary residential conditions, then shorten the interval when the panel accumulates visible dust before sunset. Coastal homes often need monthly fresh-water wiping, while desert locations may need a dry dust removal each week and a damp wash every 1-2 months.
| Environment | Inspection interval | Cleaning interval | Main contaminant | Useful adjustment |
|---|---|---|---|---|
| Suburban garden | Every 6 weeks | Every 3-6 months | Pollen and leaves | Trim branches over the panel |
| Coastal property | Every 2-4 weeks | Monthly | Salt aerosol | Wipe with fresh water, inspect corrosion |
| Desert or construction area | Weekly | Every 1-2 months | Fine sand and dust | Dry-brush before any damp wipe |
| Forested or damp yard | Monthly | Every 2-3 months | Sap, algae, insects | Remove shade and organic buildup |
| Snow or freeze region | After storms | At spring thaw and midsummer | Soot, salt, snow residue | Do not scrape frozen plastic |
Cleaning frequency should follow performance and contamination, not a fixed calendar alone. If a clean panel receives less than several hours of direct or bright open-sky light, repositioning may improve runtime more than another wash.
The battery also needs realistic evaluation. A typical rechargeable battery may last 1-3 years depending on chemistry, temperature, charge cycles, and nightly runtime; cleaning cannot restore capacity lost to aging.
What Changes for Different Solar Light Types?
Solar security floodlights need the most attention to sensor alignment and panel access, while path lights usually need faster cleaning because their integrated top panels are small and easily shaded. Separate panels on floodlights can be cleaned on a workbench if the manufacturer allows disconnection.
| Fixture type | Typical panel arrangement | Sensor location | Typical cleaning time | Post-clean test |
|---|---|---|---|---|
| Security floodlight | Separate 5-10 W panel or large integrated panel | Front, 120-180° arc | 10-15 minutes | Walk at 15-30 feet |
| Path light | Small top-mounted panel | Short-range front or top | 5-7 minutes | Cover panel, then approach |
| Step light | Narrow integrated panel | Front or lower edge | 5-8 minutes | Test at 2-6 feet |
| Wall sconce | Integrated panel, 100-400 lumen class | Front or underside | 7-10 minutes | Test motion and dusk mode |
| Decorative accent light | Small integrated panel | Internal or absent | 3-5 minutes | Check evening brightness |
Floodlight detection can change when the head or sensor bracket moves during cleaning. Mark the original angle with removable tape before adjustment, and verify the detection zone after the fixture dries.
Path and step lights collect soil splash near the lower housing. Clean the LED diffuser and drainage area, but do not bury the base deeper in soil after cleaning because moisture can reach the battery compartment.
How Do You Test a Solar Light After Cleaning?
Test the switch, darkness sensor, motion response, and charging path separately. Cover the solar panel completely with opaque cardboard during daylight, wait 30-60 seconds, and trigger the sensor from the expected approach distance; this simulates night without waiting until evening.
Use the sequence below:
- Confirm the switch is ON.
- Cover the panel without blocking the PIR lens.
- Wait for the light’s normal activation delay, commonly 5-30 seconds.
- Walk across the sensor field rather than directly toward it.
- Remove the cover and leave the light in full sun.
- Check brightness and runtime after the next dark period.
| Symptom after cleaning | Most likely cause | Confirmation test | Corrective action |
|---|---|---|---|
| No light at all | Switch off, dead battery, sensor fault | Cover panel and check switch | Charge, replace battery, inspect wiring |
| Light stays on | Sensor film, blocked dusk sensor, control fault | Rewipe sensor and expose panel | Dry lens, restore panel exposure |
| Repeated blinking | Low battery or poor contact | Observe after full sunny day | Clean contacts or replace cells |
| Dim light | Aged battery, shade, dirty diffuser | Compare panel and LED cleanliness | Improve sun, replace battery |
| Short runtime | Low charge or reduced battery capacity | Test after 1-2 clear days | Check shade, battery age, temperature |
| False triggering | Spider webs, moving foliage, heat source | Clear field and observe | Remove vegetation, adjust sensor |
A light that flashes after cleaning does not automatically need a “deep conditioning” charge. NiMH batteries may recover after a full charge, but a 48-hour charge recommendation is not universal and can be unsafe if the cell is damaged or the fixture’s controller is faulty. Follow the product manual.
What If the Panel or Sensor Is Cloudy?
Surface dirt can be cleaned; internal haze, yellowing, cracks, and deep ultraviolet damage usually cannot. A cloudy polycarbonate cover may transmit substantially less light, but the exact loss depends on material thickness, haze level, cell design, and the angle of sunlight.
Inspect the panel in direct side light. If haze remains after two gentle soap-and-water passes, stop polishing. Toothpaste, automotive compound, and abrasive plastic polish can remove a coating, create uneven optical texture, or leave residue in the sensor’s Fresnel pattern.
Replacement is usually more reliable when:
- The panel has a crack that admits water.
- The sensor lens is yellow, warped, or deeply scratched.
- The LED diffuser has melted or become opaque internally.
- The housing no longer closes against its gasket.
- A replacement panel costs more than roughly half the price of a new fixture.
Solar panel cleaning cannot fix a failed charge controller, broken wire, exhausted battery, or water-damaged circuit board. That limitation matters because repeated cleaning is often mistaken for repair.
What Does Cleaning Cost and How Long Does It Take?
Routine cleaning costs approximately $0-$5 per fixture when household soap, water, and microfiber cloths are already available. A standard fixture takes 5-10 minutes, while corrosion inspection adds about 10 minutes and elevated access can increase the total substantially.
| Job type | Typical time per fixture | Household material cost | Likely extra cost | DIY suitability |
|---|---|---|---|---|
| Routine panel and housing wipe | 5-10 minutes | $0.10-$0.50 | $0 | Most ground-level fixtures |
| Sensor and LED diffuser service | 7-12 minutes | $0.10-$0.75 | $0 | Accessible wall and path lights |
| Battery-contact inspection | 15-20 minutes | $0.25-$1.00 | $5-$15 for cells | Dry, serviceable compartments |
| Oxidized panel evaluation | 10-20 minutes | $0.25-$2.00 | $20-$60 fixture replacement | Replace if haze persists |
| Roof or high-wall fixture | 15-30 minutes | $0.25-$2.00 | $75-$200 professional visit | Professional access preferred |
The largest cost risk is not cleaning fluid. It is a fall, a damaged seal, or replacement of a fixture that was opened unnecessarily.
Common Mistakes and Their Fixes
Using a pressure washer
High-pressure water can force moisture through switches and gaskets. Use a damp cloth or a garden hose only at a gentle shower setting when the manufacturer permits it, followed by immediate drying.
Scrubbing sand into the panel
Sand and dried dust can scratch plastic and glass. Brush dry debris away first, then wash with a clean, damp cloth.
Cleaning a hot panel with cold water
A small panel is unlikely to fail from normal rinsing, but avoiding temperature extremes is sensible. Work in shade and use lukewarm water rather than pouring ice-cold water on a sun-heated surface.
Applying vinegar directly to the fixture
Vinegar can remove mineral residue, but liquid should be placed on a cloth and used only on the affected exterior surface. Wipe with clean water and dry the area immediately.
Replacing the battery with the wrong chemistry
Do not substitute alkaline cells for rechargeable cells. Match the battery type and voltage specified by the manufacturer; charging an unsuitable cell can cause leakage, overheating, or failure.
Ignoring shade after cleaning
Branches, fences, eaves, and seasonal sun angles can reduce charging more than a thin layer of dust. Observe the panel from morning through afternoon before blaming the battery.
FAQ
Can I rinse outdoor solar lights with a hose?
A gentle shower setting may be acceptable for a sealed fixture in good condition, but direct spray at the sensor, switch, battery door, or seams is unsafe. A damp microfiber cloth gives better control and removes less water from the housing seals.
Should I clean solar lights in direct sunlight?
Clean in shade during a cool morning or late afternoon. Shade prevents soap from drying into a film and reduces thermal stress from sudden temperature changes, although ordinary damp wiping does not normally crack a small panel.
Why does my solar light turn on during the day?
A covered, dirty, shaded, or failed photodiode may interpret conditions as darkness. Clean the panel and dusk sensor, remove nearby shade, confirm the switch position, and test the light with the panel covered.
How do I clean salt from coastal solar lights?
Use a fresh-water damp cloth monthly to dissolve salt residue, then dry the panel, sensor, housing joints, and battery door. Do not allow saltwater or vinegar solution to remain on metal contacts because corrosion can continue after the surface looks clean.
Can cleaning restore a solar light with a dead battery?
Cleaning can restore charging when grime blocked the panel, but it cannot restore a battery that has lost capacity or will not hold voltage. If the fixture remains dim after 1-2 clear charging days, install the manufacturer-specified rechargeable battery or replace the unit.
How can I clean a solar light mounted high on a wall?
Use a stable ground-access method only when the entire fixture can be reached without stretching. Do not lean from a ladder while holding water or tools; hire a professional when access requires a roof, unstable ladder placement, or work near electrical conductors.
The Bottom Line
Outdoor solar sensor lights need gentle, controlled cleaning rather than aggressive washing. Switch each fixture off, remove dry grit, clean the panel with mild soapy water, wipe the PIR or dusk sensor lightly, clean the LED diffuser, inspect the battery compartment only when dry, and allow a full sunny charging period before judging performance. For the search task how to clean outdoor solar lights with sensor, the deciding rule is to protect the sensor lens and electrical seals while removing the film that blocks sunlight and detection.


