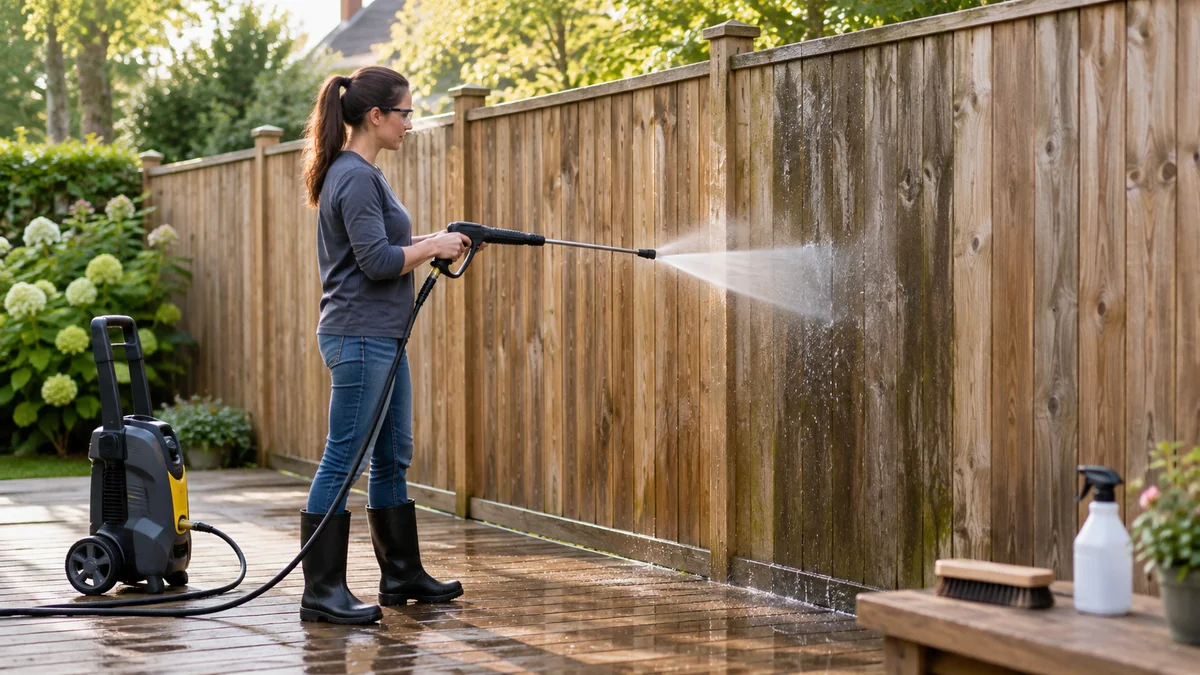
To safely pressure wash a wooden privacy fence, apply a compatible wood cleaner first, then rinse with low-impact pressure using a wide-angle nozzle, a moving wand, and the wood-grain direction. Keep the tip about 12-18 inches away, test an inconspicuous area, protect vegetation, and let the fence dry fully before sanding or staining.
Key Facts at a Glance
- A typical safe starting point is 500-1,200 PSI at the wood, not necessarily the pressure washer’s maximum rating.
- A 40-degree white nozzle provides the widest practical rinse pattern for most residential wood fences.
- Oxygen-based sodium percarbonate cleaner is a lower-risk choice for dirt, algae, and mildew on unfinished wood.
- Keep the wand moving continuously; a stationary spray can cut grooves or raise soft fibers.
- Allow 24-48 hours of dry weather before coating, then verify the wood is dry enough for the product label.
- Do not pressure wash rotten boards, unstable posts, loose paint that may contain lead, or severely weathered pickets without repairs.
Can You Pressure Wash a Wooden Privacy Fence?
Yes, a wooden privacy fence can be pressure washed when the boards and posts are structurally sound and the operator uses detergent-led cleaning rather than force-led blasting. Pressure washing is unsuitable for rotten wood, loose pickets, failing posts, or delicate historic coatings because water can enlarge defects and drive moisture into damaged fibers.
Wood is porous and anisotropic, meaning its strength differs along and across the grain. A narrow spray concentrates impact on a small area, while a wider fan distributes the same flow across more surface. That is why nozzle angle, distance, machine trigger pressure, and wand movement matter more than the advertised maximum PSI alone.
A pressure washer rated at 2,000 PSI does not automatically deliver 2,000 PSI to the fence. The actual impact changes with the nozzle, tip wear, distance, pump setting, hose restrictions, and angle. Start conservatively and increase cleaning action through dwell time, flow, or a second pass rather than immediately increasing pressure.
Inspect the Fence Before Washing
Do not wash until you identify conditions that water cannot safely correct.
- Push gently against each post. Movement indicates a footing or rot problem.
- Press a screwdriver into suspicious boards. Soft, crumbly wood needs replacement.
- Look for lifted nails, split rails, open end grain, and broken pickets.
- Check whether stain or paint is peeling in sheets.
- Identify nearby outlets, lighting, irrigation controls, and drainage paths.
- Test old paint for lead when the coating predates 1978 or its history is unknown. The U.S. Environmental Protection Agency recommends lead-safe practices for renovation, repair, and painting work that disturbs older coatings.
A fence with surface mildew is a cleaning project. A fence with structural rot is a repair project.
What Do You Need Before Starting?
A 100-linear-foot fence commonly requires 3-6 hours of active work, plus 24-48 hours of drying, with typical DIY consumable costs of $30-$70. The main prerequisites are sound wood, a compatible cleaner, a controllable washer, reliable water supply, and a forecast without rain during application and drying.
Before You Start
| Item | Typical requirement | Practical note |
|---|---|---|
| Pressure washer | 1,300-2,300 PSI electric unit | Use the lowest effective setting |
| Water flow | 1.2-2.0 GPM electric, 2.0-4.0 GPM gas | Higher flow rinses faster, but does not make high pressure safe |
| Nozzle | 40-degree white, optional 25-degree green | Never begin with 0-degree or 15-degree tips |
| Cleaner | 1-2 gallons diluted solution per 100 square feet | Follow the product label, not a generic recipe |
| Sprayer | 1-2 gallon pump sprayer | Use chemical-resistant seals |
| PPE | Goggles, gloves, boots, long trousers | Add face protection for concentrated chemicals |
| Other materials | Hose, plastic tarps, stiff nylon brush, brightener | Keep clean water available for emergency rinsing |
| Conditions | 50-85°F, low wind, no imminent rain | Avoid rapid drying and chemical drift |
Choose a working section no larger than 3-4 panels. Small sections keep the cleaner wet and make pressure, overlap, and runoff easier to control.
Step 1: Protect People, Plants, and Property
Prepare the work zone before opening the cleaner. Move furniture, toys, grills, pots, and vehicles away from the fence, trim branches that touch the boards, close windows and doors, and keep people and pets outside the spray area.
Pre-wet grass, shrubs, and flower beds with clean water. Wet foliage absorbs less diluted cleaner, but pre-wetting does not make every chemical harmless. Cover delicate plants temporarily, redirect runoff away from storm drains, and use only the dilution and disposal method on the product label.
Wear splash goggles, chemical-resistant gloves, long trousers, closed boots, and hearing protection when using a gas machine. Never aim the wand at skin, animals, electrical equipment, or another person. High-pressure injection injuries can appear minor while causing serious internal tissue damage.
Cover outdoor outlets with weatherproof protection rather than relying on loose plastic and tape. Keep the machine, extension cords, and electrical connections away from standing water; follow the pressure washer manufacturer’s electrical instructions.
Success checkpoint: Plants are saturated, utilities are protected, and runoff has a planned path.
Common mistake: Starting at the dirtiest section before testing cleaner and pressure. Begin in a hidden lower corner instead.
Step 2: Apply the Wood Cleaner
Apply wood cleaner from the bottom upward, working in sections of 3-4 panels. Bottom-up application reduces visible vertical runs because fresh solution does not repeatedly flow over already-treated dry wood.
Sodium percarbonate, commonly called oxygen bleach, is a practical first choice for unfinished fences with algae, mildew, and general dirt. Mix it according to the manufacturer’s concentration. Do not combine it with chlorine bleach, acids, ammonia, or other household cleaners.
Use a pump sprayer or the washer’s low-pressure detergent setting. Keep the surface visibly wet for the label’s dwell period, often 5-15 minutes. Do not allow cleaner to dry on the boards; lightly mist with clean water if sunlight or wind causes premature drying.
Chlorine bleach can kill organic growth quickly, but it may alter wood color, harm vegetation, corrode metal fasteners, and damage adjacent materials if poorly diluted or rinsed. Sodium hydroxide-based house-wash products can also darken some woods and require strict label compliance. Cleaner choice should follow the growth, coating, wood species, and runoff risk.
| Cleaner type | Typical use | Main risk | Rinse requirement |
|---|---|---|---|
| Sodium percarbonate | Dirt, algae, mildew on unfinished wood | Can irritate skin and eyes | Thorough rinse after 5-15 minutes |
| Sodium hypochlorite | Heavy organic staining | Plant damage, color change, corrosion | Immediate, generous rinse |
| Sodium hydroxide blend | Grease and severe grime | Darkening, fiber damage, burns | Label-directed rinse |
| Oxalic or citric acid | Tannin, rust, mineral stains | Chemical burns and metal reaction | Complete final rinse |
| Neutral wood soap | Light maintenance cleaning | Limited performance on embedded growth | Rinse before drying |
Success checkpoint: Soil and growth soften, discolor, or release under a light brush touch without the cleaner drying.
Common mistake: Increasing chemical strength because the first application looks slow. Extend dwell time within the label limit or repeat the treatment instead.
Step 3: Set Pressure, Nozzle, and Distance
Start with the lowest pressure that removes loosened residue, usually about 500-800 PSI at the surface, and increase cautiously toward 1,200 PSI only when the test area remains intact. A 40-degree nozzle is the safest starting tip for most fences; a 25-degree nozzle can work on harder, weathered wood at greater distance.
The 500-1,200 PSI range is a practical practitioner range, not a universal engineering limit. Cedar, redwood, aged pine, painted boards, and end grain respond differently. A washer’s dial or engine setting also may not show the pressure actually reaching the wood.
| Nozzle | Spray angle | Appropriate fence use | Starting distance |
|---|---|---|---|
| Black detergent | 65 degrees | Applying diluted cleaner | 12-18 inches |
| White | 40 degrees | General rinsing and soft wood | 18 inches |
| Green | 25 degrees | Sound, weathered hardwood or pine | 18-24 inches |
| Yellow | 15 degrees | Not recommended for wood | Do not use |
| Red | 0 degrees | Not recommended for wood | Do not use |
Hold the wand perpendicular to the board surface when possible, keep it 12-18 inches away, and move with the grain. For vertical pickets, use vertical passes. For horizontal rails, follow the horizontal grain. Avoid crossing from one board at a sharp angle because the fan can cut along soft earlywood bands.
Begin moving before squeezing the trigger and release the trigger before stopping the sweep. Overlap passes by about 25-30 percent. Spray a hidden test patch for 30-60 seconds, allow it to dry partially, and inspect for raised fibers, color loss, and stripe marks.
Success checkpoint: Dirt releases without visible grooves, fuzzy fibers, or sharp color boundaries.
Common mistake: Moving closer because the fence is not clean after one pass. Reapply cleaner or slow the sweep before increasing impact.
Step 4: Rinse the Fence Methodically
Rinse from the top of each treated section downward after the cleaner has worked. Keep the spray moving at a consistent speed and distance, and overlap each pass by about 25-30 percent so the final surface does not show stripes.
Use enough water to remove cleaner and suspended soil from the pores. A low-flow rinse can leave residue even when the boards look clean. Watch the ground line, rails, hinges, and neighboring surfaces because concentrated runoff can carry loosened grime or chemical residue.
Do not use the pressure washer to erase every gray color change. Some gray is weathered wood, and some darkening comes from wet fibers. Excessive rinsing removes soft surface material and creates furring without improving the fence’s service life.
Success checkpoint: No foam, slippery residue, or dark cleaner trails remain when the surface is viewed from several angles.
Common mistake: Rinsing only the face of the pickets. Clean the top edges, rails, posts, and hardware while avoiding direct spray into gaps that lead into a neighbor’s property.
Step 5: Use Brightener Only When Appropriate
A wood brightener can restore color after an alkaline cleaner and help remove tannin or iron staining, but every fence does not require an acid step. Use an oxalic- or citric-acid product only when its label identifies the surface and existing cleaner as compatible.
Apply brightener to damp wood after the primary cleaner has been thoroughly rinsed. Follow the label dwell time, commonly 5-10 minutes, then rinse until no residue remains. Never mix acid brightener directly with bleach or alkaline cleaner; chemical reactions can release heat or hazardous vapors.
Brightener does not repair rot, replace sanding, or guarantee better stain adhesion. It adjusts surface chemistry and appearance. On a lightly soiled fence cleaned with a neutral product, a clean-water rinse may be sufficient.
Success checkpoint: The fence has an even appearance without active foam, slickness, or concentrated brightener marks.
Common mistake: Applying acid to a fence that still contains bleach or alkaline cleaner. Rinse thoroughly and allow the surface to drain before changing chemical classes.
Step 6: Dry, Inspect, and Protect the Wood
Allow 24-48 hours of dry weather before sanding or coating, and use a moisture meter when the coating manufacturer specifies a limit. Many exterior wood coatings require moisture content below approximately 15-18 percent, but the product label controls.
Inspect every board after drying. Raised fibers can be lightly sanded with 80-120 grit paper along the grain, followed by removal of sanding dust. Do not aggressively sand a thin, weathered picket because sanding can reduce its remaining thickness.
Apply a penetrating stain or water-repellent sealer only when the wood is clean, dry, and compatible with the product. UV-resistant pigments generally protect better than a completely clear film, while a semi-transparent stain preserves visible grain. Apply within several days when practical, but never coat damp wood to meet an arbitrary schedule.
| Post-wash condition | Action | Typical timing |
|---|---|---|
| Smooth and evenly colored | Apply compatible stain or sealer | After 24-48 hours |
| Minor raised fibers | Lightly sand with 80-120 grit | After complete drying |
| Dark tannin or rust marks | Use labeled brightener, then rinse | Same workday |
| Deep grooves or severe furring | Stop and assess replacement or repair | Before coating |
| Soft, crumbling boards | Replace damaged boards | Before washing again |
| Moisture above coating limit | Extend drying period | Additional 12-24 hours |
What Are the Safest Equipment Choices?
A low-powered electric washer is usually the best choice for a first-time homeowner because it limits output and is easier to control. A gas washer can clean faster through greater water volume, but its higher available pressure increases the consequence of a poor nozzle choice, short working distance, or trigger stop.
| User and fence | Recommended setup | Why |
|---|---|---|
| First-time DIYer, cedar | 1,300-1,800 PSI electric, 40-degree tip | Wide spray and limited output |
| Experienced DIYer, sound pine | 2,000-3,000 PSI gas set low, 40-degree tip | More flow for faster rinsing |
| Painted fence | Low-pressure rinse, soft brush, coating test | Avoid lifting sound paint |
| Large commercial perimeter | Low-pressure, high-flow soft-wash system | Efficient application and rinsing |
| Rotten or unstable fence | No washer until repaired | Water cannot restore structure |
A machine rated at 4,000 PSI is not inherently wrong, but operating that machine at maximum pressure on wood is an avoidable risk. Flow helps carry away loosened soil; pressure supplies impact. Use chemistry and water volume for cleaning, not concentrated pressure.
Pressure Washing Versus Other Cleaning Methods
Soft washing is preferable when biological growth is embedded, while manual scrubbing is safer for fragile coatings and small areas. Chemical-only treatment can kill growth but may leave dead residue, discoloration, or a poor surface for new stain.
| Method | Typical time per 100 linear feet | Typical cost | Best application |
|---|---|---|---|
| Soft wash and low-pressure rinse | 3-6 active hours | $30-$90 DIY | Sound unfinished wood |
| Manual brush and bucket | 6-12 hours | $15-$45 DIY | Small or delicate sections |
| Chemical treatment only | 1-2 hours active | $20-$60 DIY | Maintenance between washes |
| Professional service | 2-5 hours on site | $1.50-$4.00 per linear foot | Large, difficult, or risky fences |
Manual scrubbing has a lower gouging risk but can force workers to lean against weak pickets and may produce uneven color. Pressure washing is not a substitute for repair, paint stabilization, or post replacement.
Typical professional pricing ranges from $250-$600 for a suburban fence, depending on length, height, access, growth, staining, repairs, and regional labor rates. Rental equipment commonly costs $40-$90 per day, excluding cleaner and brightener.
What Can Go Wrong, and How Do You Fix It?
The most common failures are furring, striping, chemical discoloration, plant injury, and incomplete rinsing. Stop the process when damage appears, because another aggressive pass usually makes recovery harder.
Fuzzy or Splintered Wood
Furring means raised or torn fibers, usually caused by excessive impact, a narrow spray pattern, short distance, or cross-grain movement. Let the fence dry for 48 hours, remove loose fibers with 80-120 grit paper along the grain, and replace boards with deep tearing or structural loss.
Stripes and Wand Marks
Stripe marks result from inconsistent distance, uneven sweep speed, or inadequate overlap. After drying, lightly re-clean the affected panel with detergent and use long, consistent passes across the whole board rather than spot-blasting individual lines.
Dark Brown or Black Discoloration
Darkening can result from wet tannins, iron reaction, alkaline cleaner, biological staining, or an incompatible coating. Rinse first, identify the cleaner used, and apply a compatible brightener only according to its label. Do not randomly layer bleach, acid, and alkaline products.
Yellowing Plants or Damaged Grass
Plant injury usually follows concentrated runoff, chemical drift, or inadequate pre-wetting. Flush foliage and soil with clean water immediately, stop chemical discharge, and follow the product’s spill guidance. Do not assume oxygen bleach makes unlimited runoff safe.
Loose Paint or Stain
A pressure washer can remove failing coatings, but it can also drive water behind sound paint and expose bare wood. Lower pressure, use a wider fan, and confirm whether the coating contains lead before disturbing it.
How Should You Handle Different Fence Situations?
Cedar or Redwood
Use a 40-degree nozzle, greater distance, and the lowest effective pressure because soft earlywood can fur quickly. Tannin-rich cedar and redwood may darken during cleaning, so a compatible brightener can improve uniformity before staining.
Pressure-Treated Pine
Sound pressure-treated pine generally tolerates controlled washing, but checks and end grain absorb water readily. Avoid direct close-range spray into splits, post tops, and fastener holes, then allow extended drying before coating.
Painted or Previously Stained Wood
Treat the existing coating as the surface to preserve, not as dirt to remove. Use detergent, a soft brush, and a low-pressure rinse; if the goal is stripping, test for lead and use a deliberate coating-removal plan.
Winter or Hot Weather
Avoid freezing conditions because trapped water can damage fittings and wet wood cannot dry reliably. In hot, windy weather, reduce section size and work in shade so cleaner does not dry before rinsing.
When to Hire a Professional
Hire an insured contractor when the fence contains lead paint, spans several hundred feet, borders sensitive landscaping, has unstable posts, or requires chemical stripping. Ask for the planned pressure at the surface, nozzle type, cleaner, runoff controls, insurance, and repair exclusions.
FAQ
Can I use a garden hose instead of a pressure washer?
Yes. A hose with a trigger nozzle and a stiff nylon brush can clean lightly soiled wood with the lowest structural risk. The method takes longer and may not remove embedded algae or old gray residue evenly, but it is appropriate for fragile boards, loose coatings, and small repairs.
Should I pressure wash a fence before staining it?
Pressure washing can prepare a sound fence for staining when it removes dirt, mildew, and loose fibers without gouging the boards. Dry the fence completely, sand only raised fibers, remove dust, and follow the stain manufacturer’s moisture and preparation requirements before applying the coating.
How close can a pressure washer be to wood?
Start about 18 inches from the surface and adjust only after a test patch proves safe. Some operators work at 12 inches with a wide fan and low pressure, but shorter distances sharply increase impact and make furring, stripes, and gouges more likely.
Is 2,000 PSI too much for a wooden fence?
A 2,000 PSI machine is not automatically too powerful, but its maximum setting is inappropriate for most wood fences. Reduce the trigger pressure, use a 40-degree tip, keep the wand moving, and judge the result at the surface rather than relying on the machine’s advertised rating.
How often should a wooden privacy fence be washed?
Most fences need cleaning when mildew, algae, or embedded dirt becomes visible, commonly every 2-3 years in damp or shaded locations. Sunny, dry yards may need less frequent washing, while heavy vegetation, irrigation overspray, and coastal moisture can shorten the interval.
Can pressure washing remove gray wood?
Washing removes surface dirt and some degraded fibers, but it should not be used to erase all natural silver-gray weathering. Aggressively chasing gray color can thin boards and create furring. Use a labeled brightener and a UV-resistant stain if restoring a warmer appearance is the goal.
The Bottom Line
The safest way to pressure wash a wooden privacy fence is to inspect and protect the site, apply compatible cleaner from the bottom upward, rinse with a wide-angle nozzle at controlled pressure, follow the grain, and keep the wand moving. Start near 500-800 PSI, stay roughly 12-18 inches away, and increase force only after a test patch remains undamaged. The same process in how to safely pressure wash a wooden privacy fence fails when the operator treats maximum machine pressure as the cleaning objective. Clean with chemistry and flow first, then dry, inspect, repair, and seal the wood.